Limit Who Can Work on Checklists
Custom checklist permissions are not available in Checklists for Jira (Free)
The custom Work Permissions can be used to set specific controls for who can add, edit, toggle and delete items on local checklists; and who can toggle items on Global checklists, regardless of whether or not the user has Edit issue / work item permission.
If the custom Work Permissions setting is enabled, the following permissions are required:
Action | Permission Required |
|---|---|
Add a checklist | Add Checklist Items |
Add checklist items | Add Checklist Items |
Save checklist as a template | Add Checklist Items |
Load template (append to current checklist) | Add Checklist Items |
Edit a checklist name | Edit Checklist Items |
Edit checklist item | Edit Checklist Items |
Reorder checklist items | Edit Checklist Items |
Toggle items / change item status | Toggle Checklist Items |
*Toggle items or change item status on Global checklists | Toggle Checklist Items |
Delete a checklists | Delete Checklist Items |
Delete items | Delete Checklist Items |
**Load template (overwrite current checklist) | Delete Checklist Items |
* This is the only case where the Custom Work permission impacts Global checklists. Only Jira administrators can create, edit, delete and apply Global checklists to work items.
**Loading templates in Overwrite mode requires both Add Checklist Items permission and Delete Checklist Items permission
If no permissions are configured…
For Company-managed spaces, if the Custom work permissions toggle is enabled and no checklist permissions have been set, checklist permissions will be assigned based on the Edit work item permission (users with Edit work item permission will be able to add, edit, toggle and delete checklist items). If Checklist permissions have been configured, only users granted those permissions will be able to interact with the checklists.
For Team-managed spaces all checklists will be read-only until Project permissions have been configured.
Note that to access the checklist Editor, the user must be granted all of the work on checklists permissions (Add, Edit, Toggle, Delete)
For checklists to function properly, if Custom Work permissions are enabled then the Checklist Text custom field must not be present on the Work item Edit and Work item Create screens.
Who Can Work on Checklists by Default
By default, anyone who can work on the Jira work item can work on the Checklists. In Company-managed spaces this is anyone with the Edit Issue permission. In Team-managed spaces anyone in a Member, Agent or Administrator role can view the Checklists.
Limiting Who Can Add Checklists & Checklist Items
How to Limit Who Can Add Checklists to Work Items in Company-Managed Spaces
Navigate to Jira Settings > Apps and select Permissions under the Checklists for Jira heading. Use the toggle to enable custom Custom Work permissions.

Navigate to Space settings > Permissions.
Click Edit Permissions under the Actions menu.

Navigate to the Add Checklist Items permission (under issue / work item permissions) and click Update.

Use the checkboxes to indicate who you want to grant the permission to.
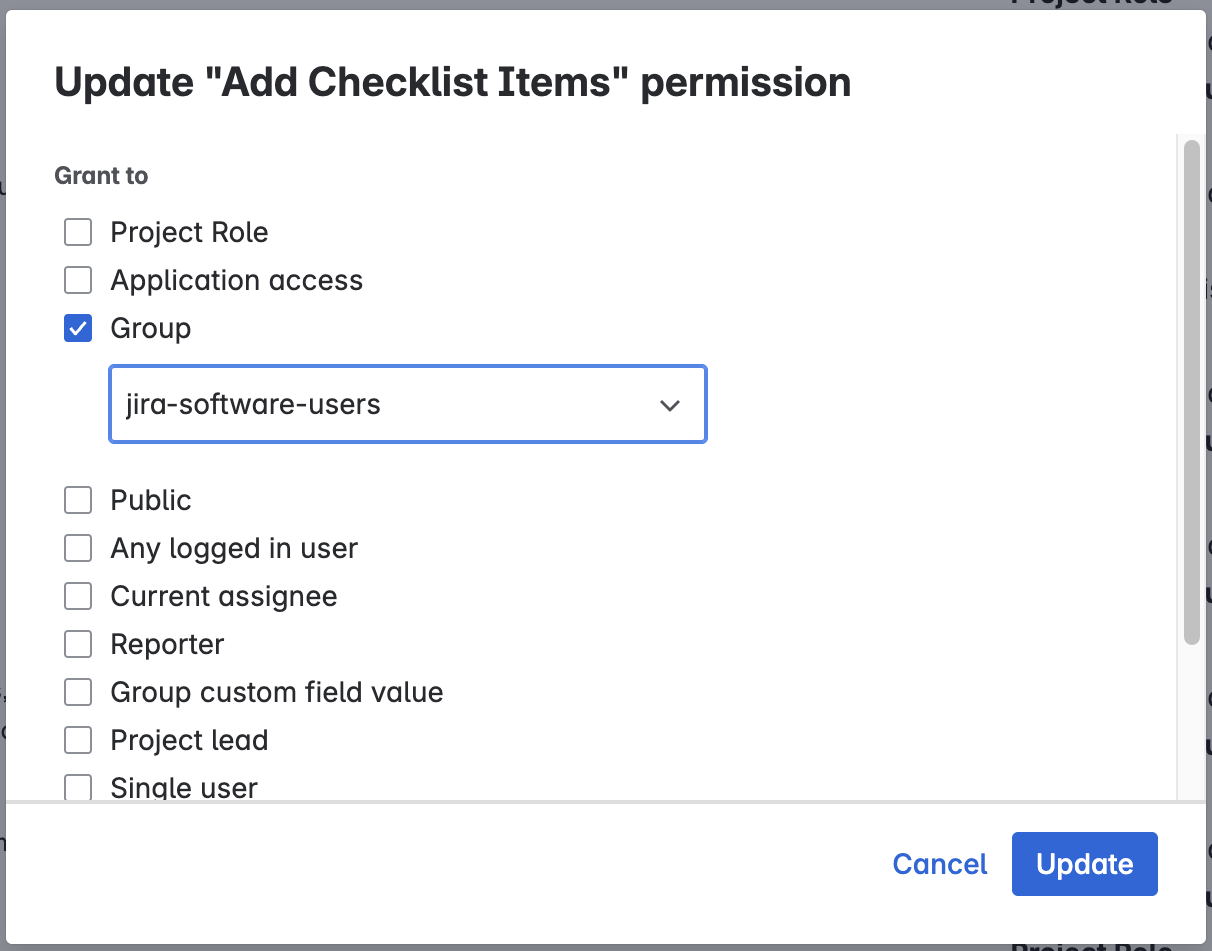
Click Update.
How to Limit Who Can Add Checklists to Work Items in Team-Managed Spaces
Navigate to Jira Settings > Apps and select Permissions under the Checklists for Jira heading. Use the toggle to enable custom Custom Work permissions.

Navigate to Space settings > Access.
Click the Manage roles button (top right).
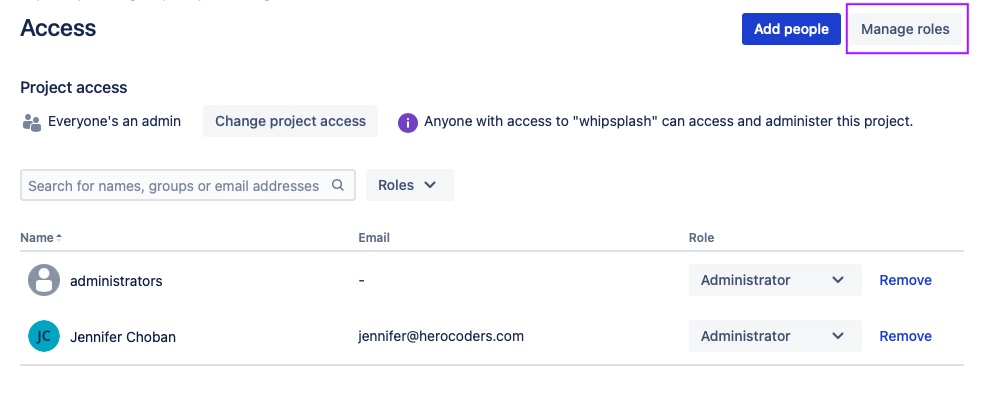
Click Create role.
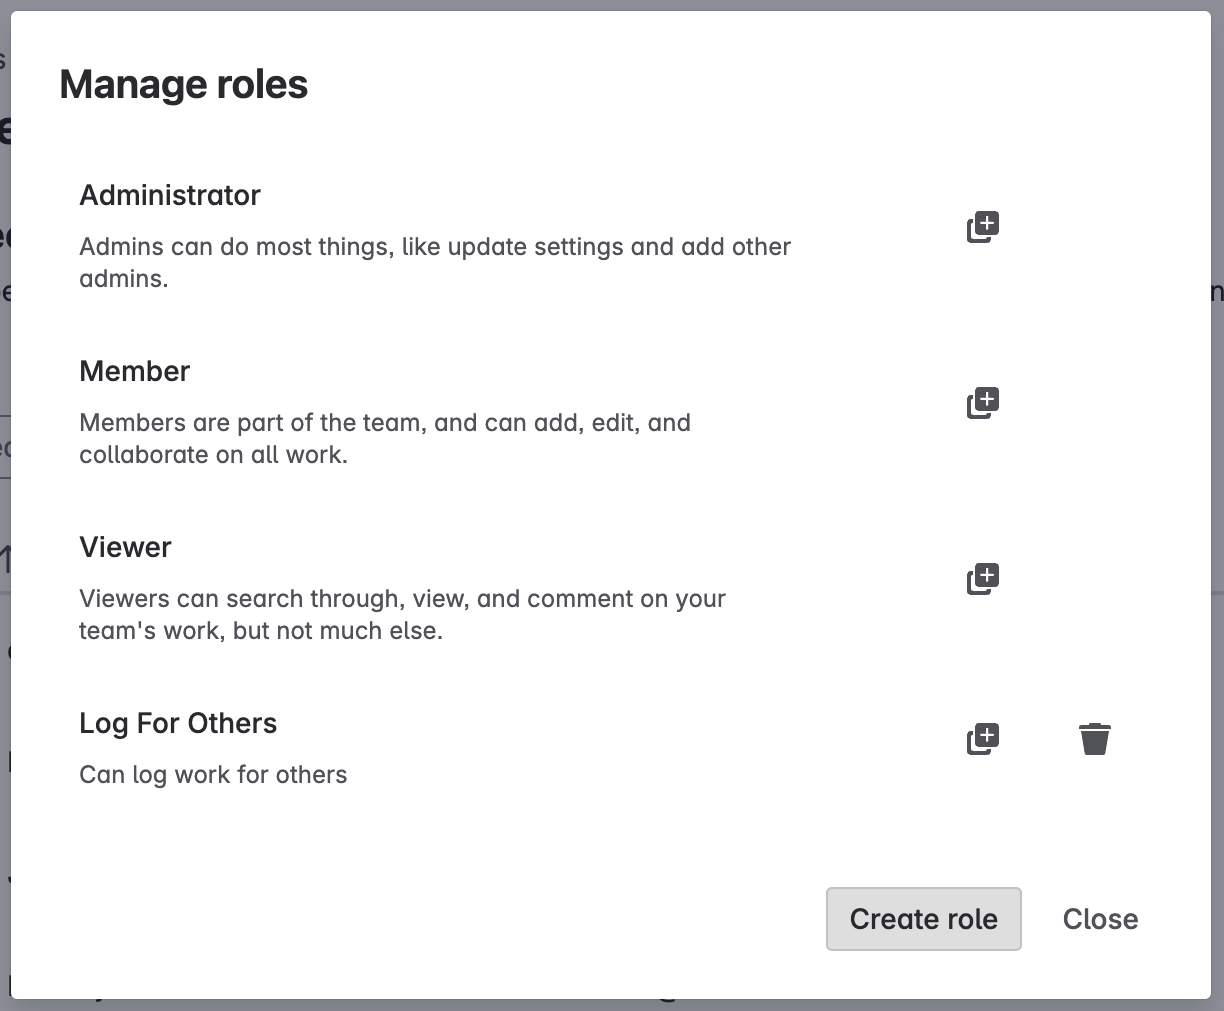
Name the role and select the App permissions tab.
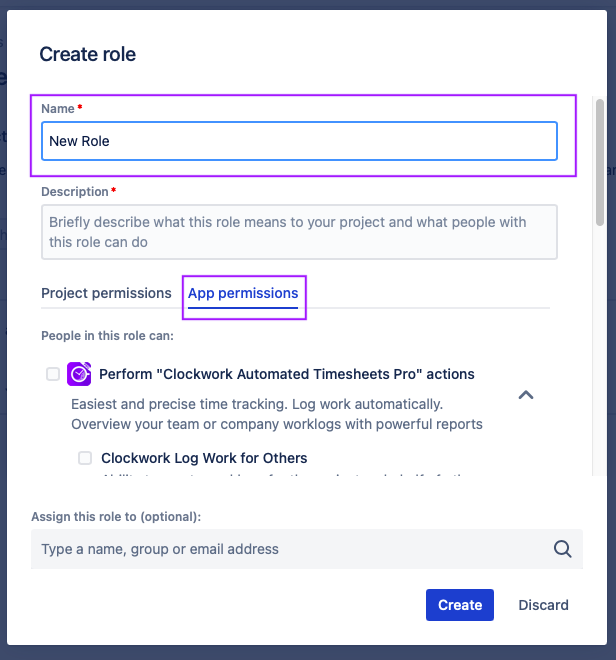
Select the Add Checklist Items permission.
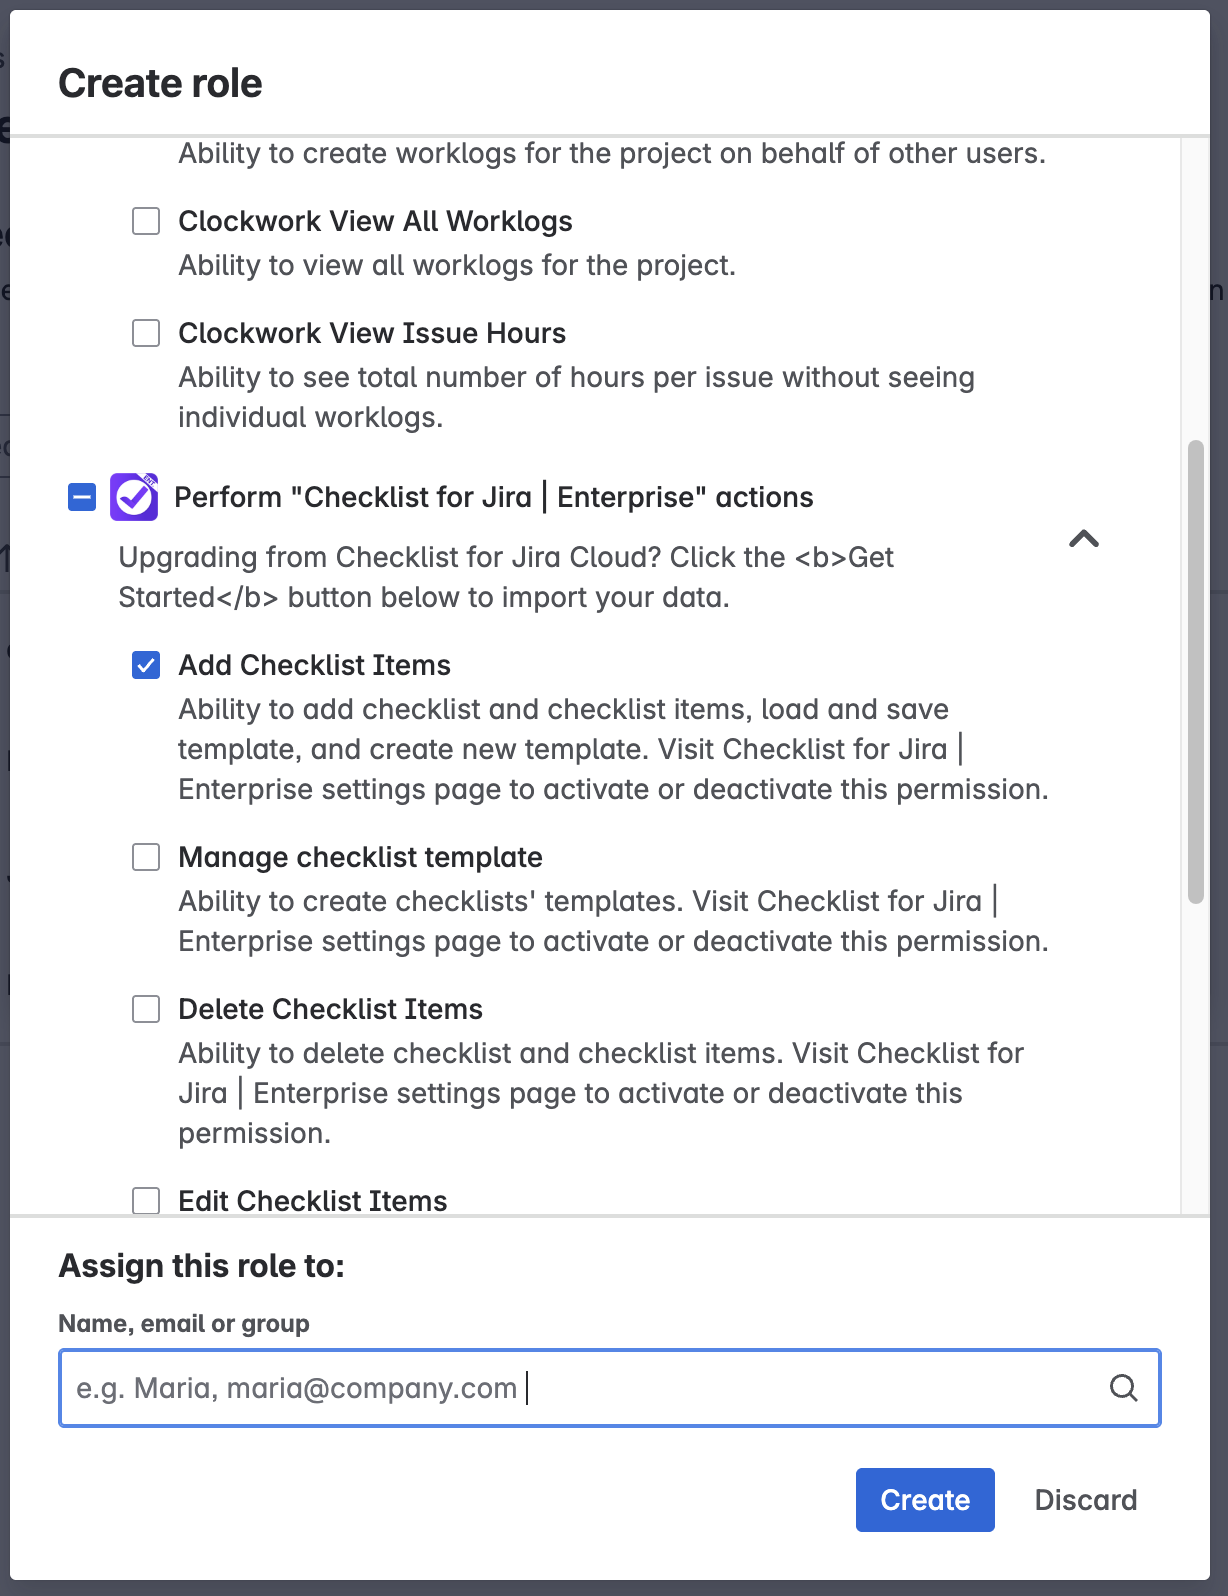
Select the users/groups who will be added to the role.
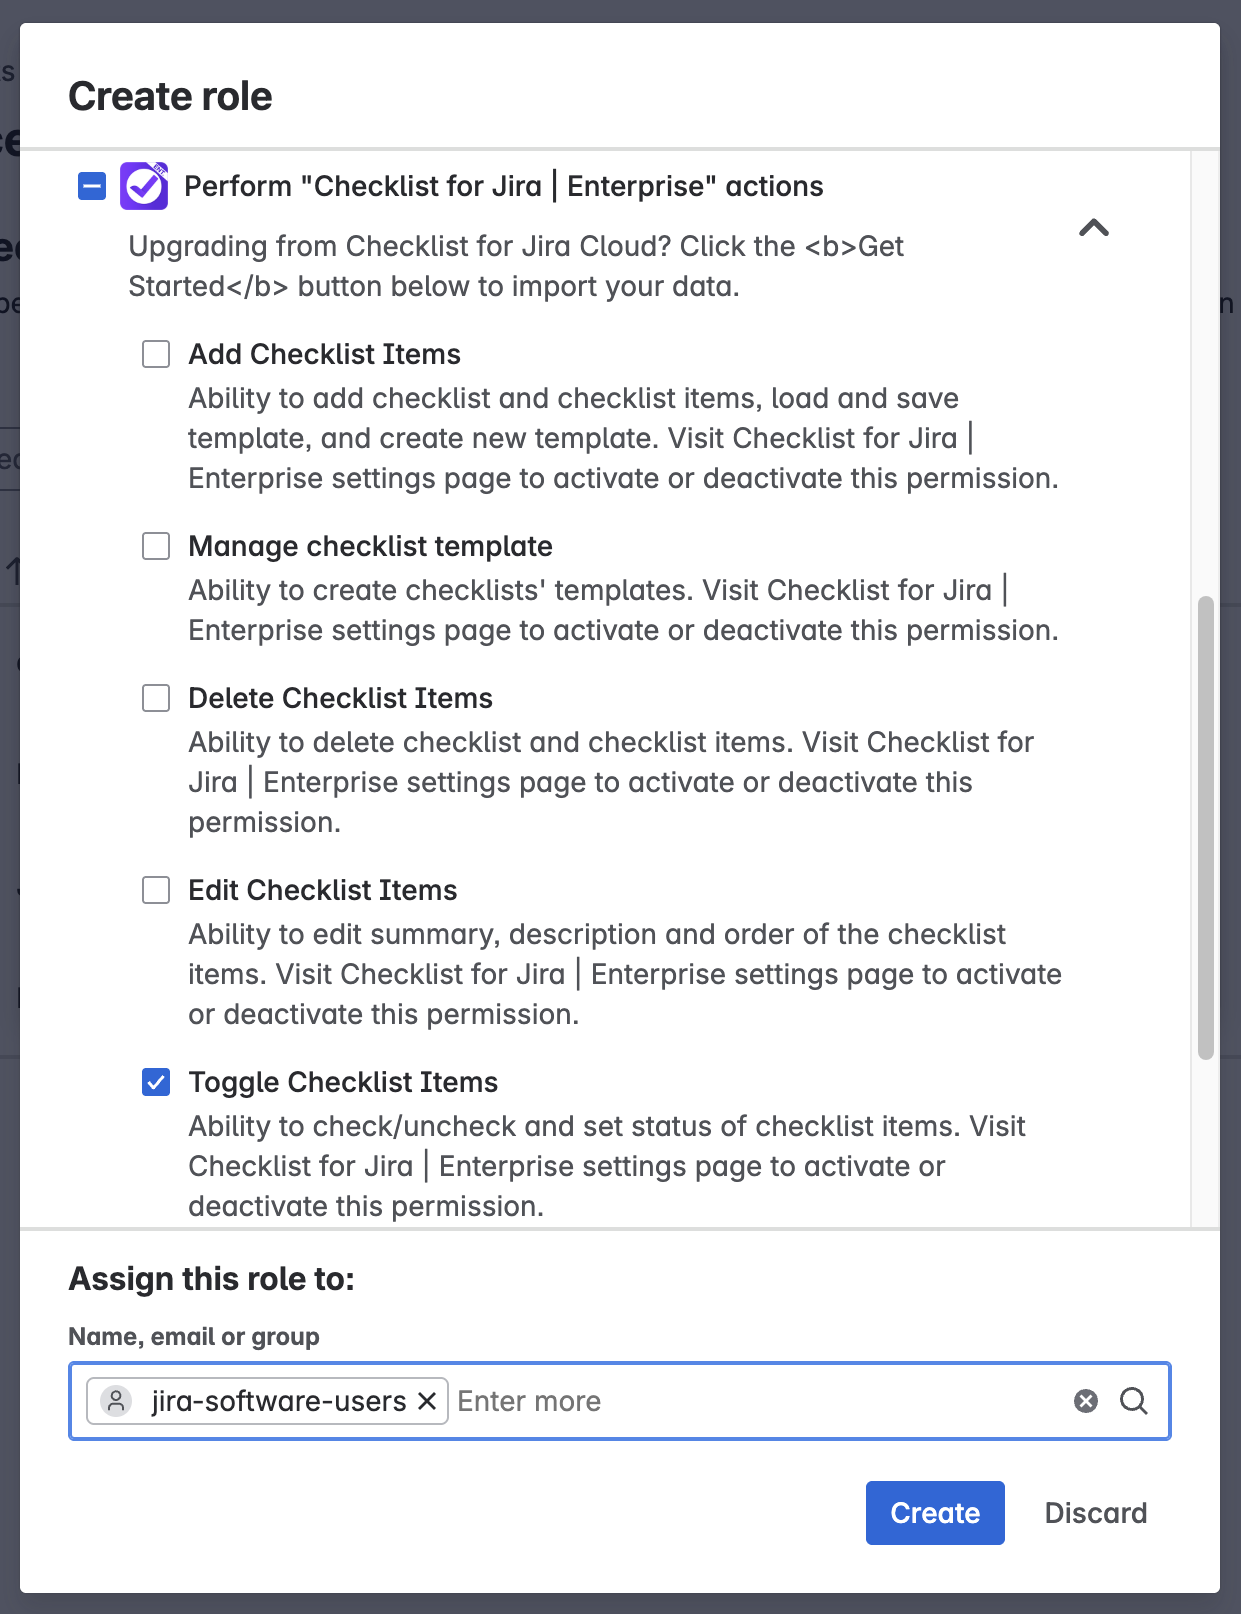
Click Create.
Limiting Who Can Toggle Checklist Items (Change Item Statues)
How to Limit Who Can Toggle Checklist Items in Company-Managed Spaces
Navigate to Jira Settings > Apps and select Permissions under the Checklists for Jira heading. Use the toggle to enable custom Custom Work permissions.

Navigate to Space settings > Permissions.
Click Edit Permissions under the Actions menu.

Navigate to the Toggle Checklist Items permission (under issue / work item permissions) and click Update.

Use the checkboxes to indicate who you want to grant the permission to.
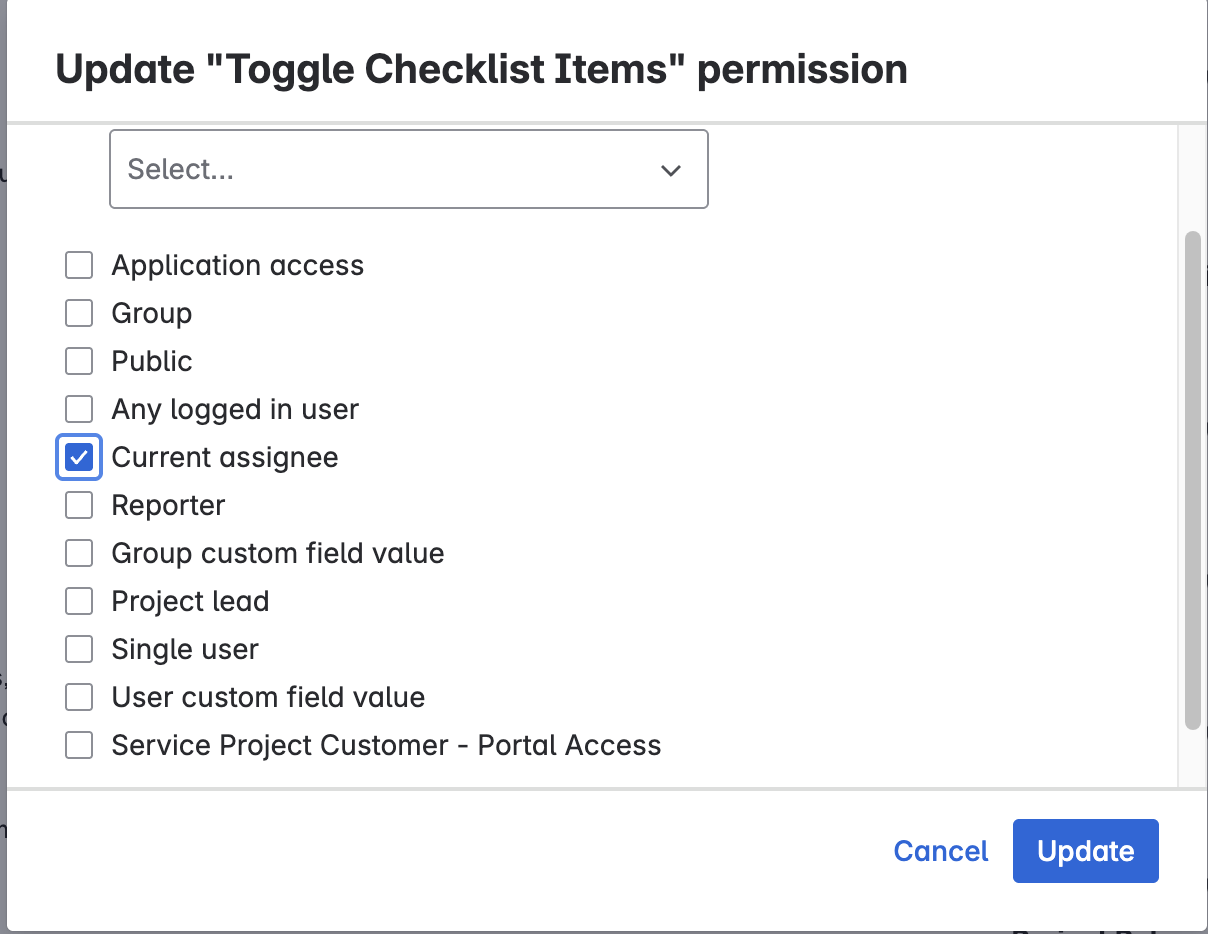
Click Update.
How to Limit Who Can Toggle Checklist Items in Team-Managed Spaces
Navigate to Jira Settings > Apps and select Permissions under the Checklists for Jira heading. Use the toggle to enable custom Custom Work permissions.

Navigate to Space settings > Access.
Click the Manage roles button (top right).
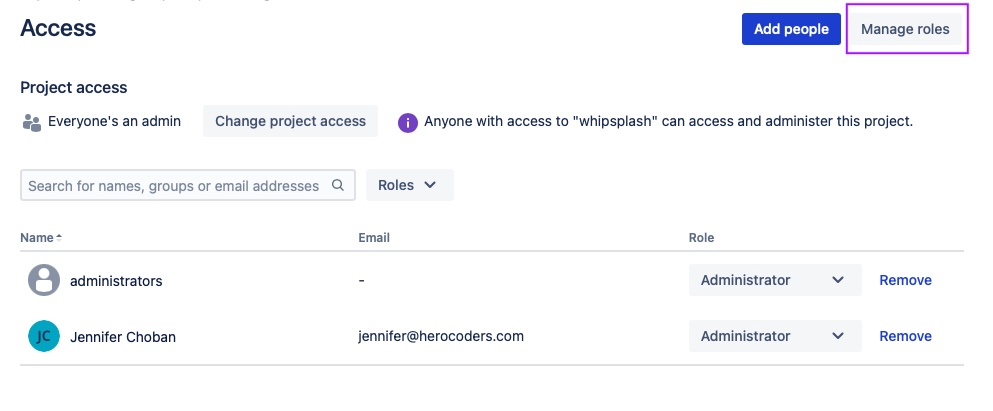
Click Create role.
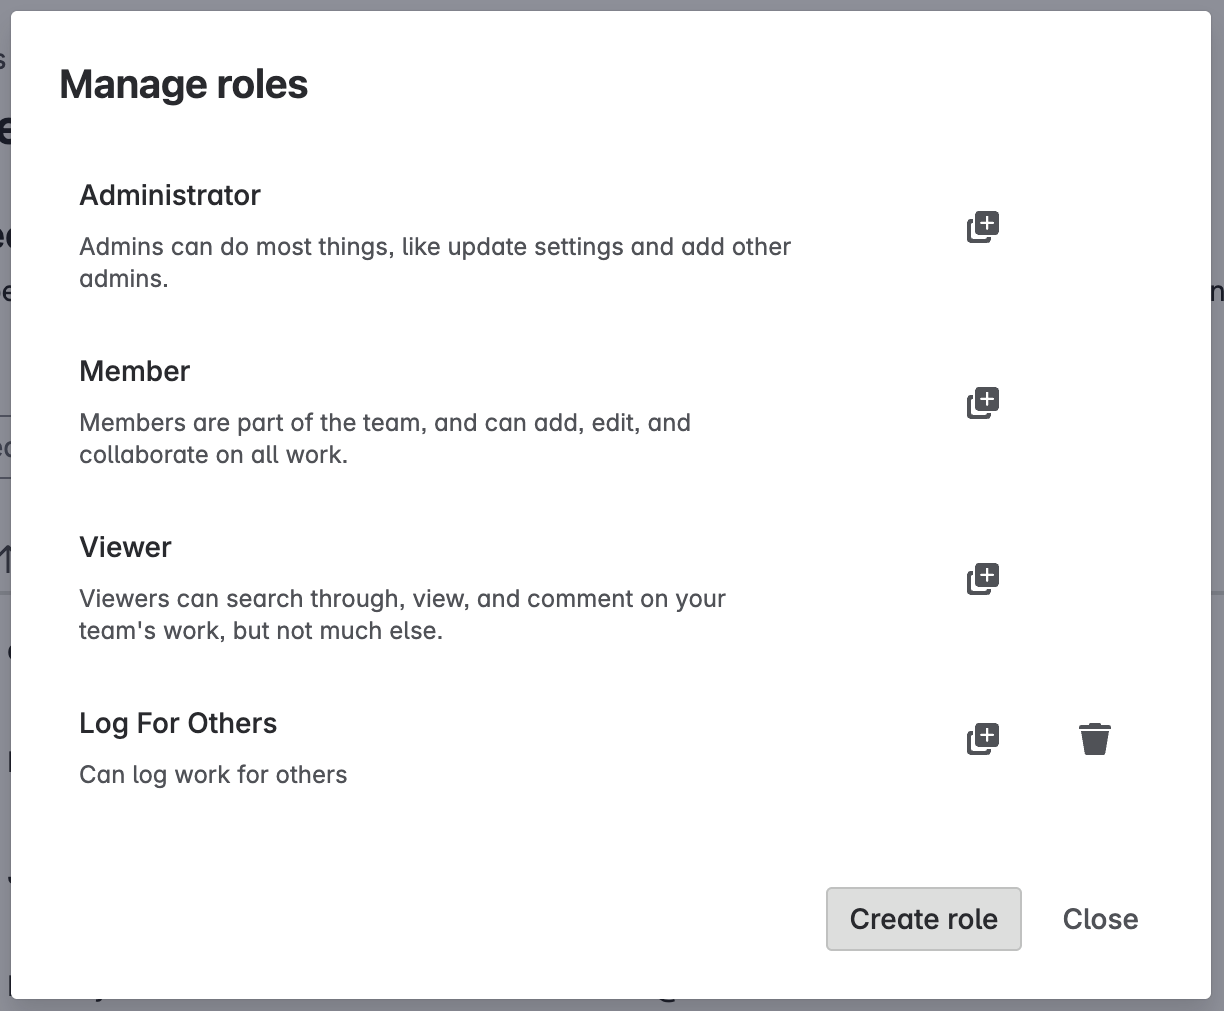
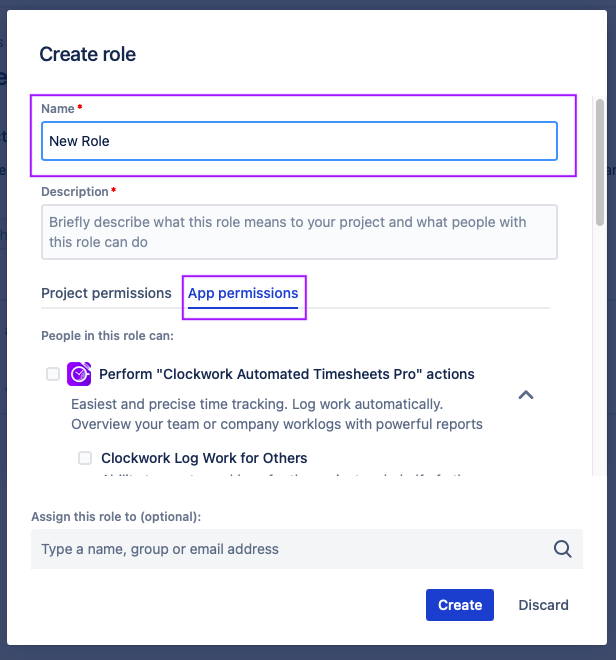
Name the role and select the App permissions tab.
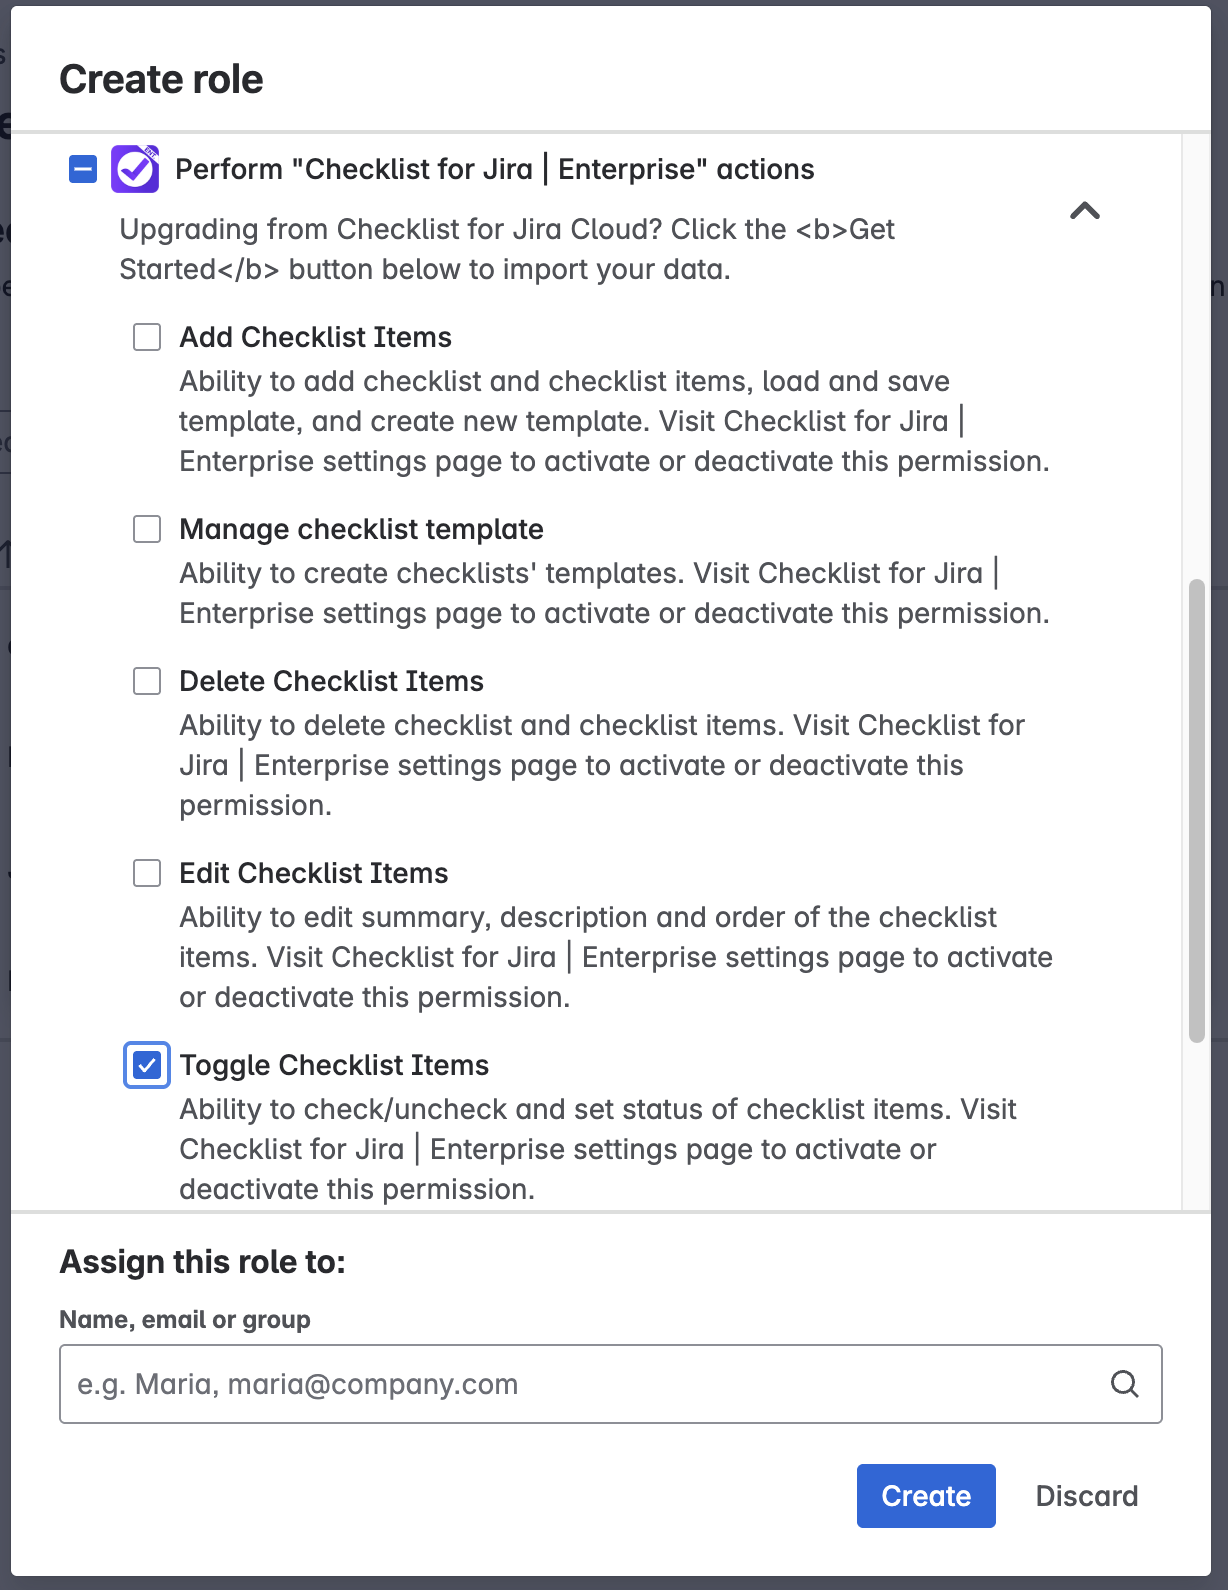
Select the Toggle Checklist Items permission.
Select the users/groups who will be added to the role.
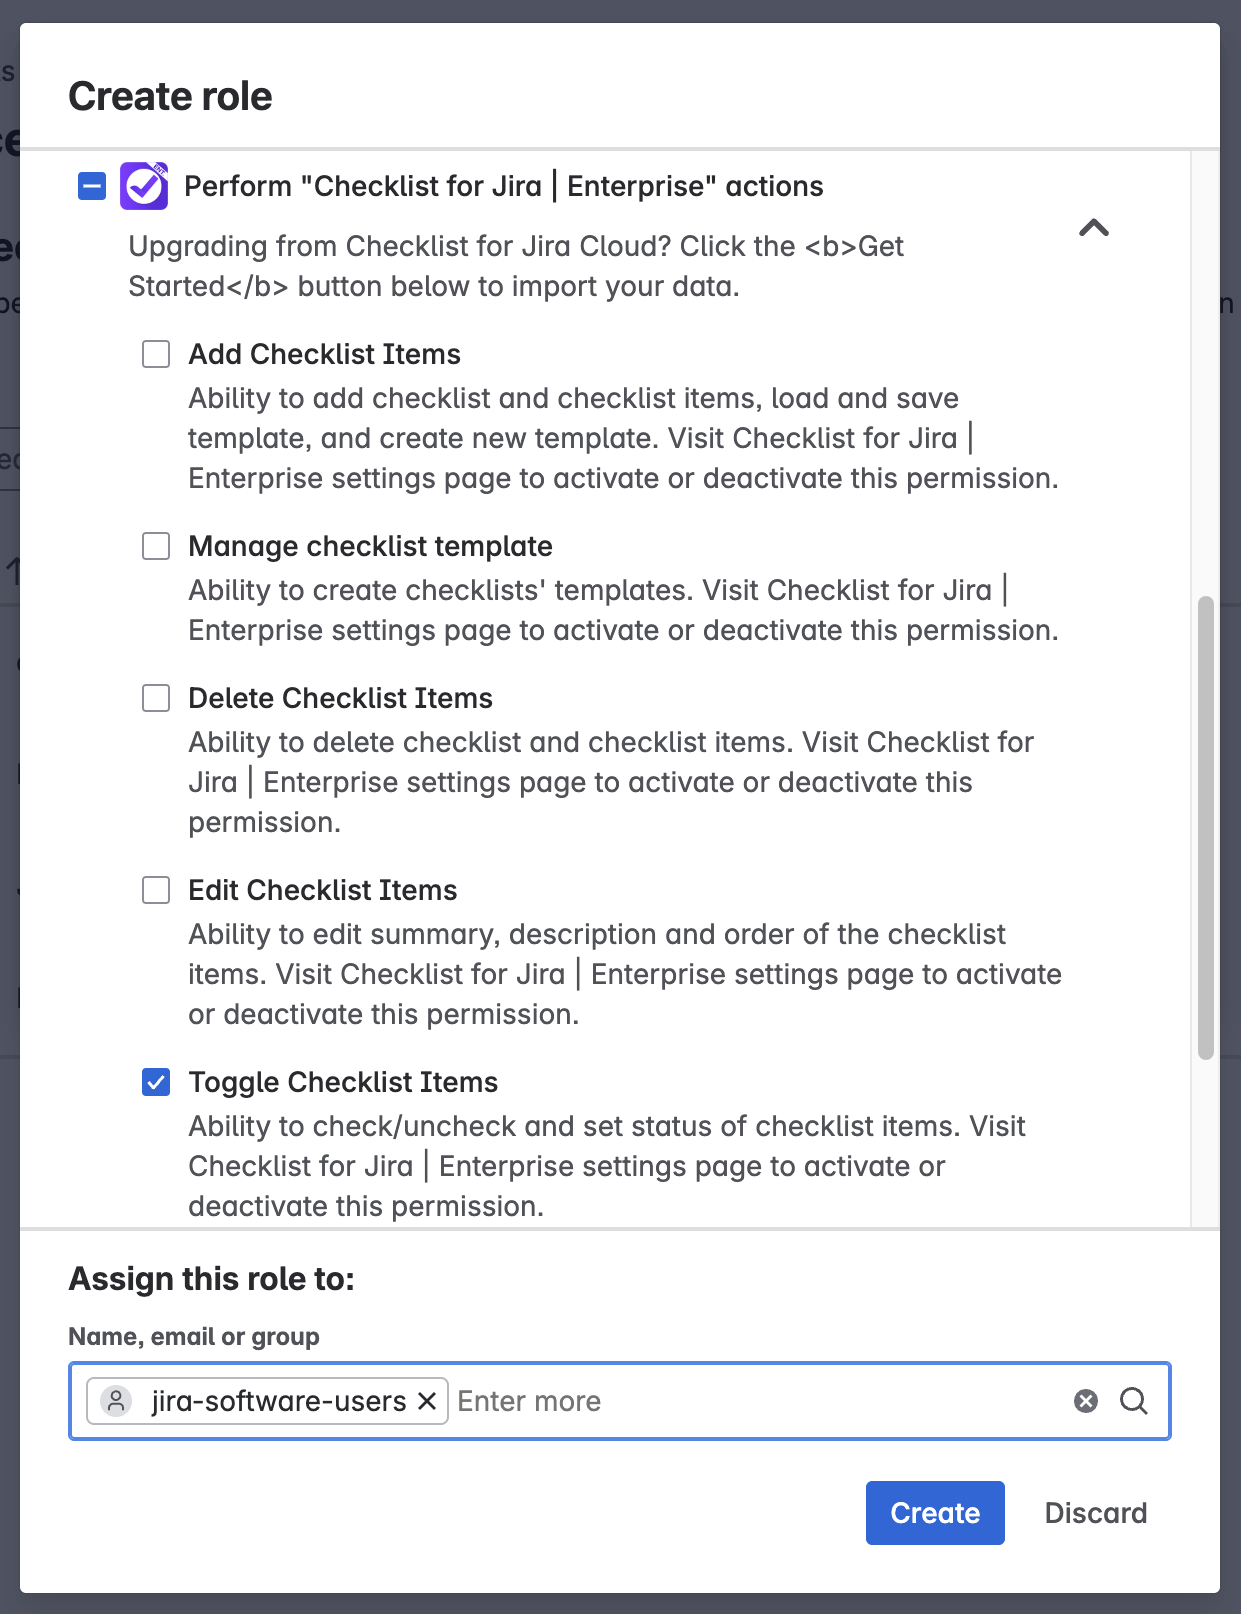
Click Create.
Limiting Who Can Edit Checklists & Checklist Items
How to Limit Who Can Edit Checklists in Company-Managed Spaces
Navigate to Jira Settings > Apps and select Permissions under the Checklists for Jira heading. Use the toggle to enable custom Custom Work permissions.

Navigate to Space settings > Permissions.
Click Edit Permissions under the Actions menu.

Navigate to the Edit Checklist Items permission (under issue / work item permissions) and click Update.

Use the checkboxes to indicate who you want to grant the permission to.
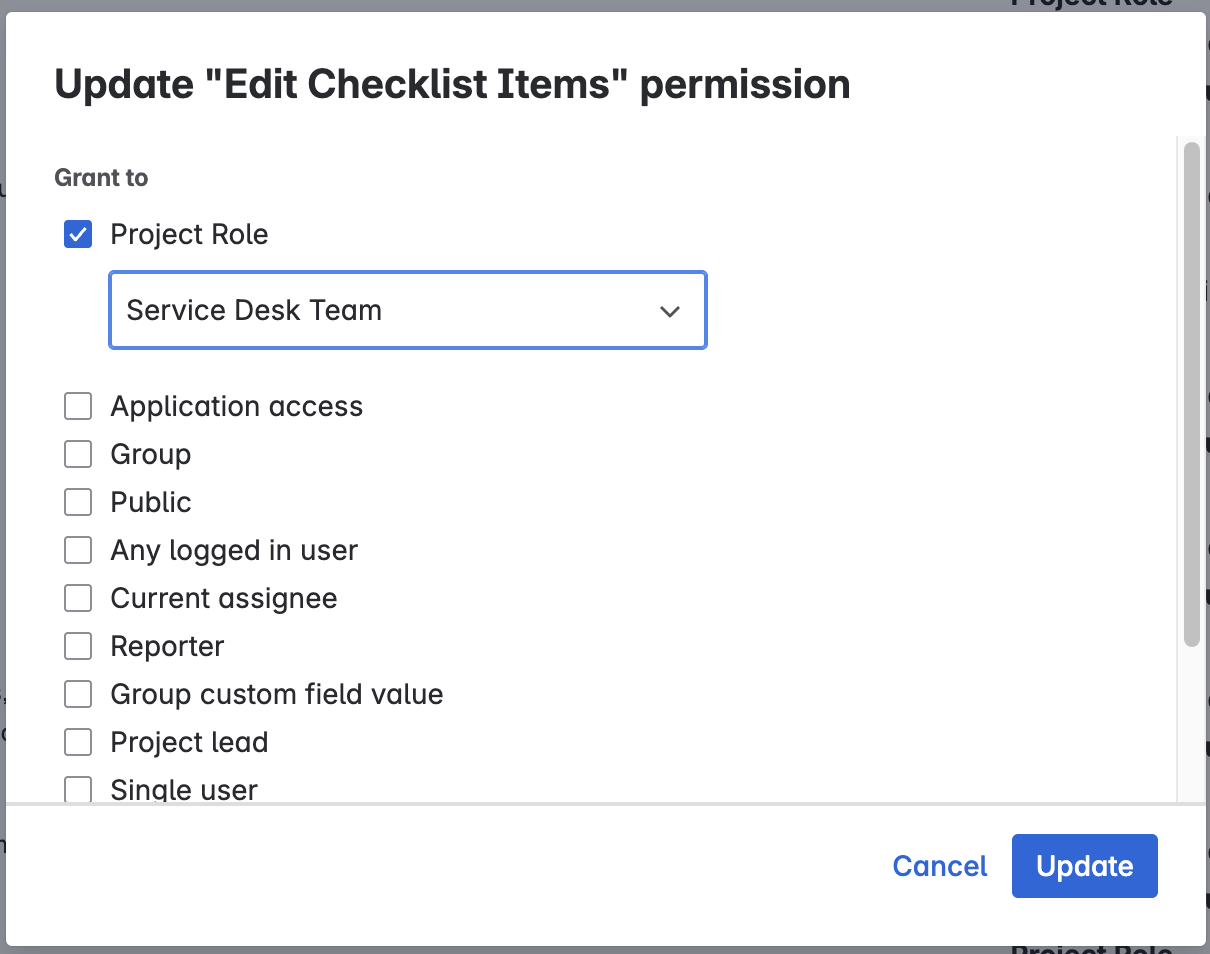
Click Update.
How to Limit Who Can Edit Checklists in Team-Managed Spaces
Navigate to Jira Settings > Apps and select Permissions under the Checklists for Jira heading. Use the toggle to enable custom Custom Work permissions.

Navigate to Space settings > Access.
Click the Manage roles button (top right).

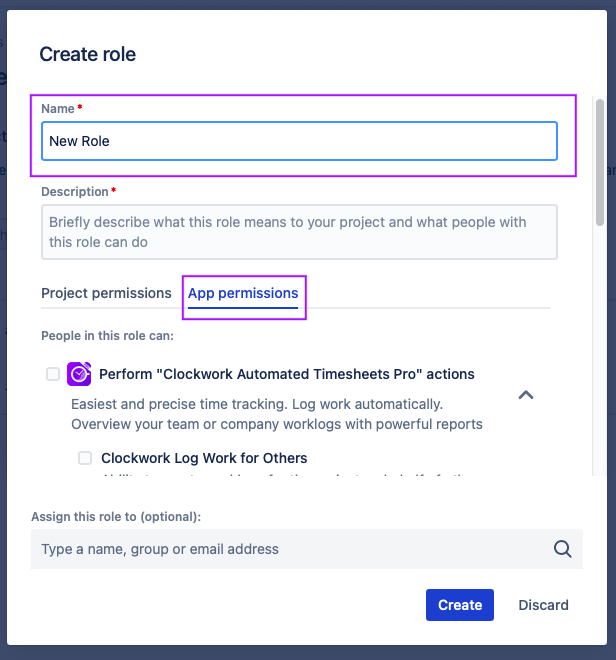
Click Create role.
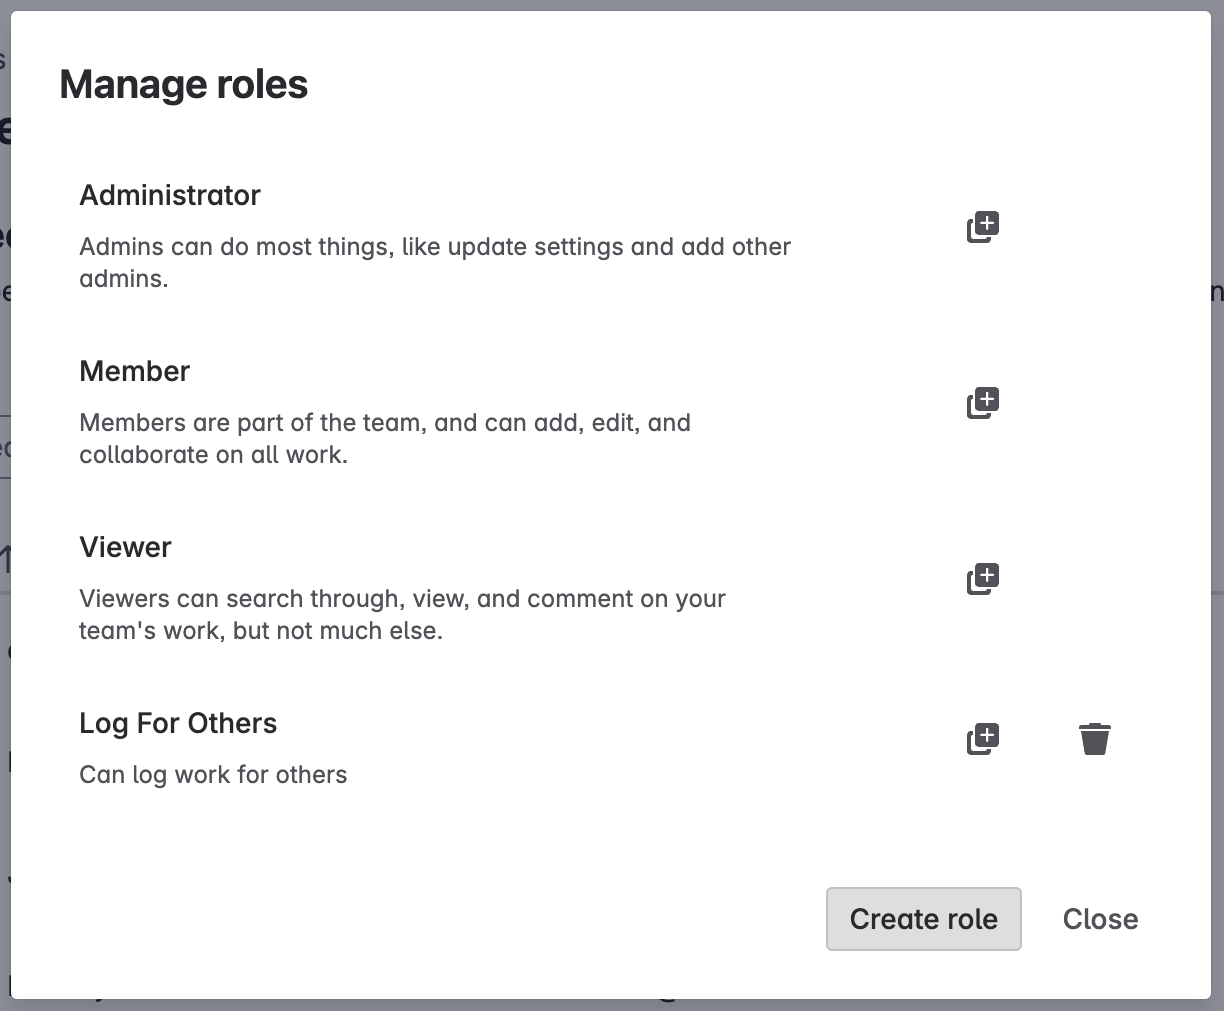
Name the role and select the App permissions tab.
Select the Edit Checklist Items permission.
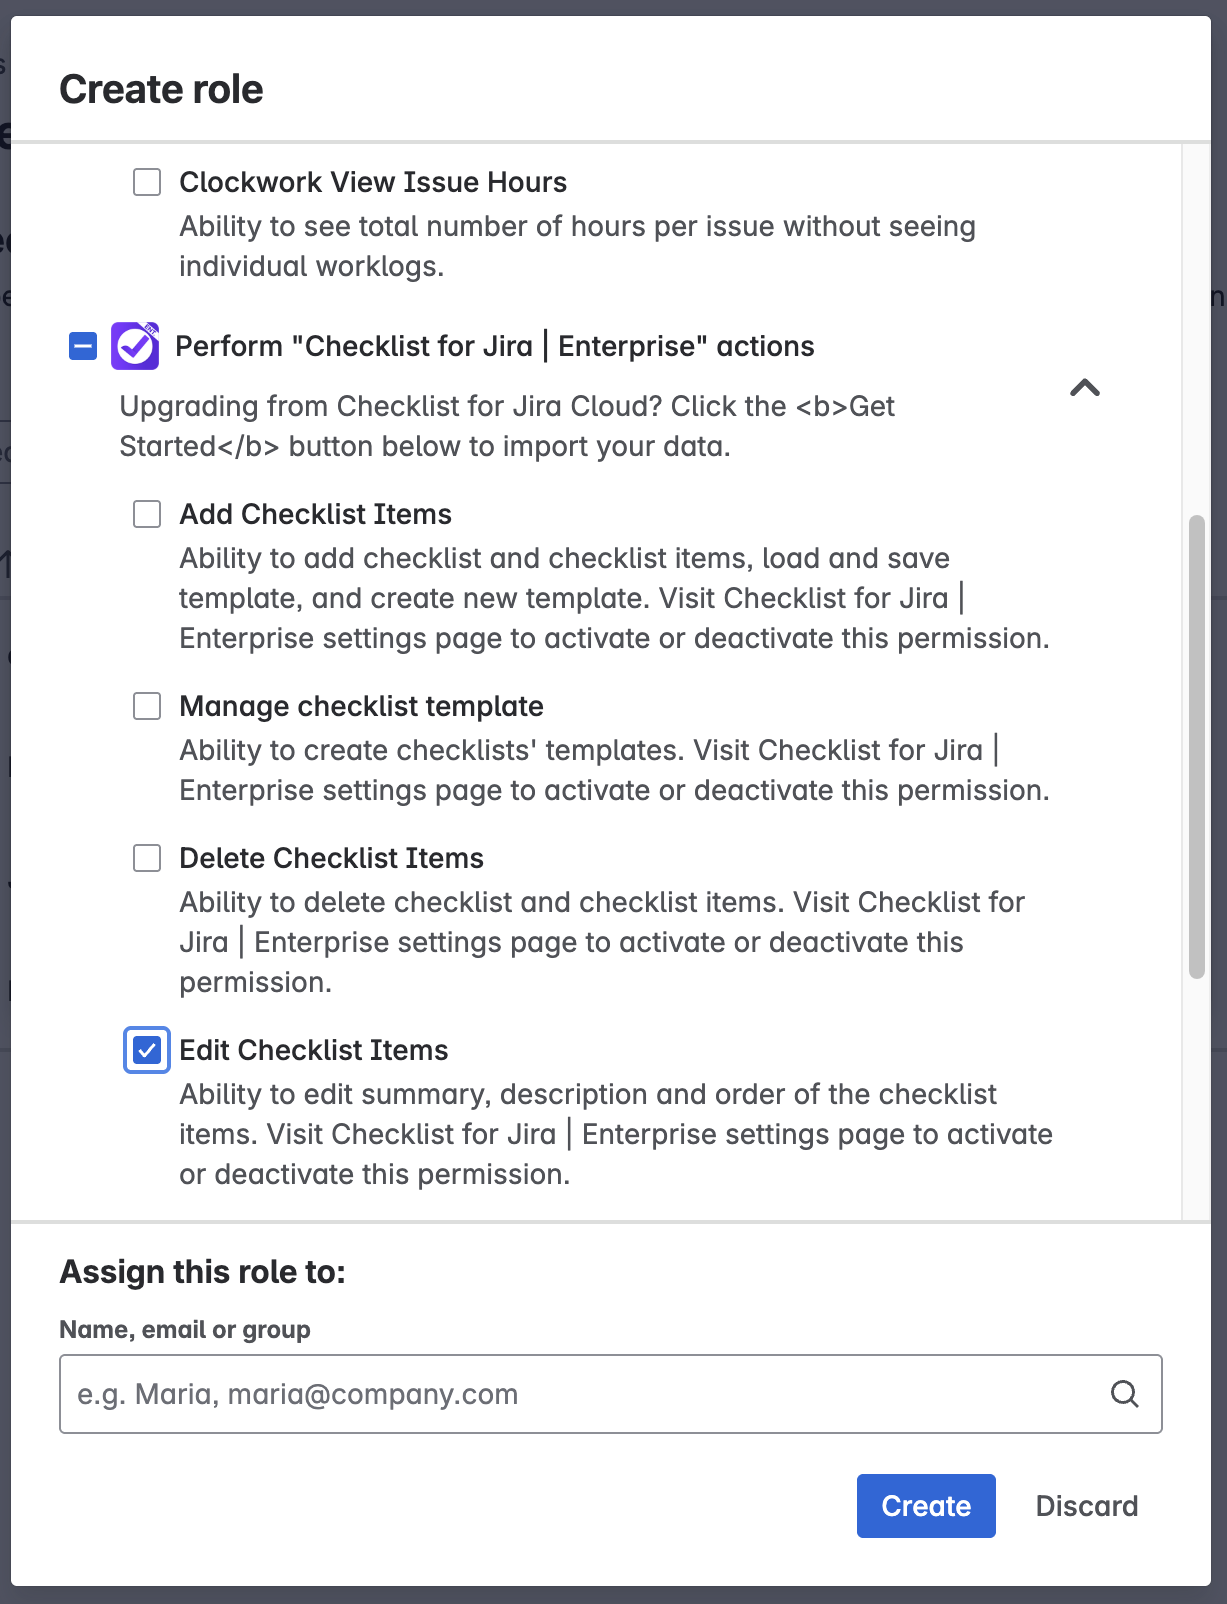
Select the users/groups who will be added to the role.
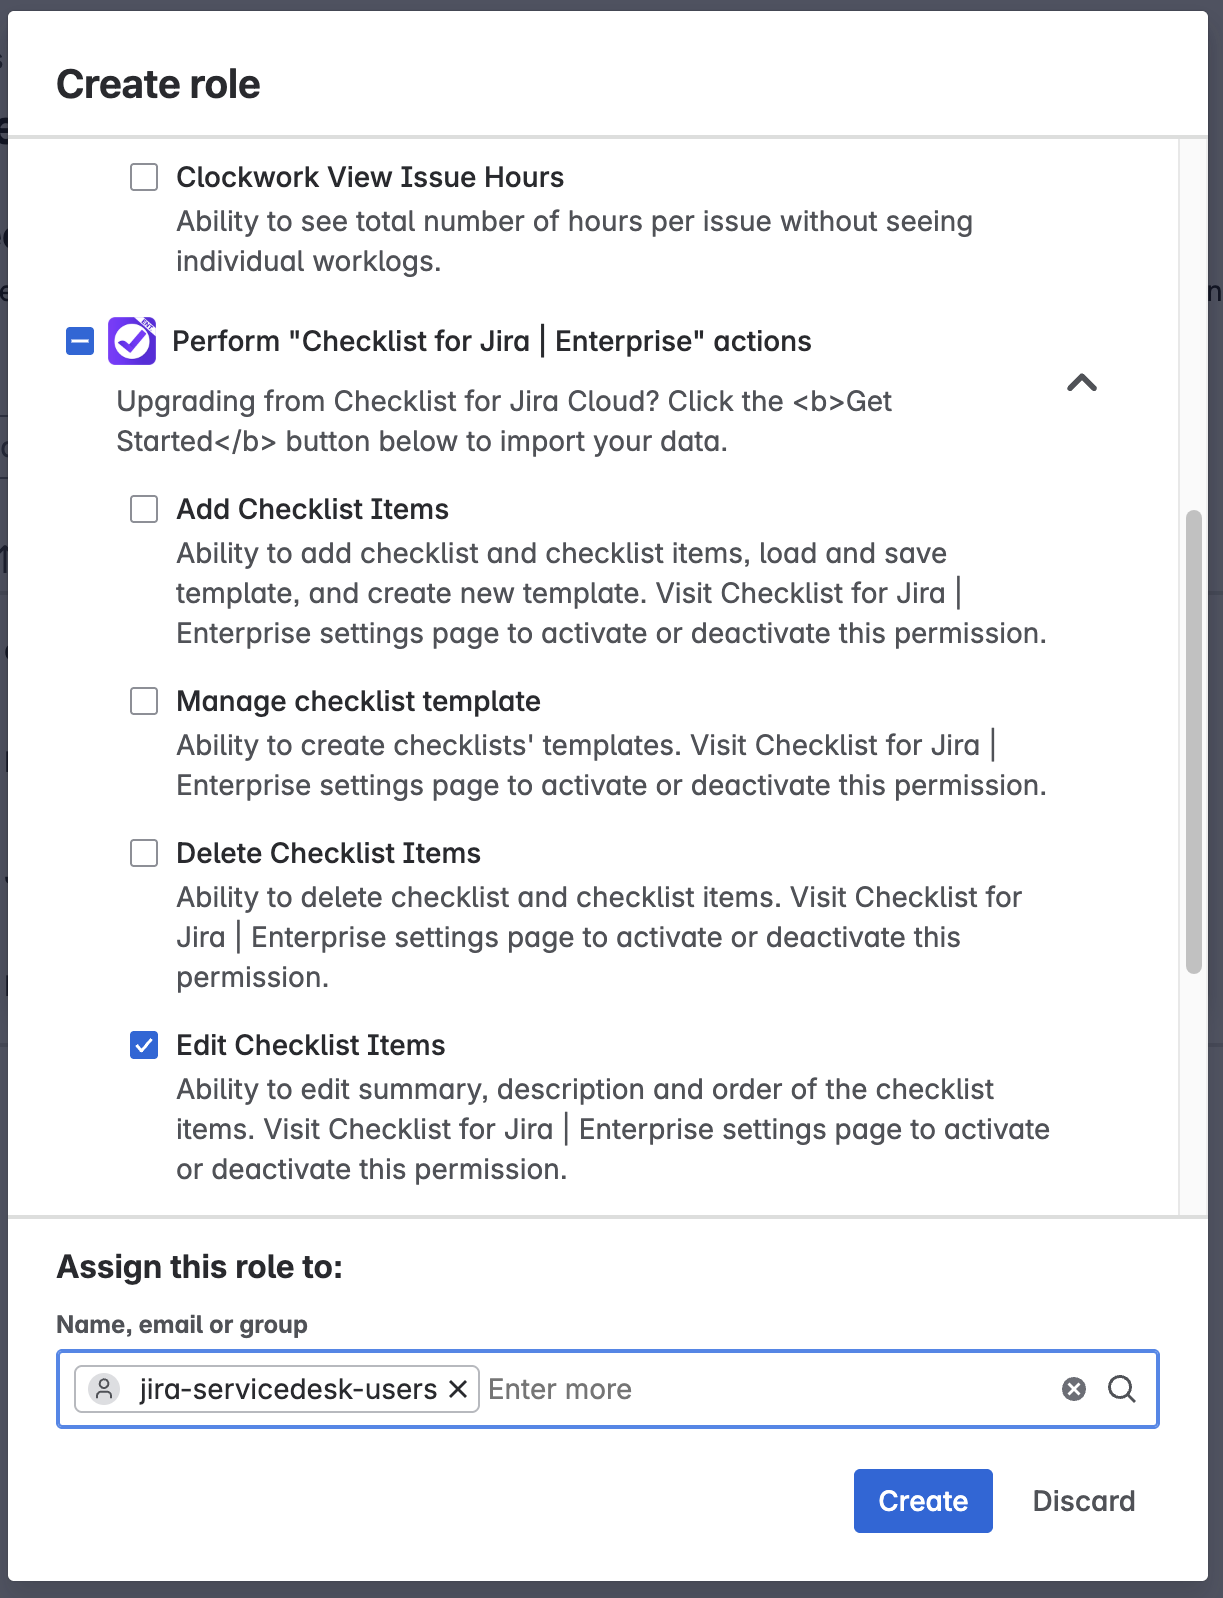
Click Create.
Limiting Who Can Delete Checklists & Checklist Items
How to Limit Who Can Delete Checklists & Checklist Items in Company-Managed Spaces
Navigate to Jira Settings > Apps and select Permissions under the Checklists for Jira heading. Use the toggle to enable custom Custom Work permissions.

Navigate to Space settings > Permissions.
Click Edit Permissions under the Actions menu.

Navigate to the Delete Checklist Items permission (under issue / work item permissions) and click Update.

Use the checkboxes to indicate who you want to grant the permission to.
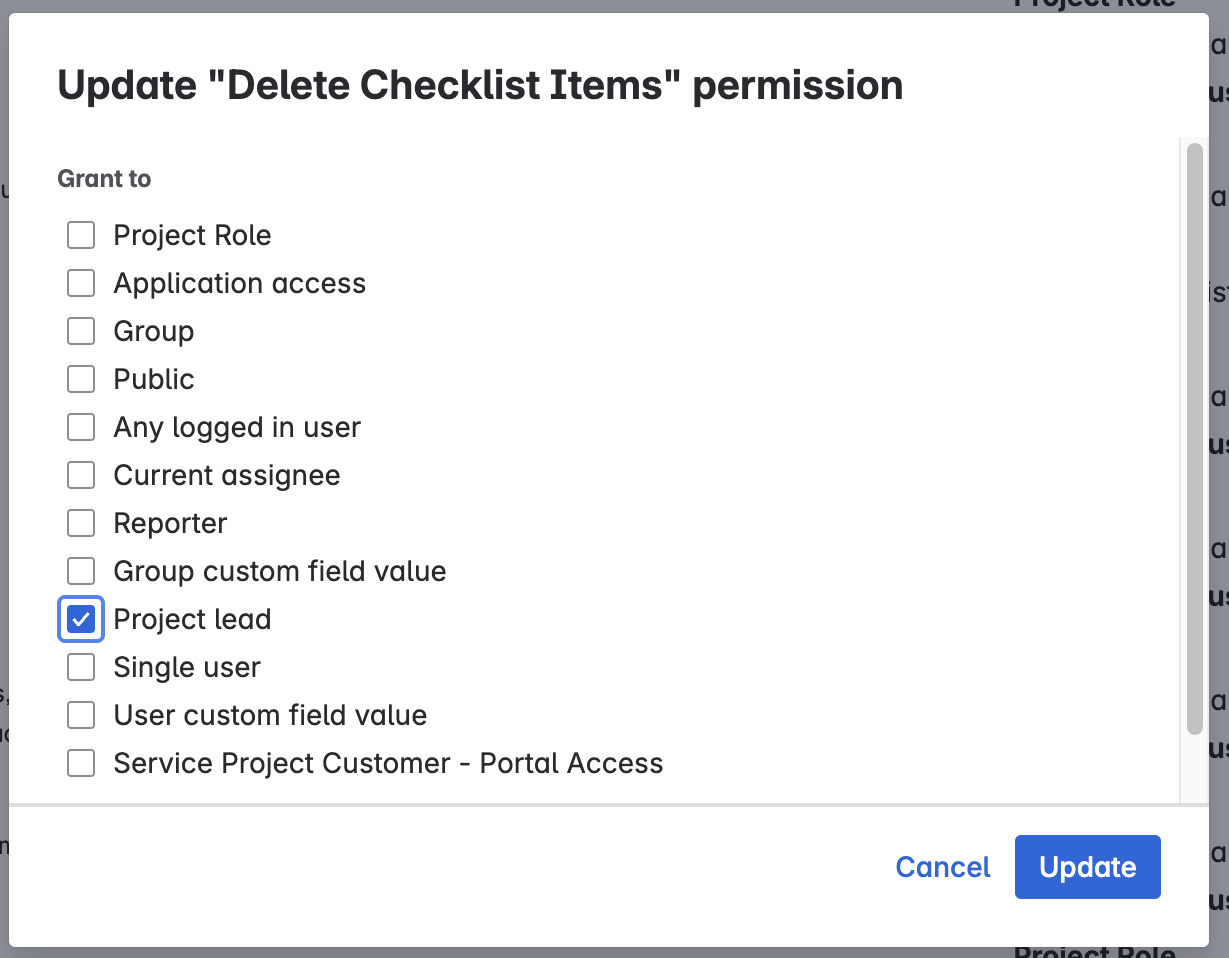
Click Update.
How to Limit Who Can Delete Checklists & Checklist Items in Team-Managed Spaces
Navigate to Jira Settings > Apps and select Permissions under the Checklists for Jira heading. Use the toggle to enable custom Custom Work permissions.

Navigate to Space settings > Access.
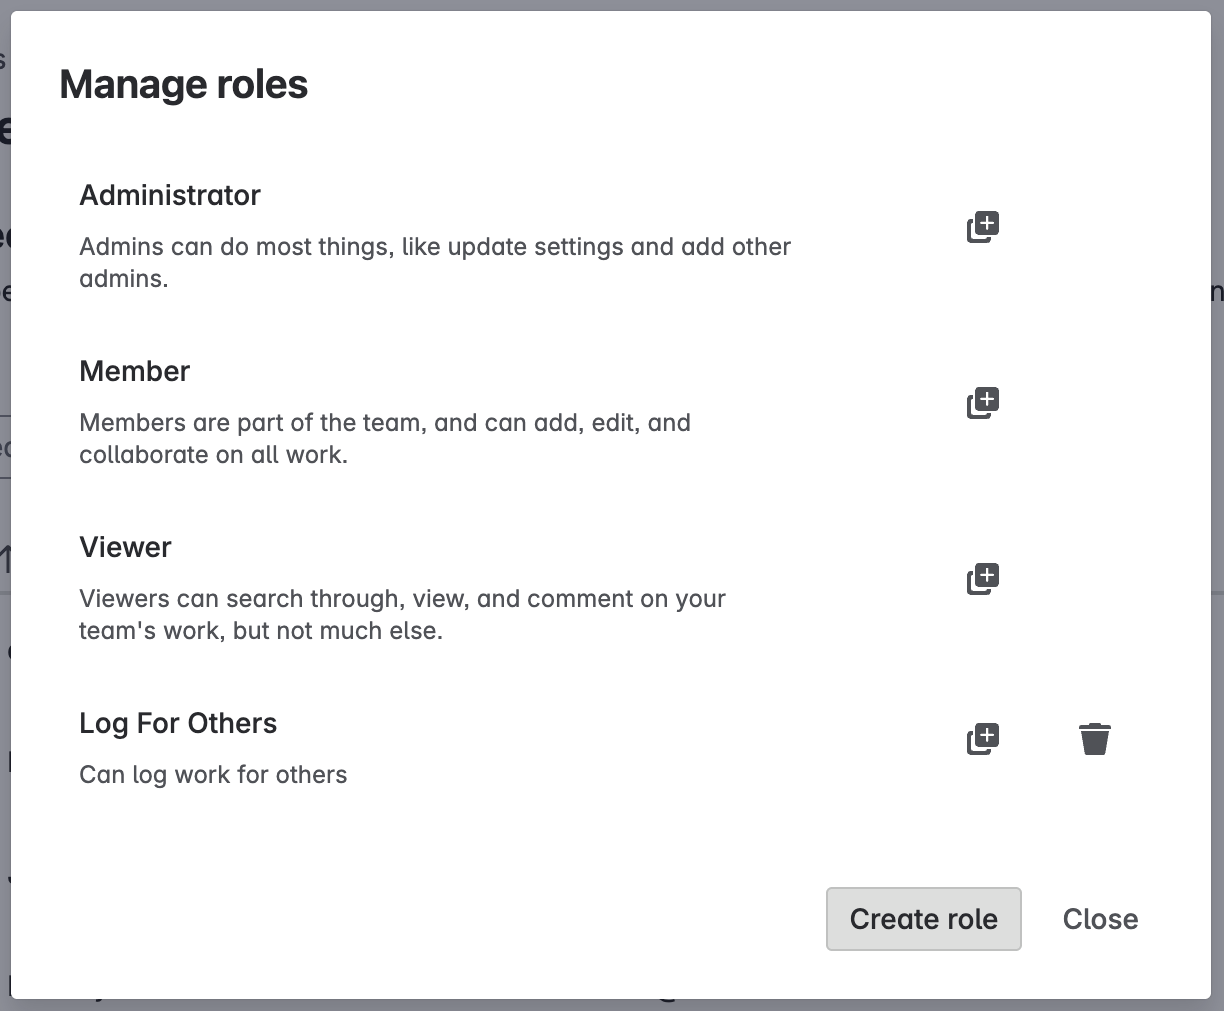
Click the Manage roles button (top right).

Click Create role.
Name the role and select the App permissions tab.
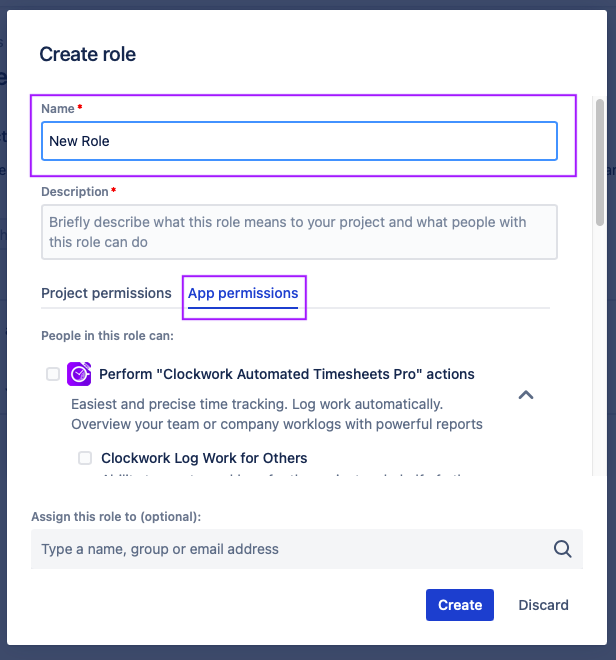
Select the Delete Checklist Items permission.
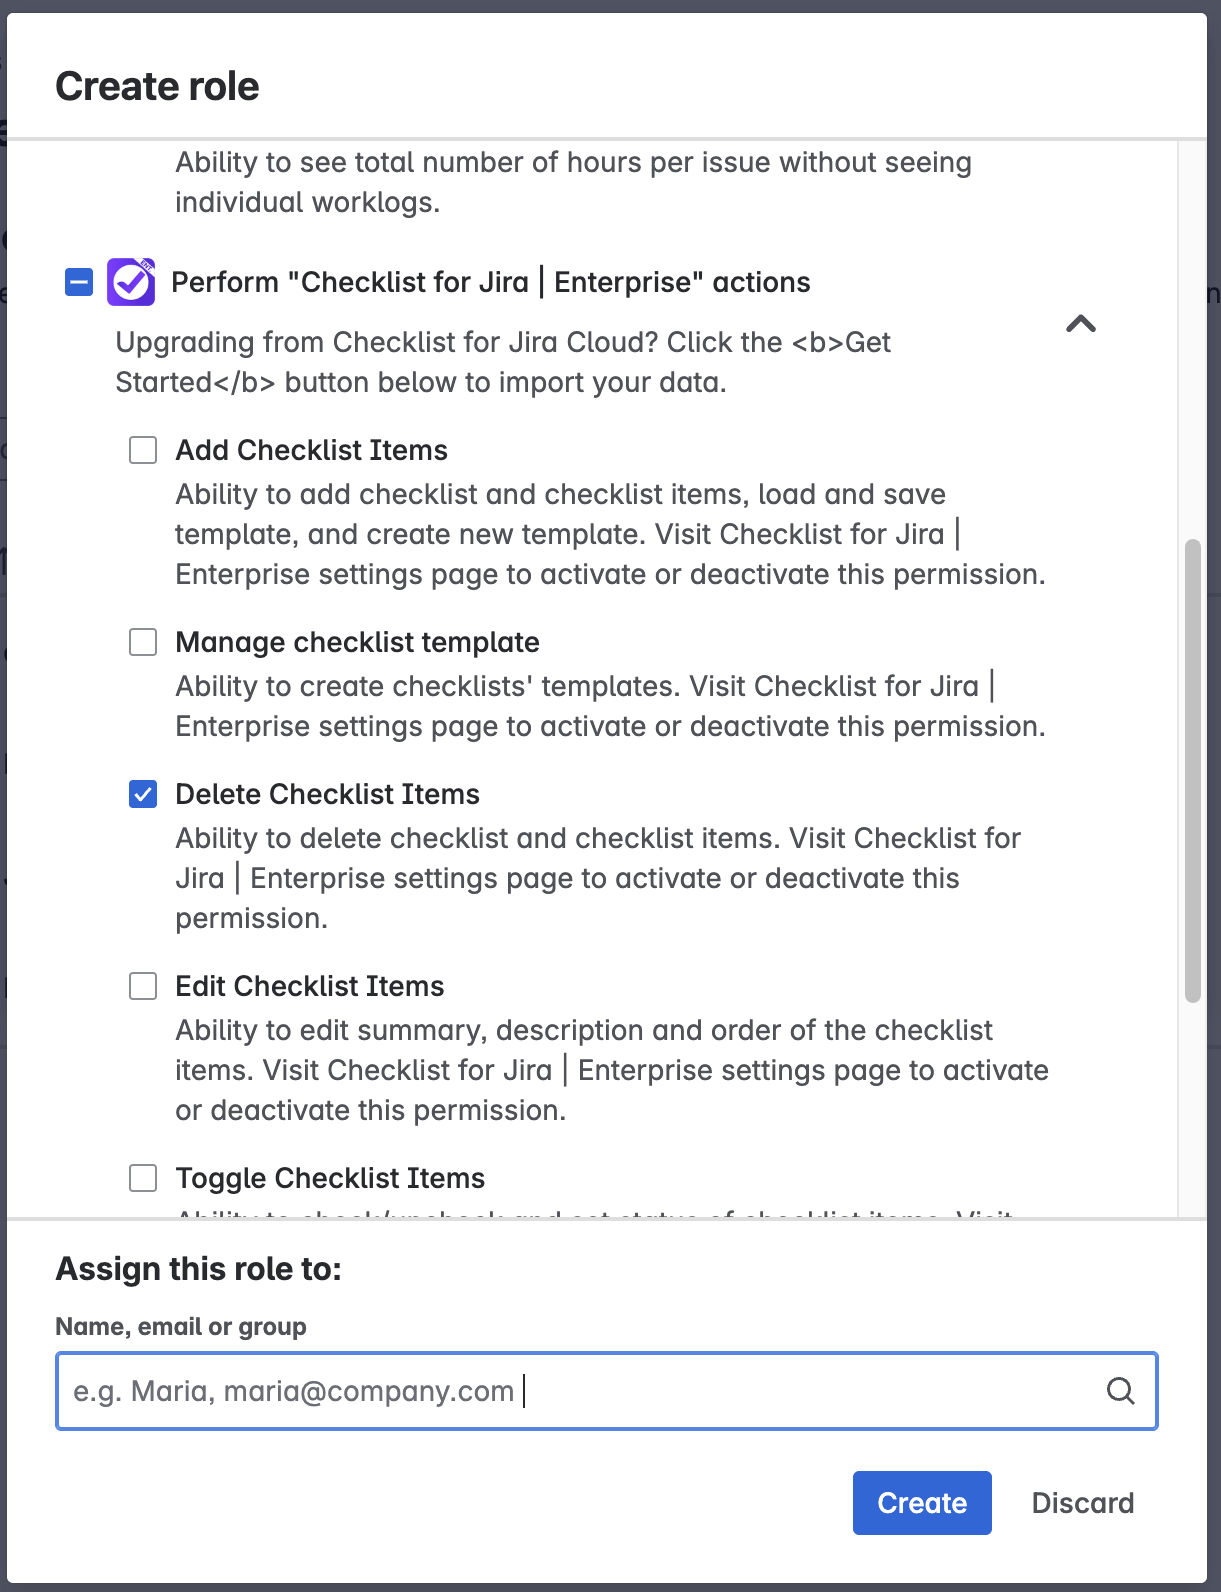
Select the users/groups who will be added to the role.
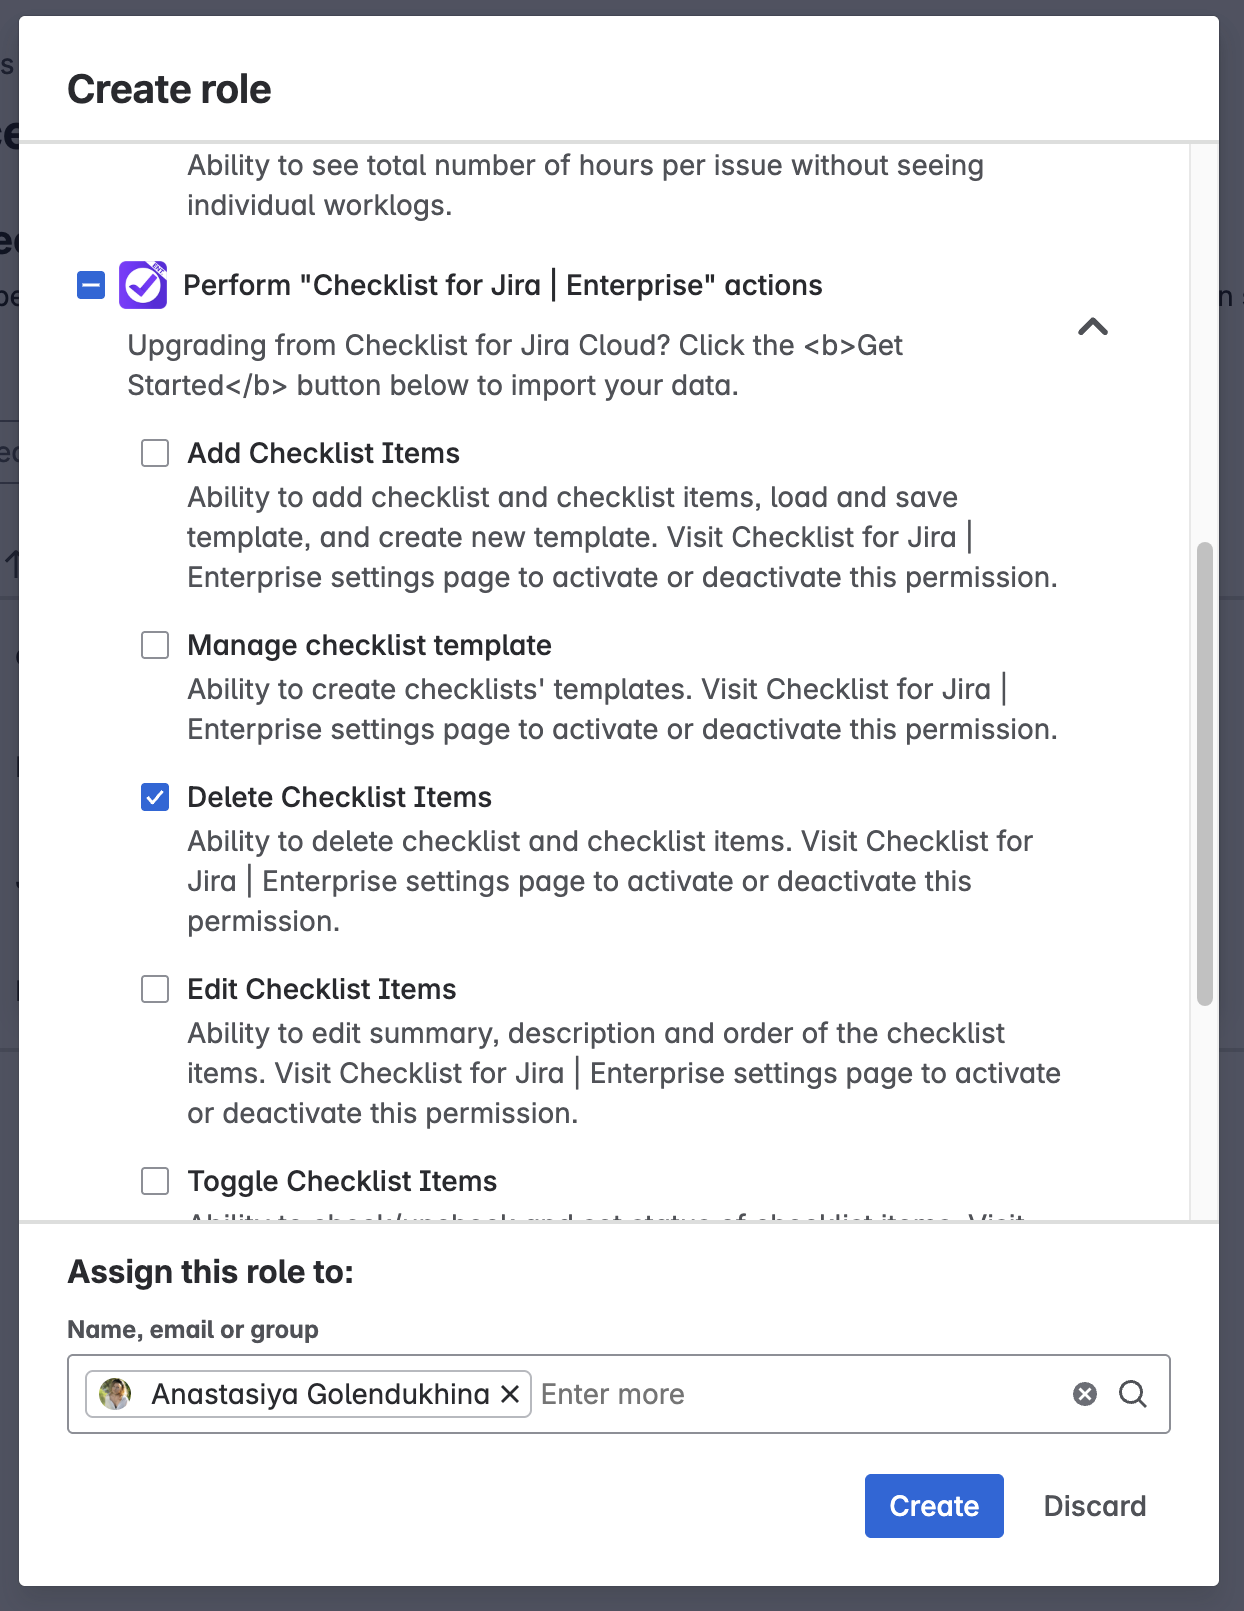
Click Create.
