
Viewing your Portfolio as a customizable table provides several advantages. You can search, sort, add columns, and even add new fields to your Jira work items. Shift to Gantt view when you need a timeline, make inline edits for quick updates, or bulk edit when changes impact multiple work items.
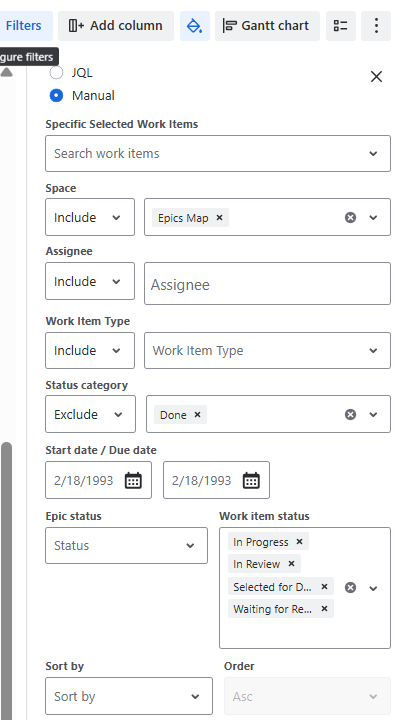
Set up the scope of your Portfolio with Filters
You can adjust your Portfolio filters at any time to keep up with changing scopes of work.
To set a Portfolio filter:
-
Click on the Filter button.

-
Select the appropriate filter option or type in a JQL query. You can select a couple of projects (spaces), add some additional work items from other projects, include or exclude some work item typs or status categories or select a specific time range.
-
Click Save.
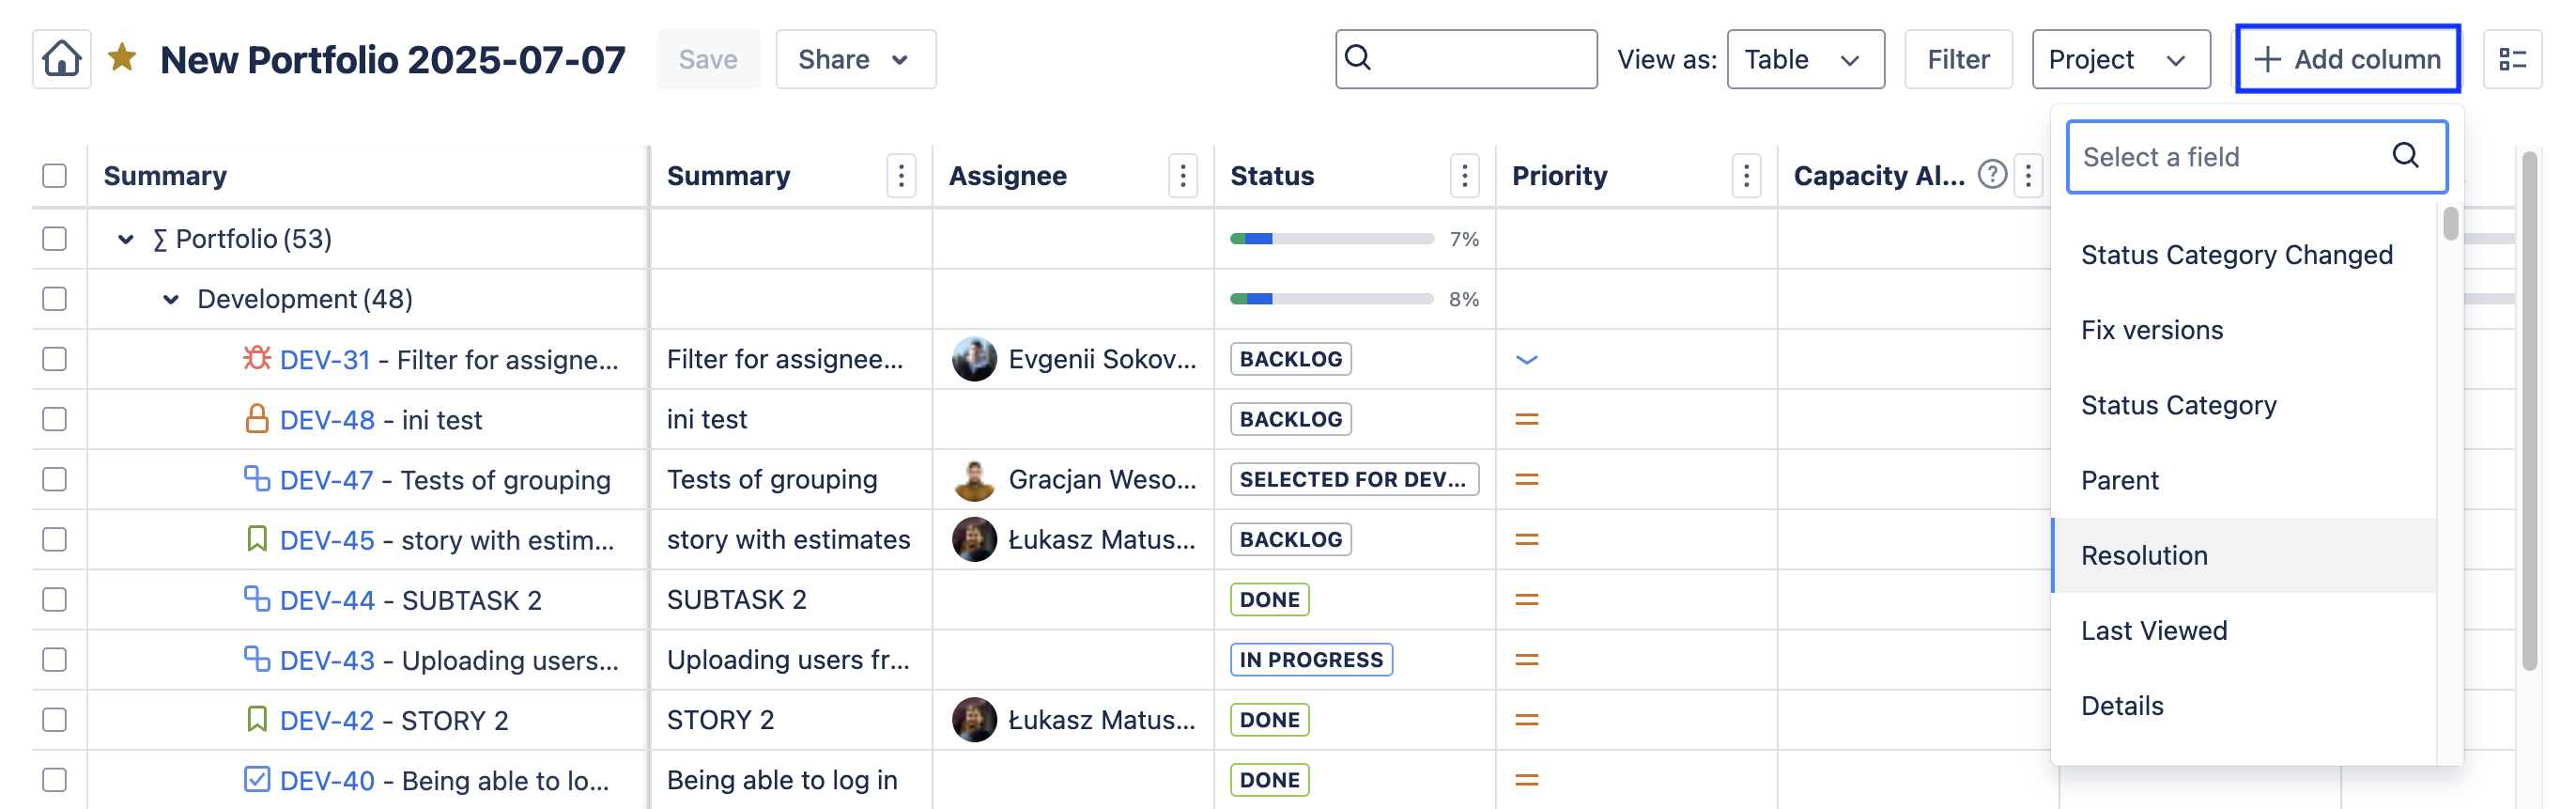
Add Columns
You can customize the table by adding columns for any supported field to the table view. You can add Jira, custom fields and Portfolio own insights like Capacity or Delivery Alerts, Time in Status, Calculated End Date, Formula and many more.
To add a column:
-
Click on the + Add column button.
-
Select the field you want to add to the view. If the field you want to add does not appear in the search dropdown, you can select using the search option.
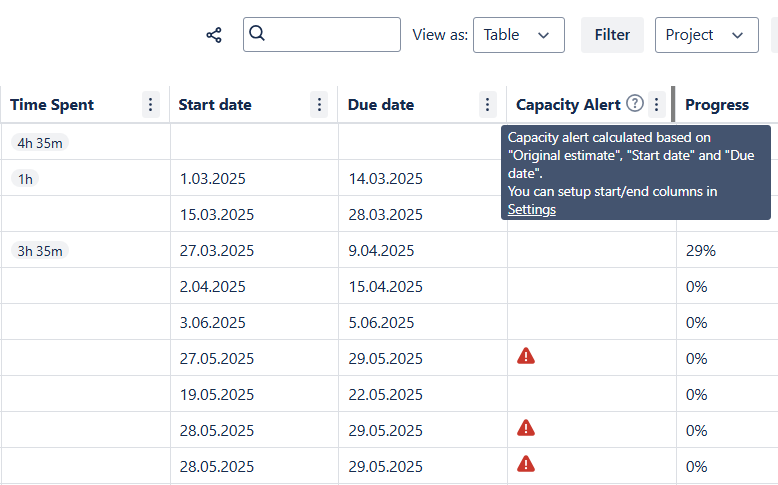
See Capacity Alerts
Ensure workloads are realistic and protect your team from overload with Capacity Alerts. Adding a Capacity Alert column lets you quickly identify Assignees who are overbooked. Portfolio by deafult uses the Original Estimate, Booking Start Date and Booking End Date to calculate capacity. You can specify which fields should be used for creating bookings in Settings. If the work item’s Assignee is overbooked, a warning icon will appear. You can hover over the icon to see a tooltip with the Assignee’s overbooked days or click on it to open the Capacity Plan to reschedule or re-assign the work item to someone else.
To add Capacity Alerts:
-
Click on the + Add column button.
-
Select the Capacity Alert field.
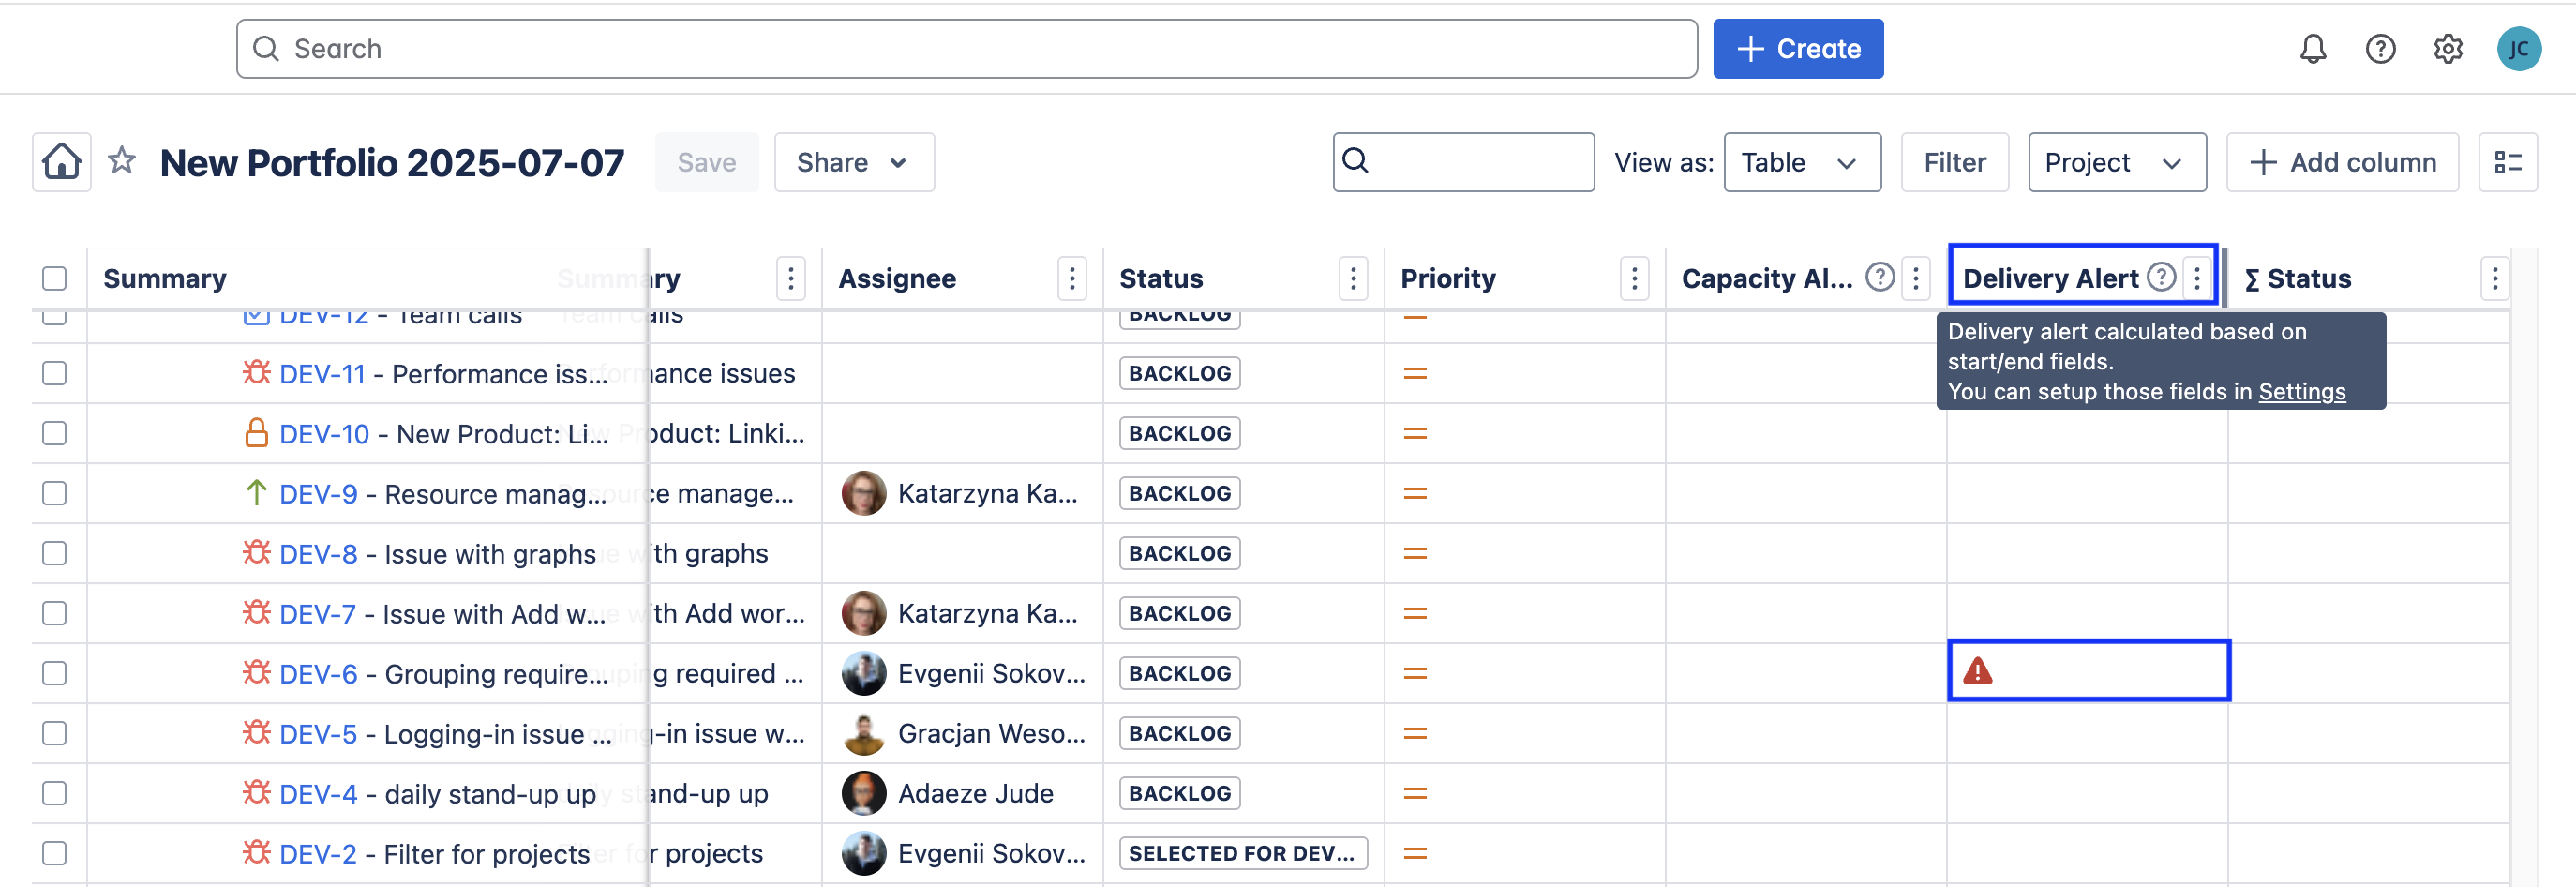
See Delivery Alerts
Avoid delayed deliveries. When Hierarchy grouping is enabled, Delivery Alerts display a warning icon if a child work item’s end date is later than the parent item’s end date or when it’s past due date and the work hasn’t started yet. This allows you to easily identify parent work items that are at risk.
To add Delivery Alerts:
-
Click on the + Add column button.
-
Select the Delivery Alert field.
See Epic Progress Status
Easily monitor the progress of epics, and other parent work items. When using the Hierarchy grouping, you can add the ∑ Status field to display a progress bar showing cumulative progress on the Epic/Parent work item:
-
Click on the + Add column button.
-
Select the ∑ Status field.
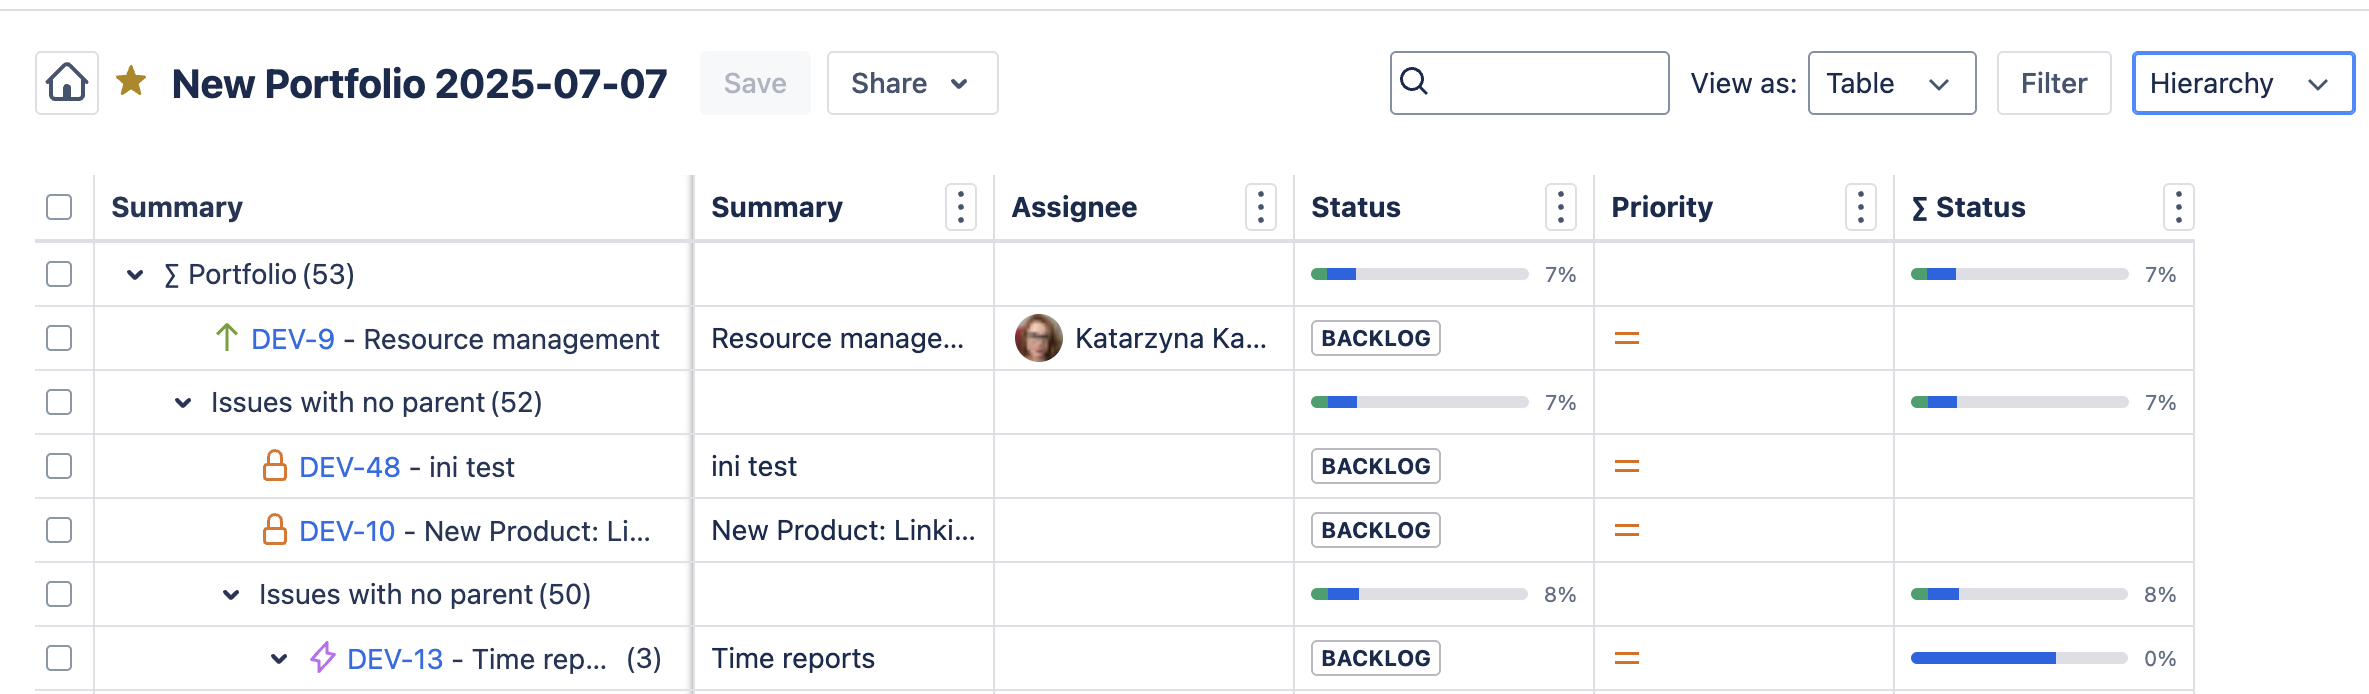
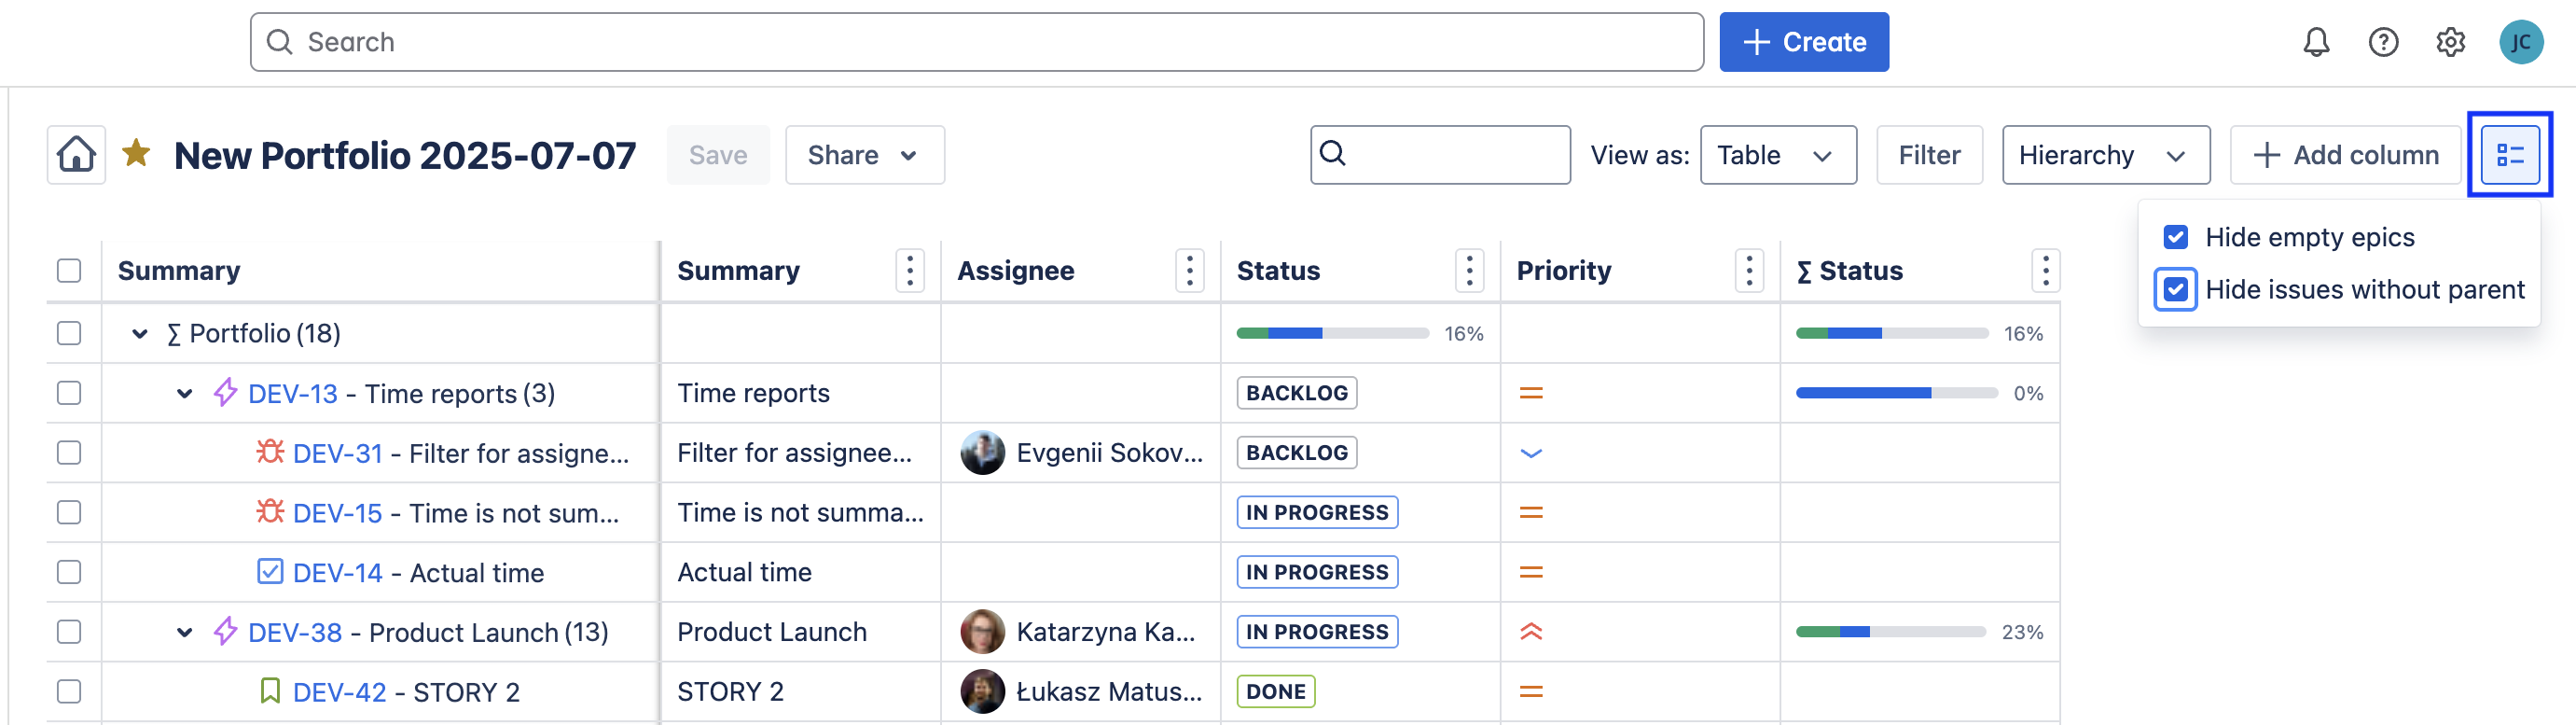
Hide Empty Epics / Work Items Without Parent
When you want to stay focuses on large initiatives, you can hide work that isn’t part of an epic. The icon on the far right allows you to filter out empty epics and/or work items that do not have a parent.
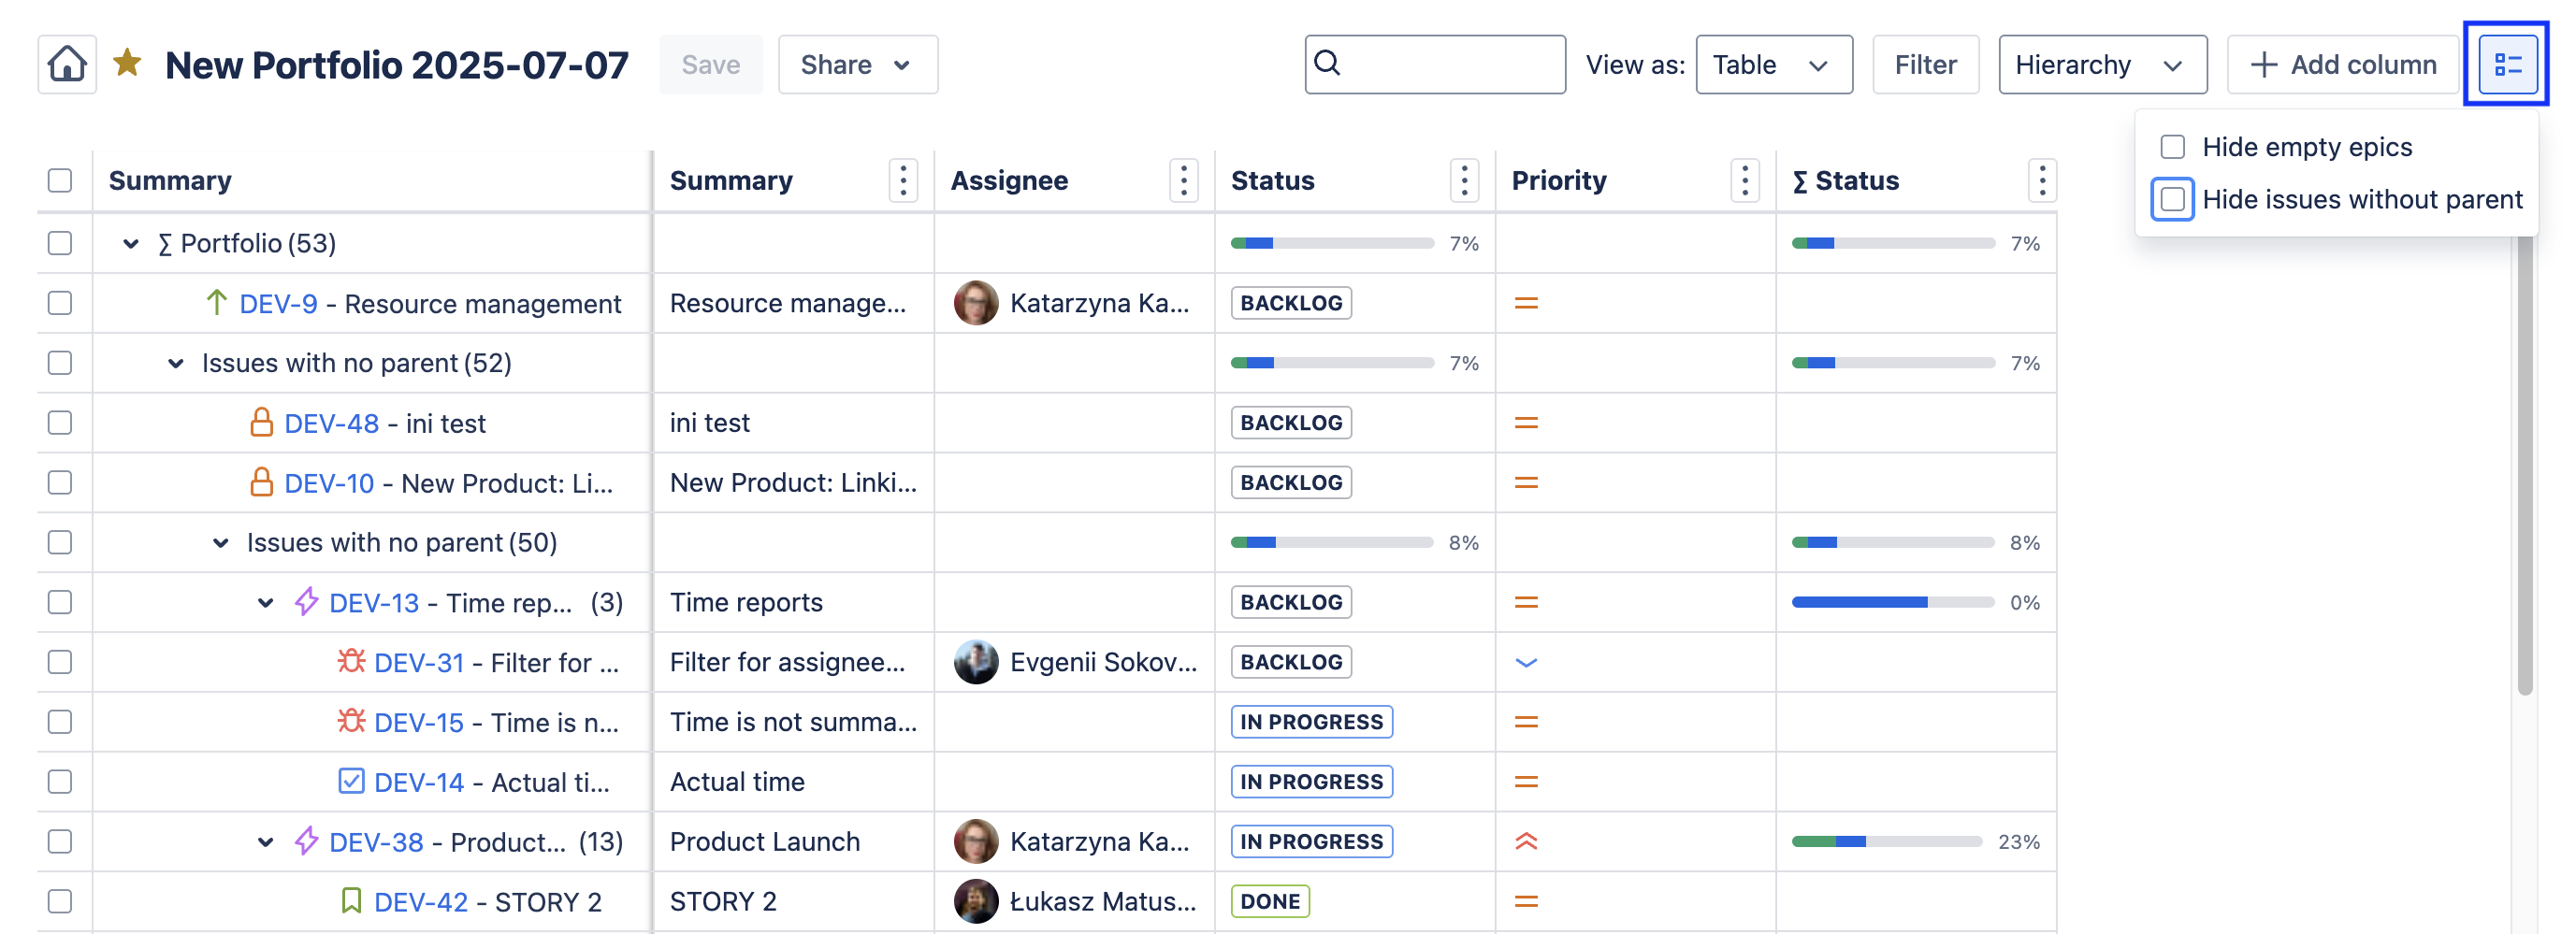
When the corresponding box is checked, that epics and/or work items will be hidden from the view and removed from the Epic Status (∑ Status) calculation.
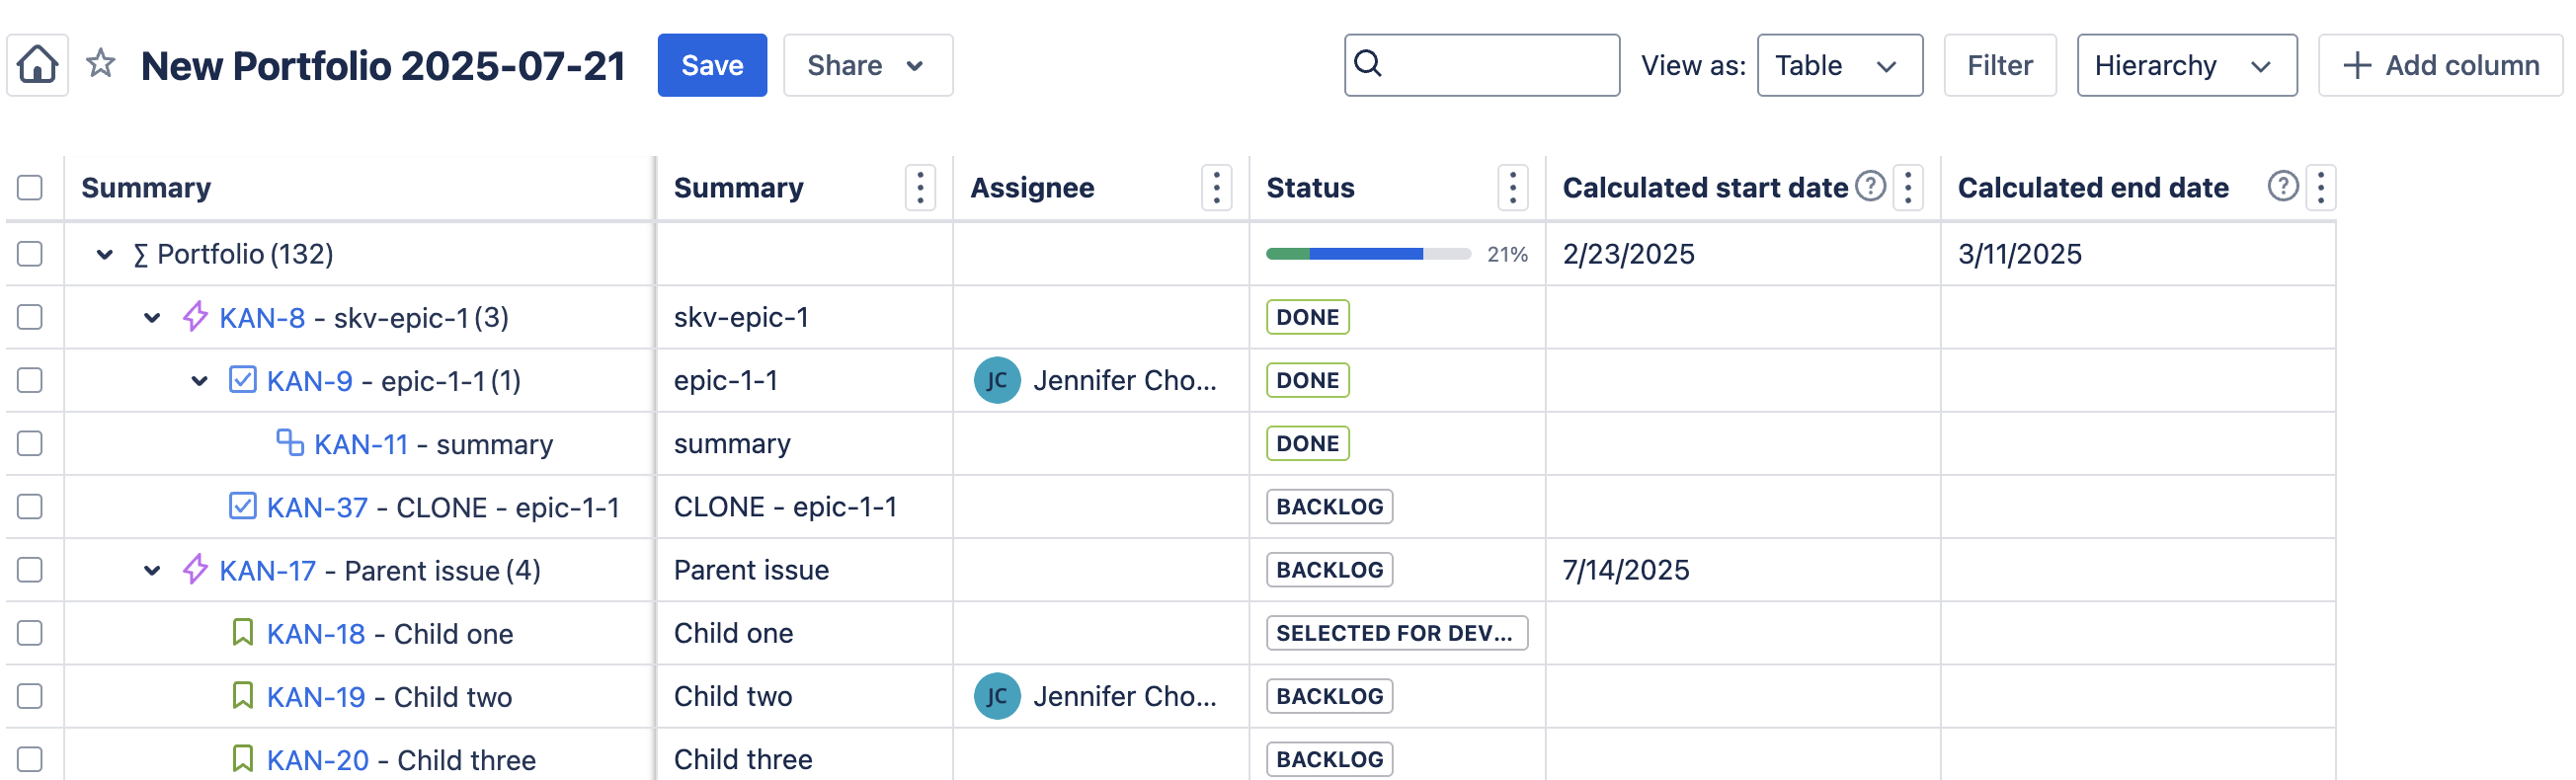
See Grouping Start and End Dates
Plan work and forecast completion with calculated start and end dates for grouped work items. At the grouped level (Portfolio, Parent work items, Work items with no parents), the Calculated start date and Calculated end date fields will respectively display, the earliest start date, and latest end date of any work item in the group. These dates will be based on the field selected in the Settings for the Bookings Start Date and Bookings End Date.
To add Calculated start and/or end dates:
-
Click on the + Add column button.
-
Select the Calculated start date and/or Calculated end date field.
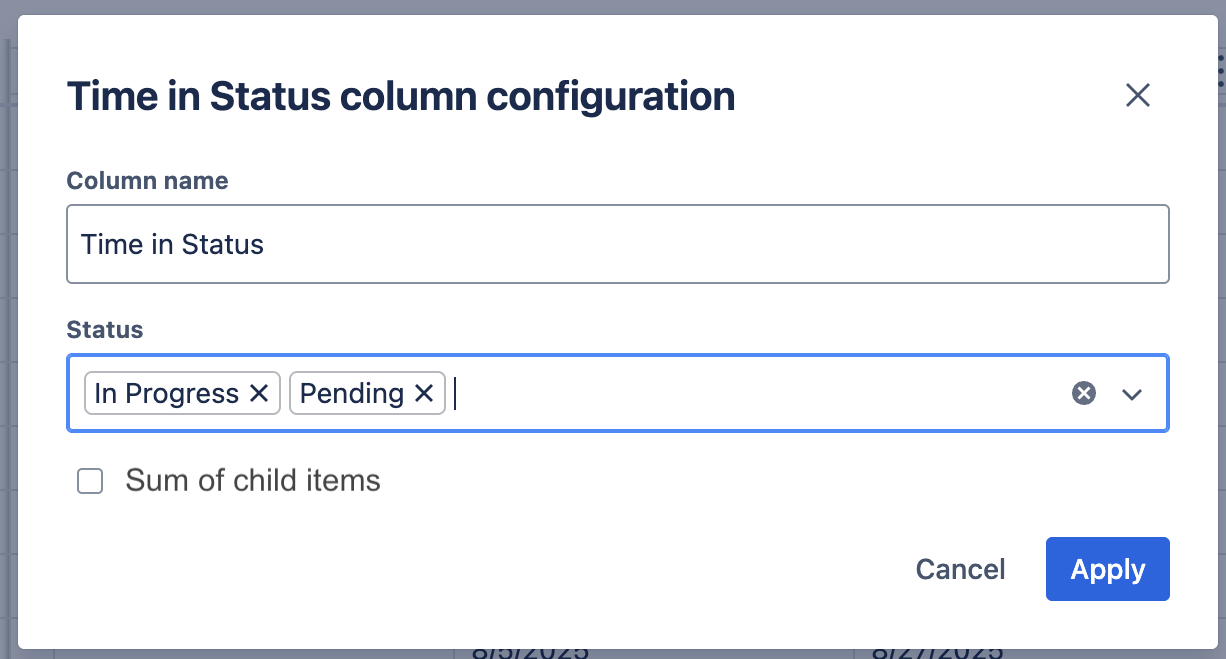
See Time in Status
Use the Time in Status field to identify bottlenecks and inform process improvements.
To add time in status to the table:
-
Click on the + Add column button.
-
Select the Time in Status field.
-
Click on the three vertical dots to the right of the field name and select Configure.

-
Use the Status dropdown to select the statuses you want to include.
-
You can also opt to include the sum of time child items spent in those statuses.
-
Click Apply.
Grouping Options
You can group portfolios by multiple attributes at the same time, making it easier to organize and analyze large sets of items.
You can now apply multiple grouping levels (for example: Project → Hierarchy). This creates a structured view where items are first grouped by the primary attribute and then further organized by additional attributes within each group.
To set a the grouping
-
Click on the Grouping dropdown.
-
Select the grouping option and add aditional attributes as you wish.

Create a structure
Custom structures let you organise your Portfolio in a way that matches how your team plans and delivers work. Instead of relying only on standard grouping options, you can create a tailored hierarchy using hierarchy and linked issues that are meaningful to your organisation, such as initiatives with their blockers or themes and initiatives and epics. This makes it easier to view work at the right level of detail, understand how items relate to one another, and keep complex portfolios clear and actionable.
Sort by Column
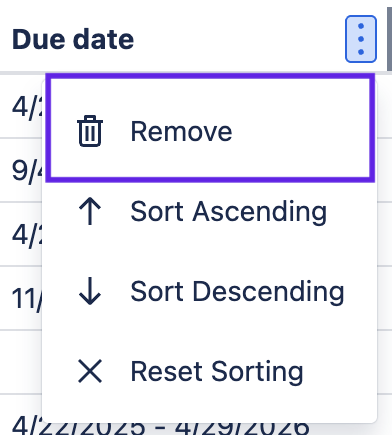
You can sort the table by the values in any column. To sort the table, click on the More menu (three vertical dots) and select the appropriate sorting option.
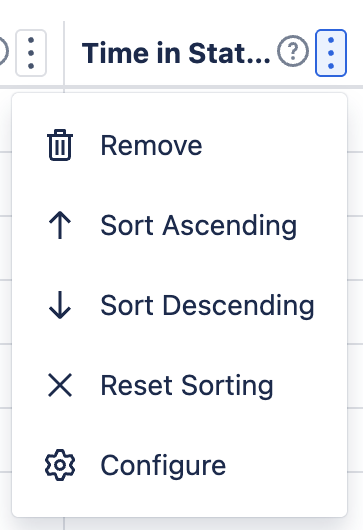
Delete a Column
To remove a column from the table, click on the More menu (three vertical dots) and select Remove.
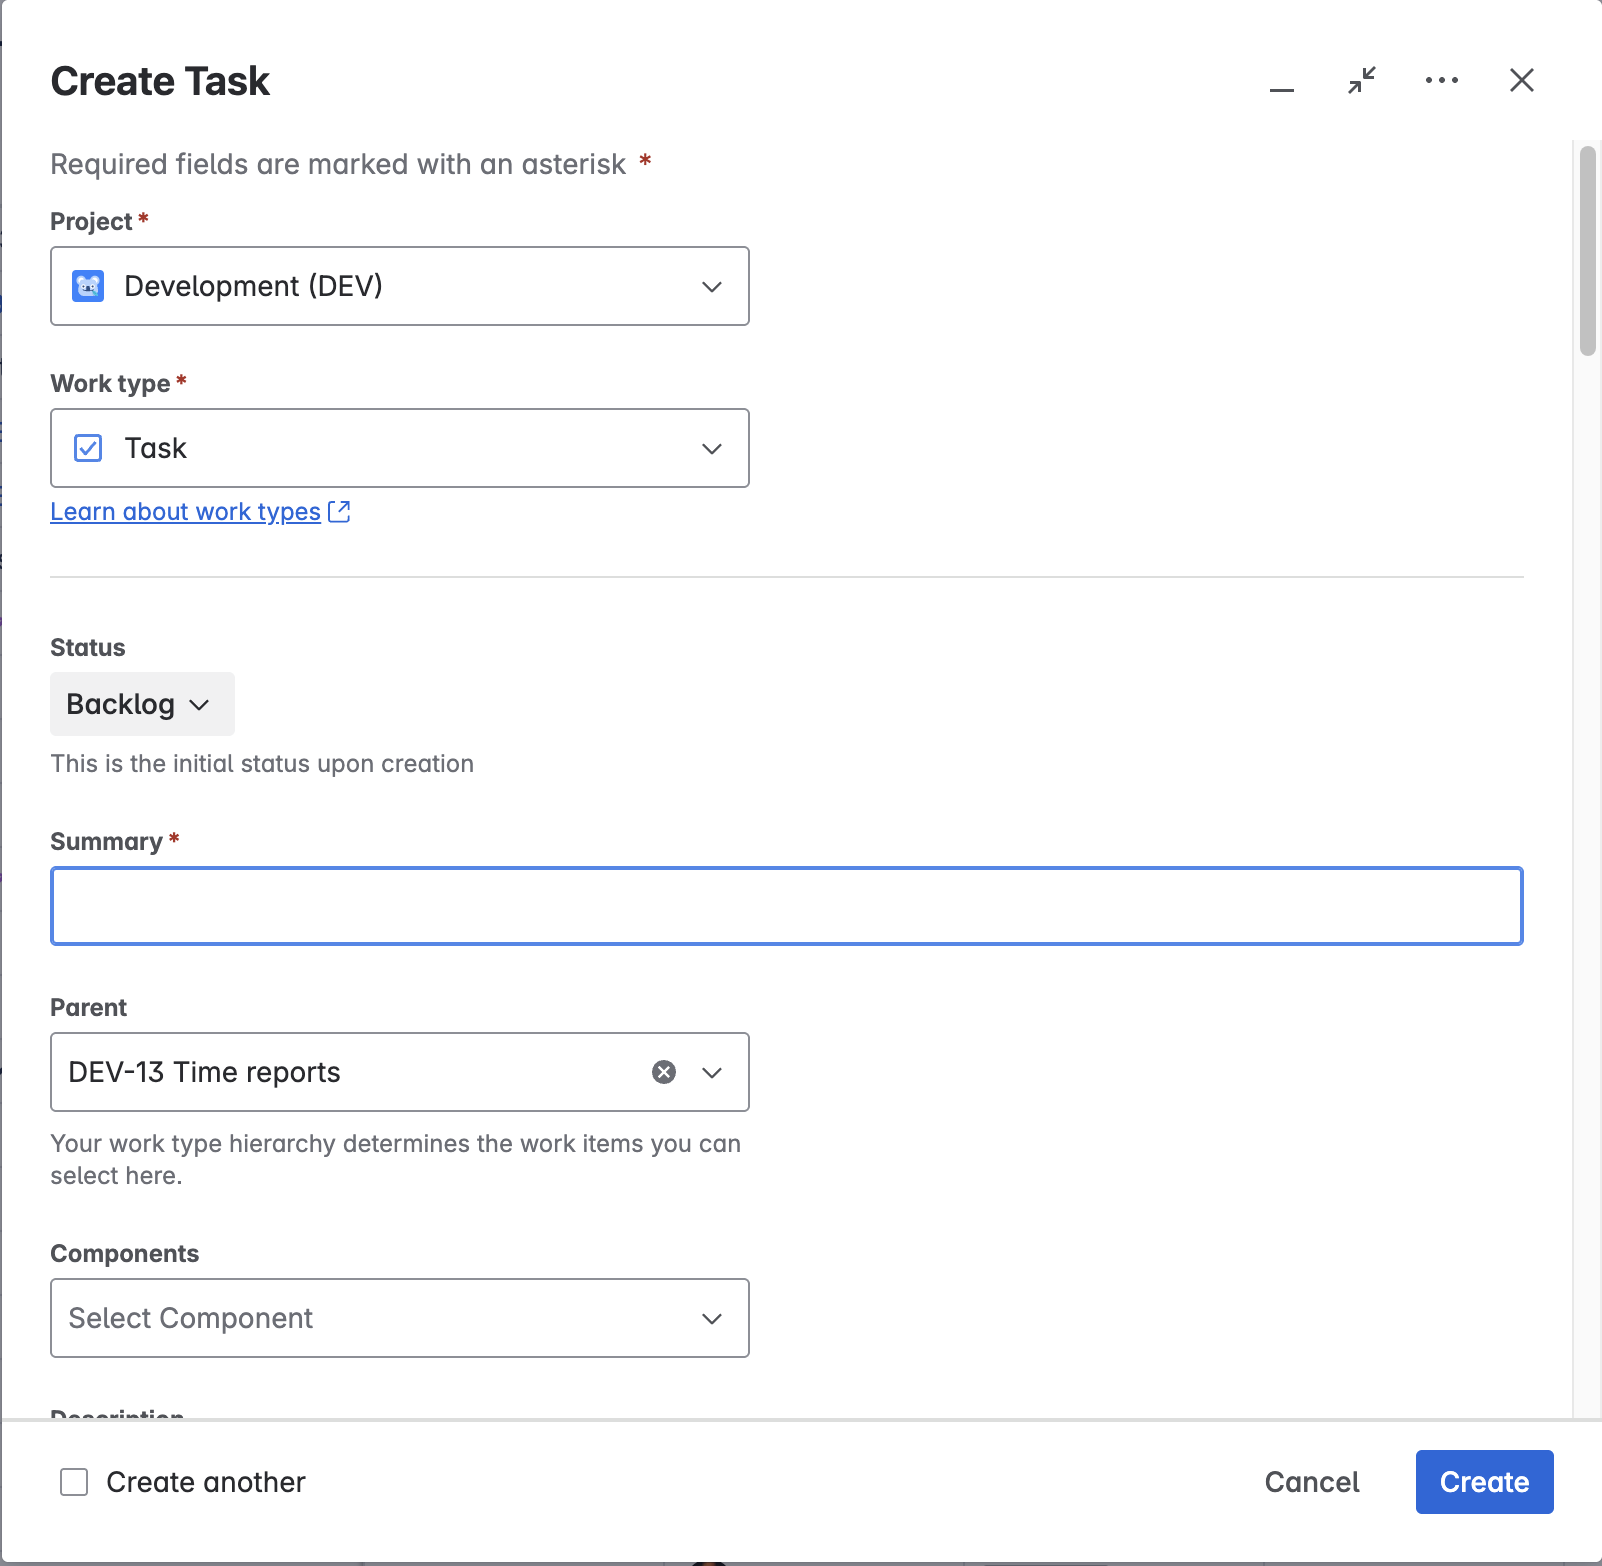
Create a Jira Work Item
If you discover that an important piece of work is missing from your plan, you can add it directly from the table. The newly created Jira work items will appear under the appropriate Parent.
To create a new Jira work item:
-
Scroll down until the blue line is where you want the new work item to be in the hierarchy.

-
Click on the + button.
-
The Create work item screen will open with:
-
The Work type pre-populate with the same type as the previous work item in the table.
-
The Parent field will be pre-populated if the Hierarchy grouping was selected.
-
Edit Jira Work Items
Save time by editing Jira work items directly from your portfolio. Portfolio supports adding new fields (with their values) to work items, inline editing from the table, and bulk editing multiple items in one go.
Add a Field and Its Values to Work Items
The table view allows users with admin permission to add new fields and their values to Jira work items (even if the field is not currently on the work item screen/layout). To add a field to a work item:
-
Select a Portfolio that includes the appropriate Jira space.
-
Select the Table view.
-
Click on the + Add column button.
-
Select the field you want to add.
-
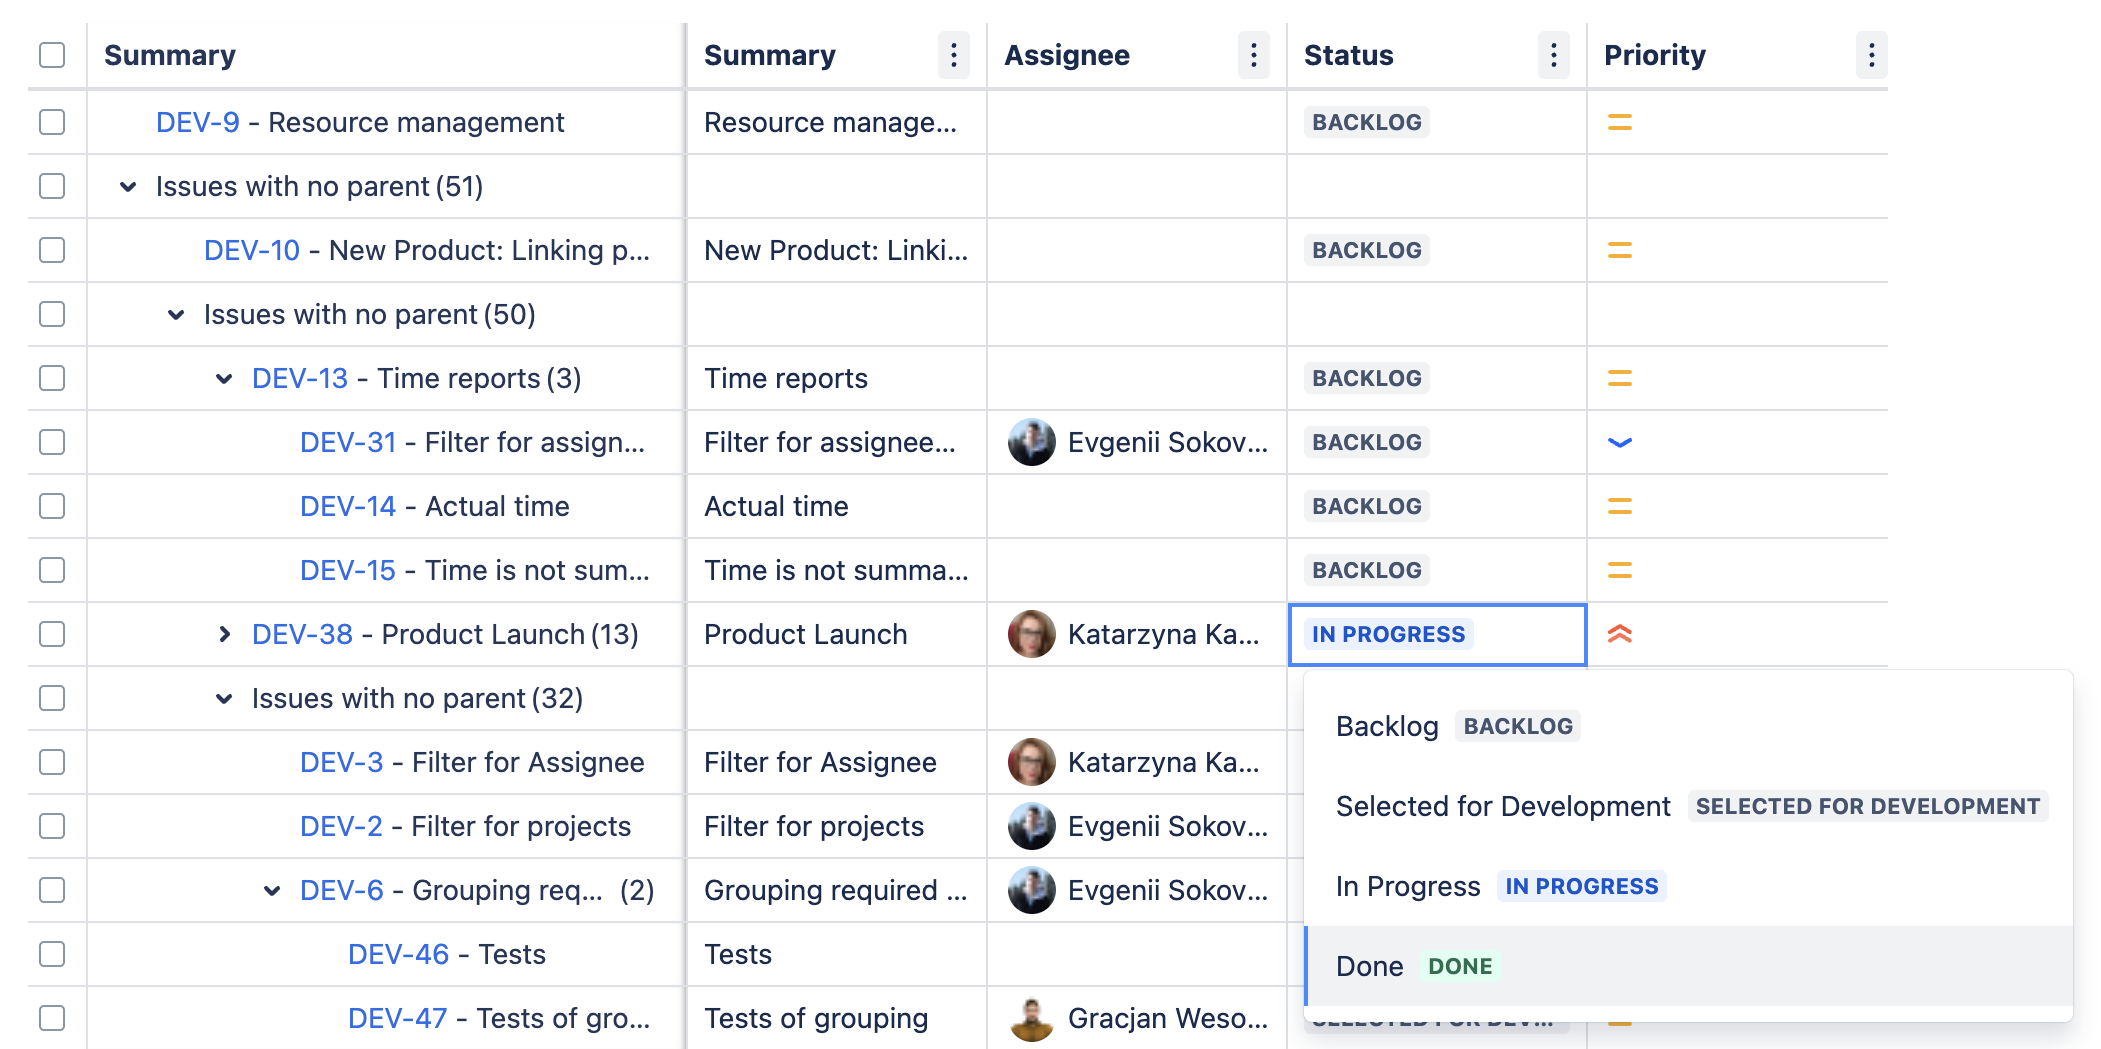
From the table, click into the field cell for the appropriate item and type/select the desired field value.
-
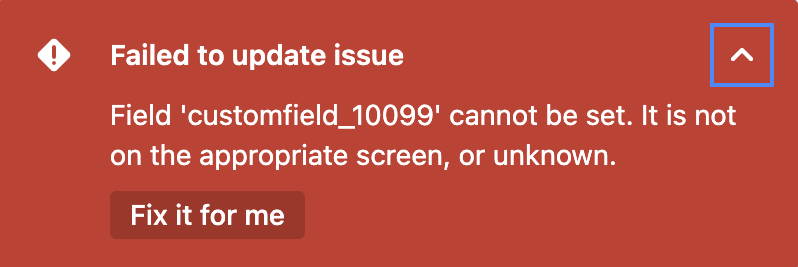
An error message will be displayed to tell you that the field is currently not available on the work item screen.

-
Click on the down arrow to expand the error message. Then lick Fix it for me.
-
The new field and its value will be:
-
Automatically added in company-managed spaces,
-
Added the next time the work item layout is opened in team-managed spaces.

-
-
You can now update the value of the added fields for all work items of that type.

Edit a Jira Work Item
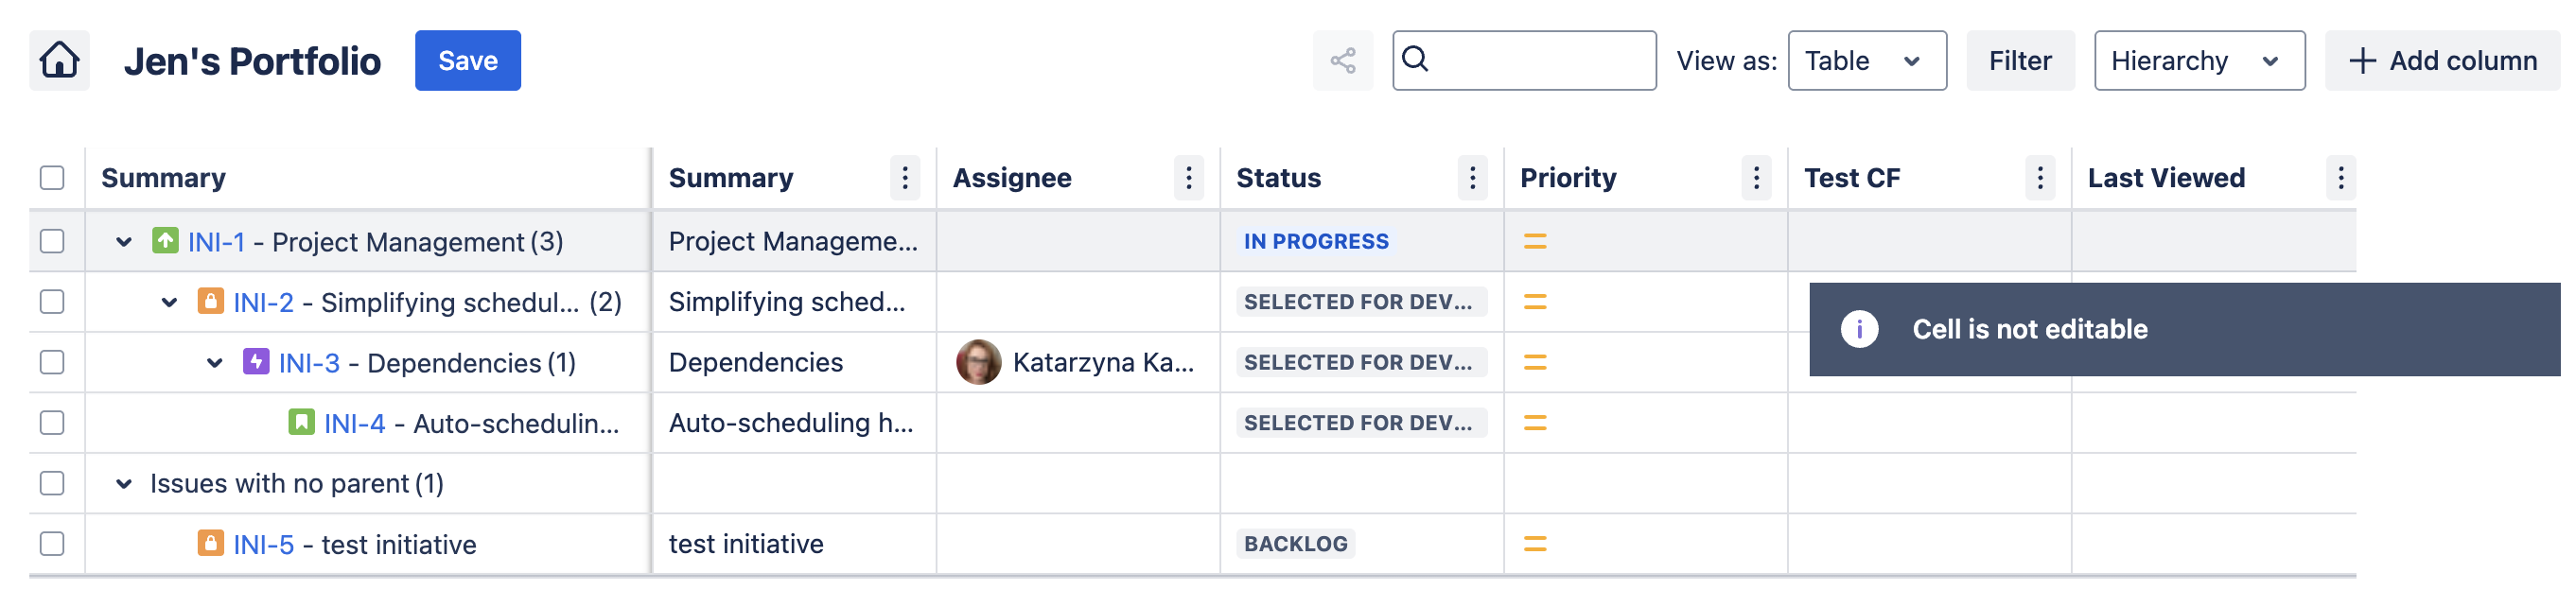
For quick updates, the table view allows inline editing, with all changes instantly updated in Jira.
Some system-managed fields (Created, Last viewed, etc.) are not editable. An error message will notify you that field cannot be edited.
Bulk Edit Multiple Jira Work Items
Save time by editing multiple work items at once. Use the checkboxes on the left side of the table to select Jira work items you want to view, edit or delete.

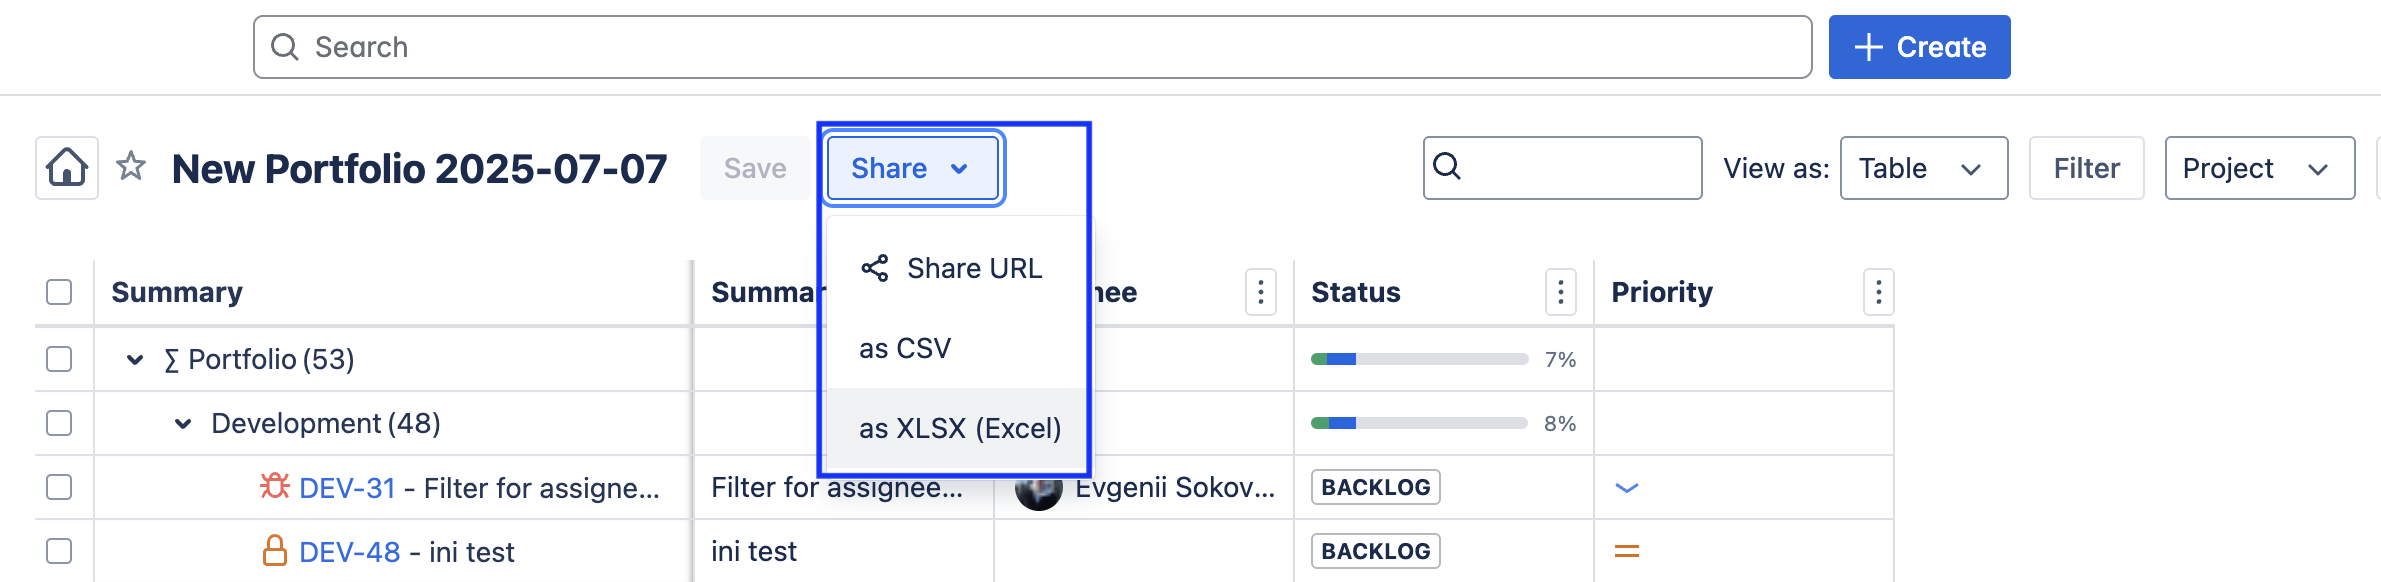
Share or Export a Portfolio
Enhance collaboration with stakeholders by sharing your portfolio.
Share access to your portfolio and then share a URL or export it to Excel or a CSV file to share your portfolio outside of Jira.
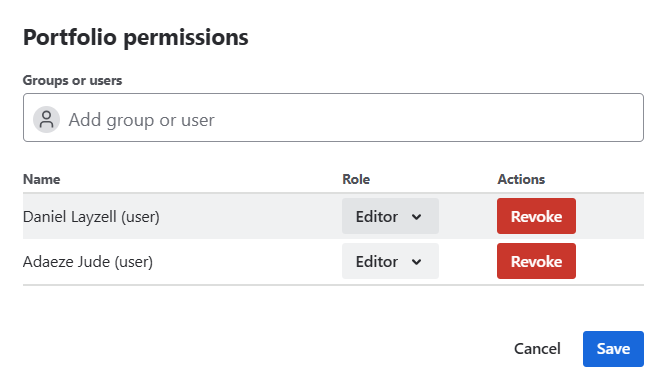
To share access to your portfolio:
-
Click on the dots in the top right corner
-
Select Permissions.
-
Select a user or group and then assign either an Editor or Viewer role to the user or group.

To share a URL of your Portfolio or Export it:
-
Select the Table view option
-
Use the filters and columns to create the View.
-
Click on the Share button.
-
Select the appropriate share/export option.
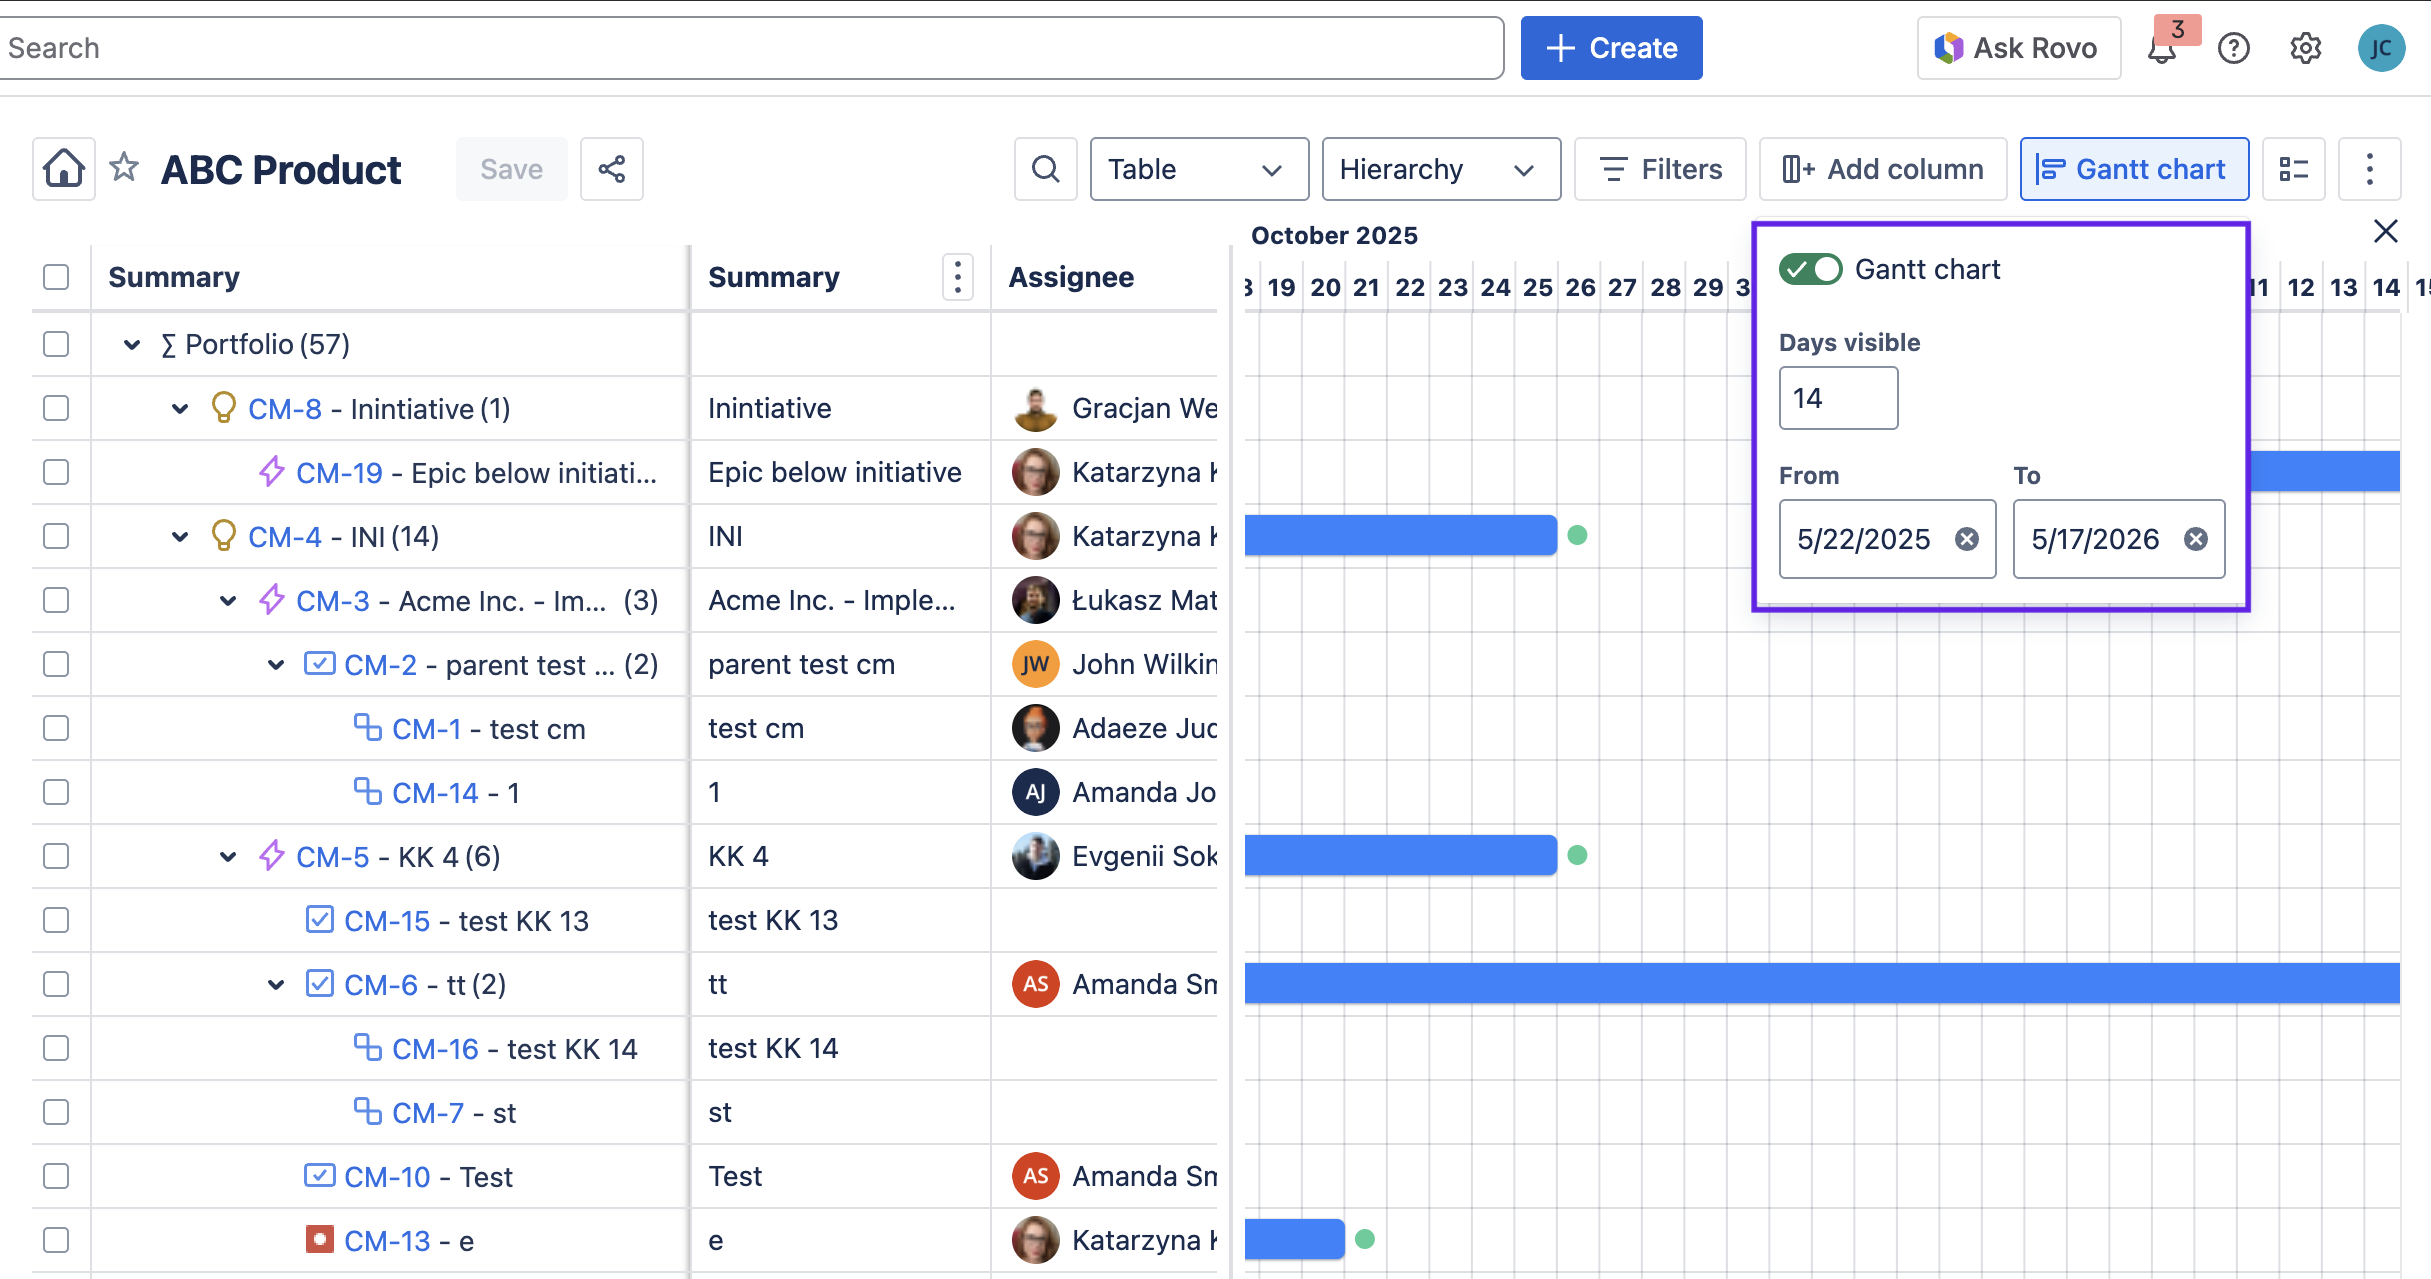
View as a Gantt Chart advanced edition
The Advanced edition of Portfolio allows you to view your portfolio as a dynamic Gantt chart allowing you to see a timeline view, complete with dependencies, of your teams' upcoming work.
To view the Gantt chart:
-
Click on the Gantt chart button in the upper right corner.
-
Enable the Gantt chart toggle.
-
Enter the number of visible days and date range parameters.
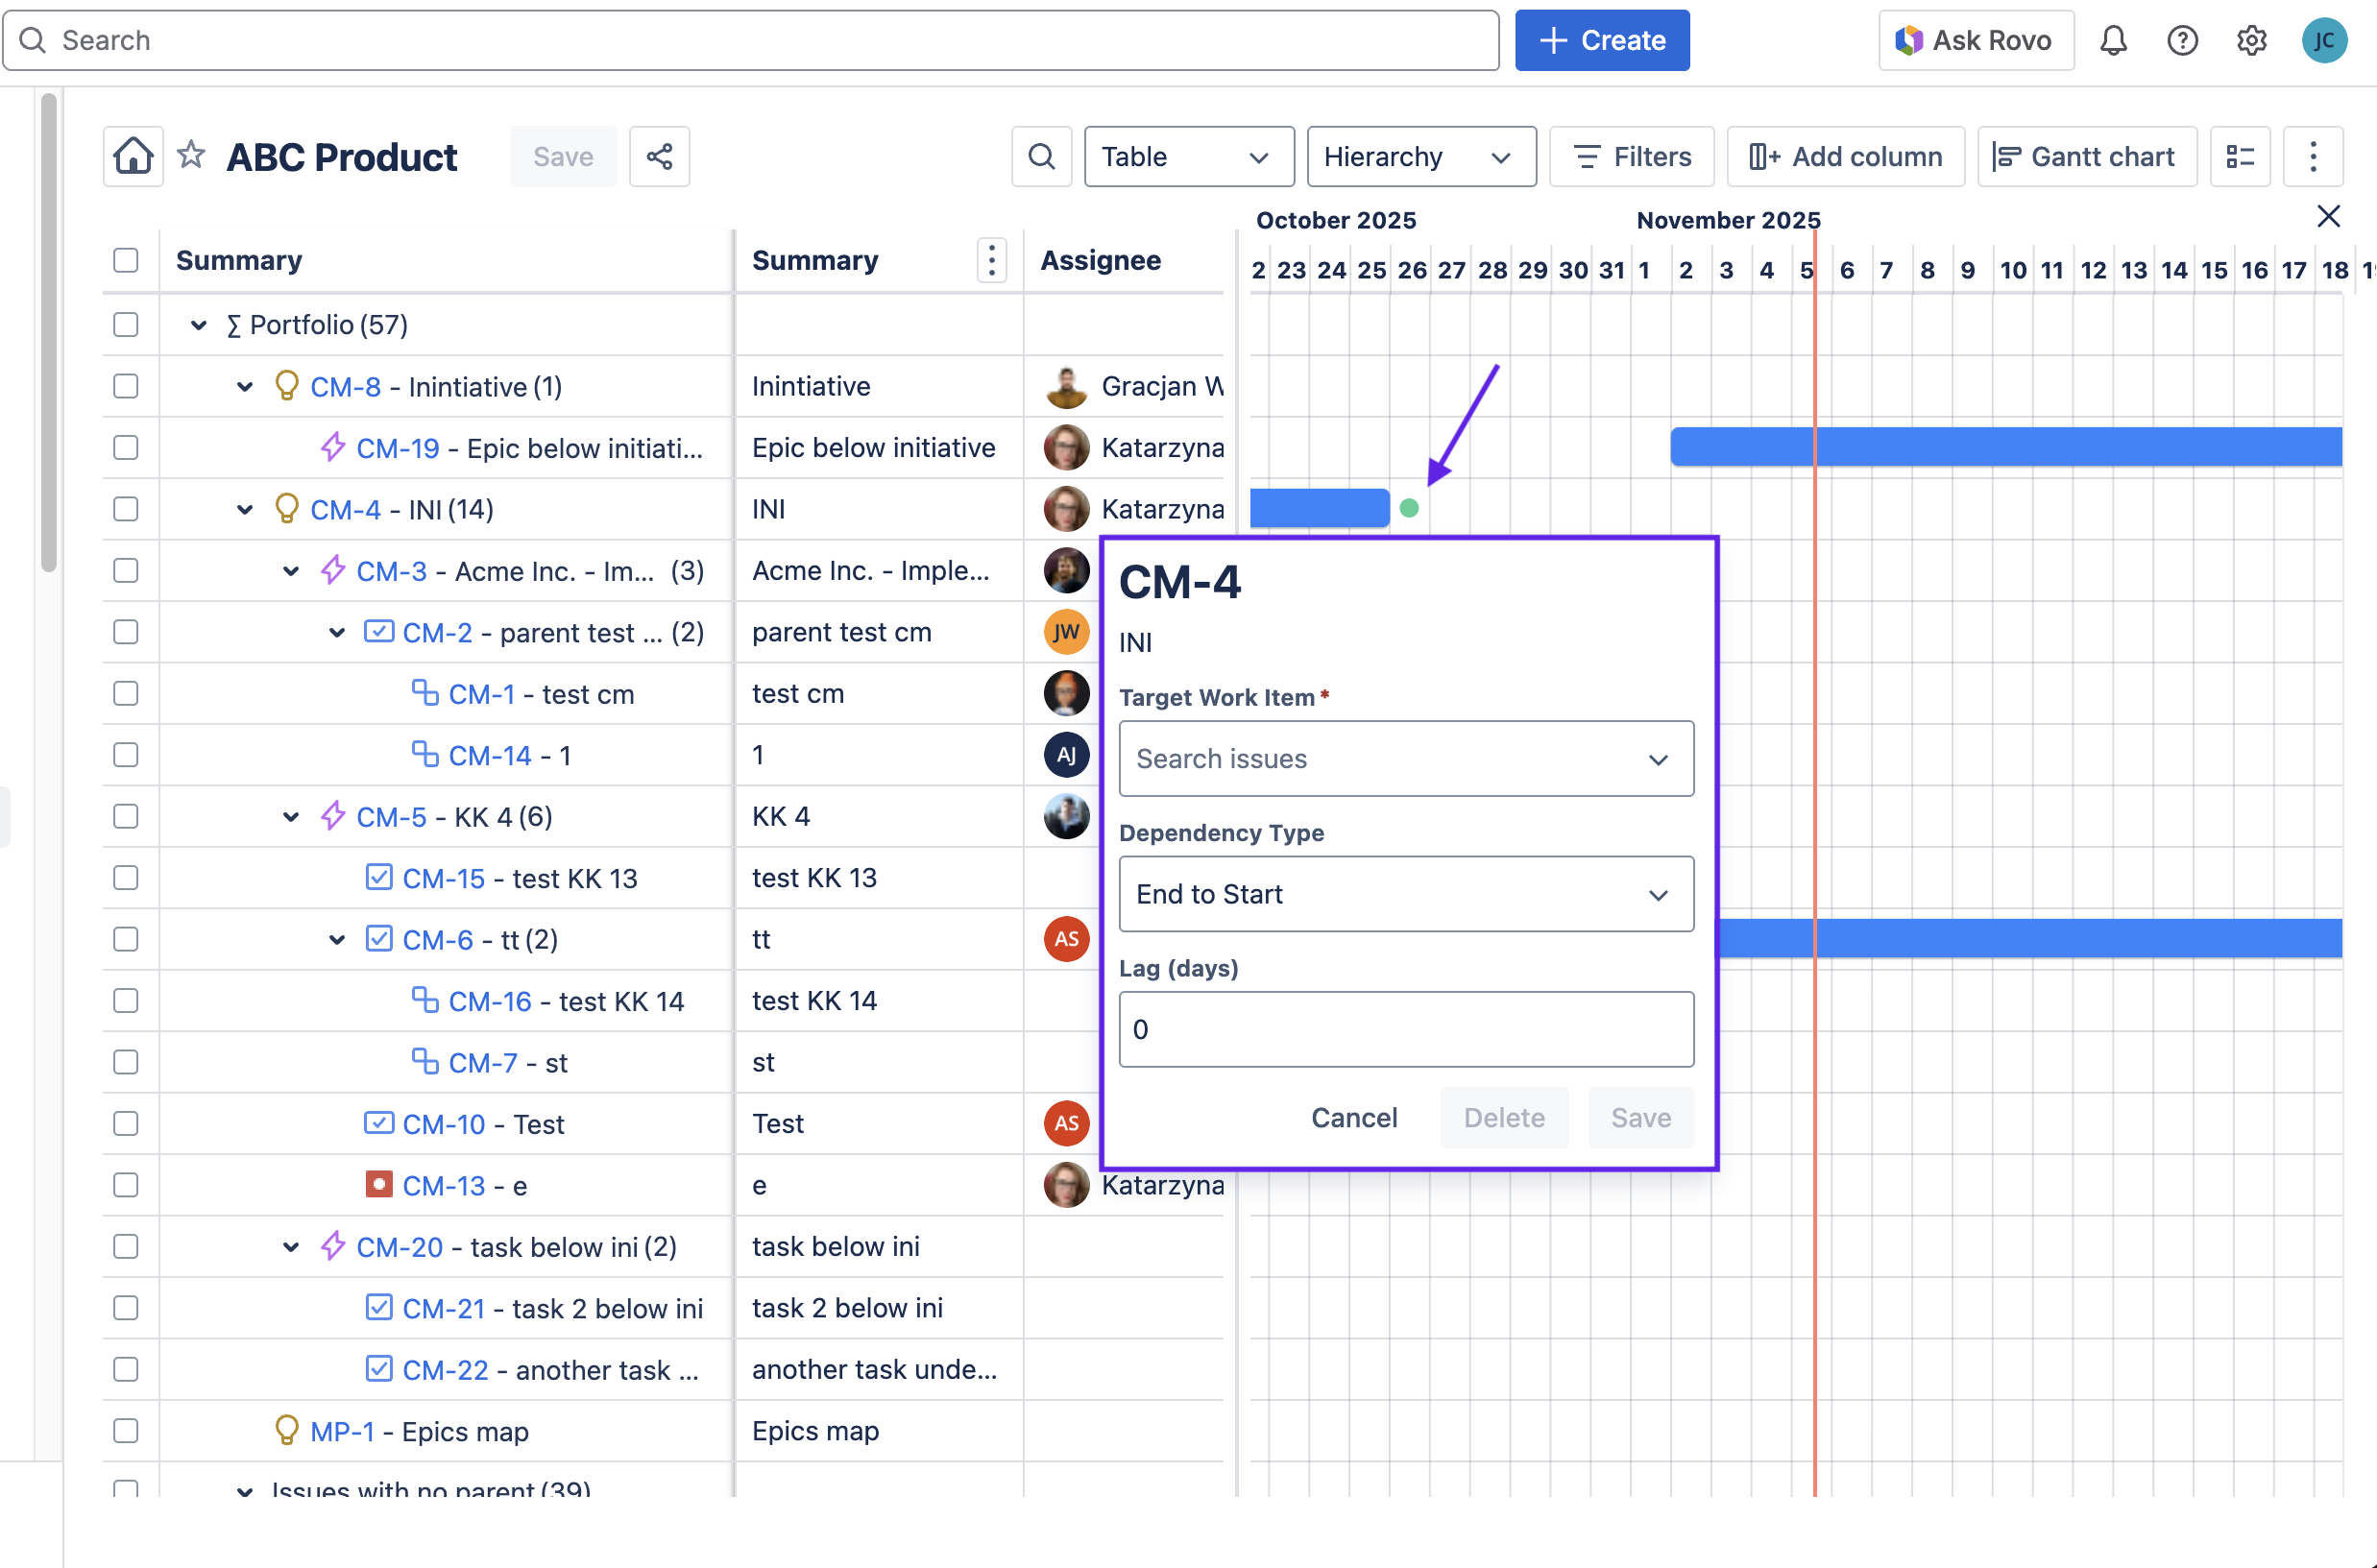
Add a Dependency to the Gantt Chart advanced edition
Make dependencies easily visible for better planning. The Advanced edition of Portfolio lets you add dependencies to the Gantt chart:
-
Enable the Gantt chart view as described above.
-
Click on the green dot at the end of a task bar.
-
A dialog box will open. Complete the fields to create the Dependency:
-
Select the Target Work Item
-
Select the Dependency Type (End to Start, Start to End, End to End, Start to Start, Soft)
-
Enter any Lag time (in days)
-
Click Save.
-
Edit a Dependency on the Gantt Chart advanced edition
To edit an existing dependency:
-
Enable the Gantt chart view.
-
Click onto the red arrow representing the dependency you want to edit.
-
The dialog box will open. Update the appropriate fields and click Update.
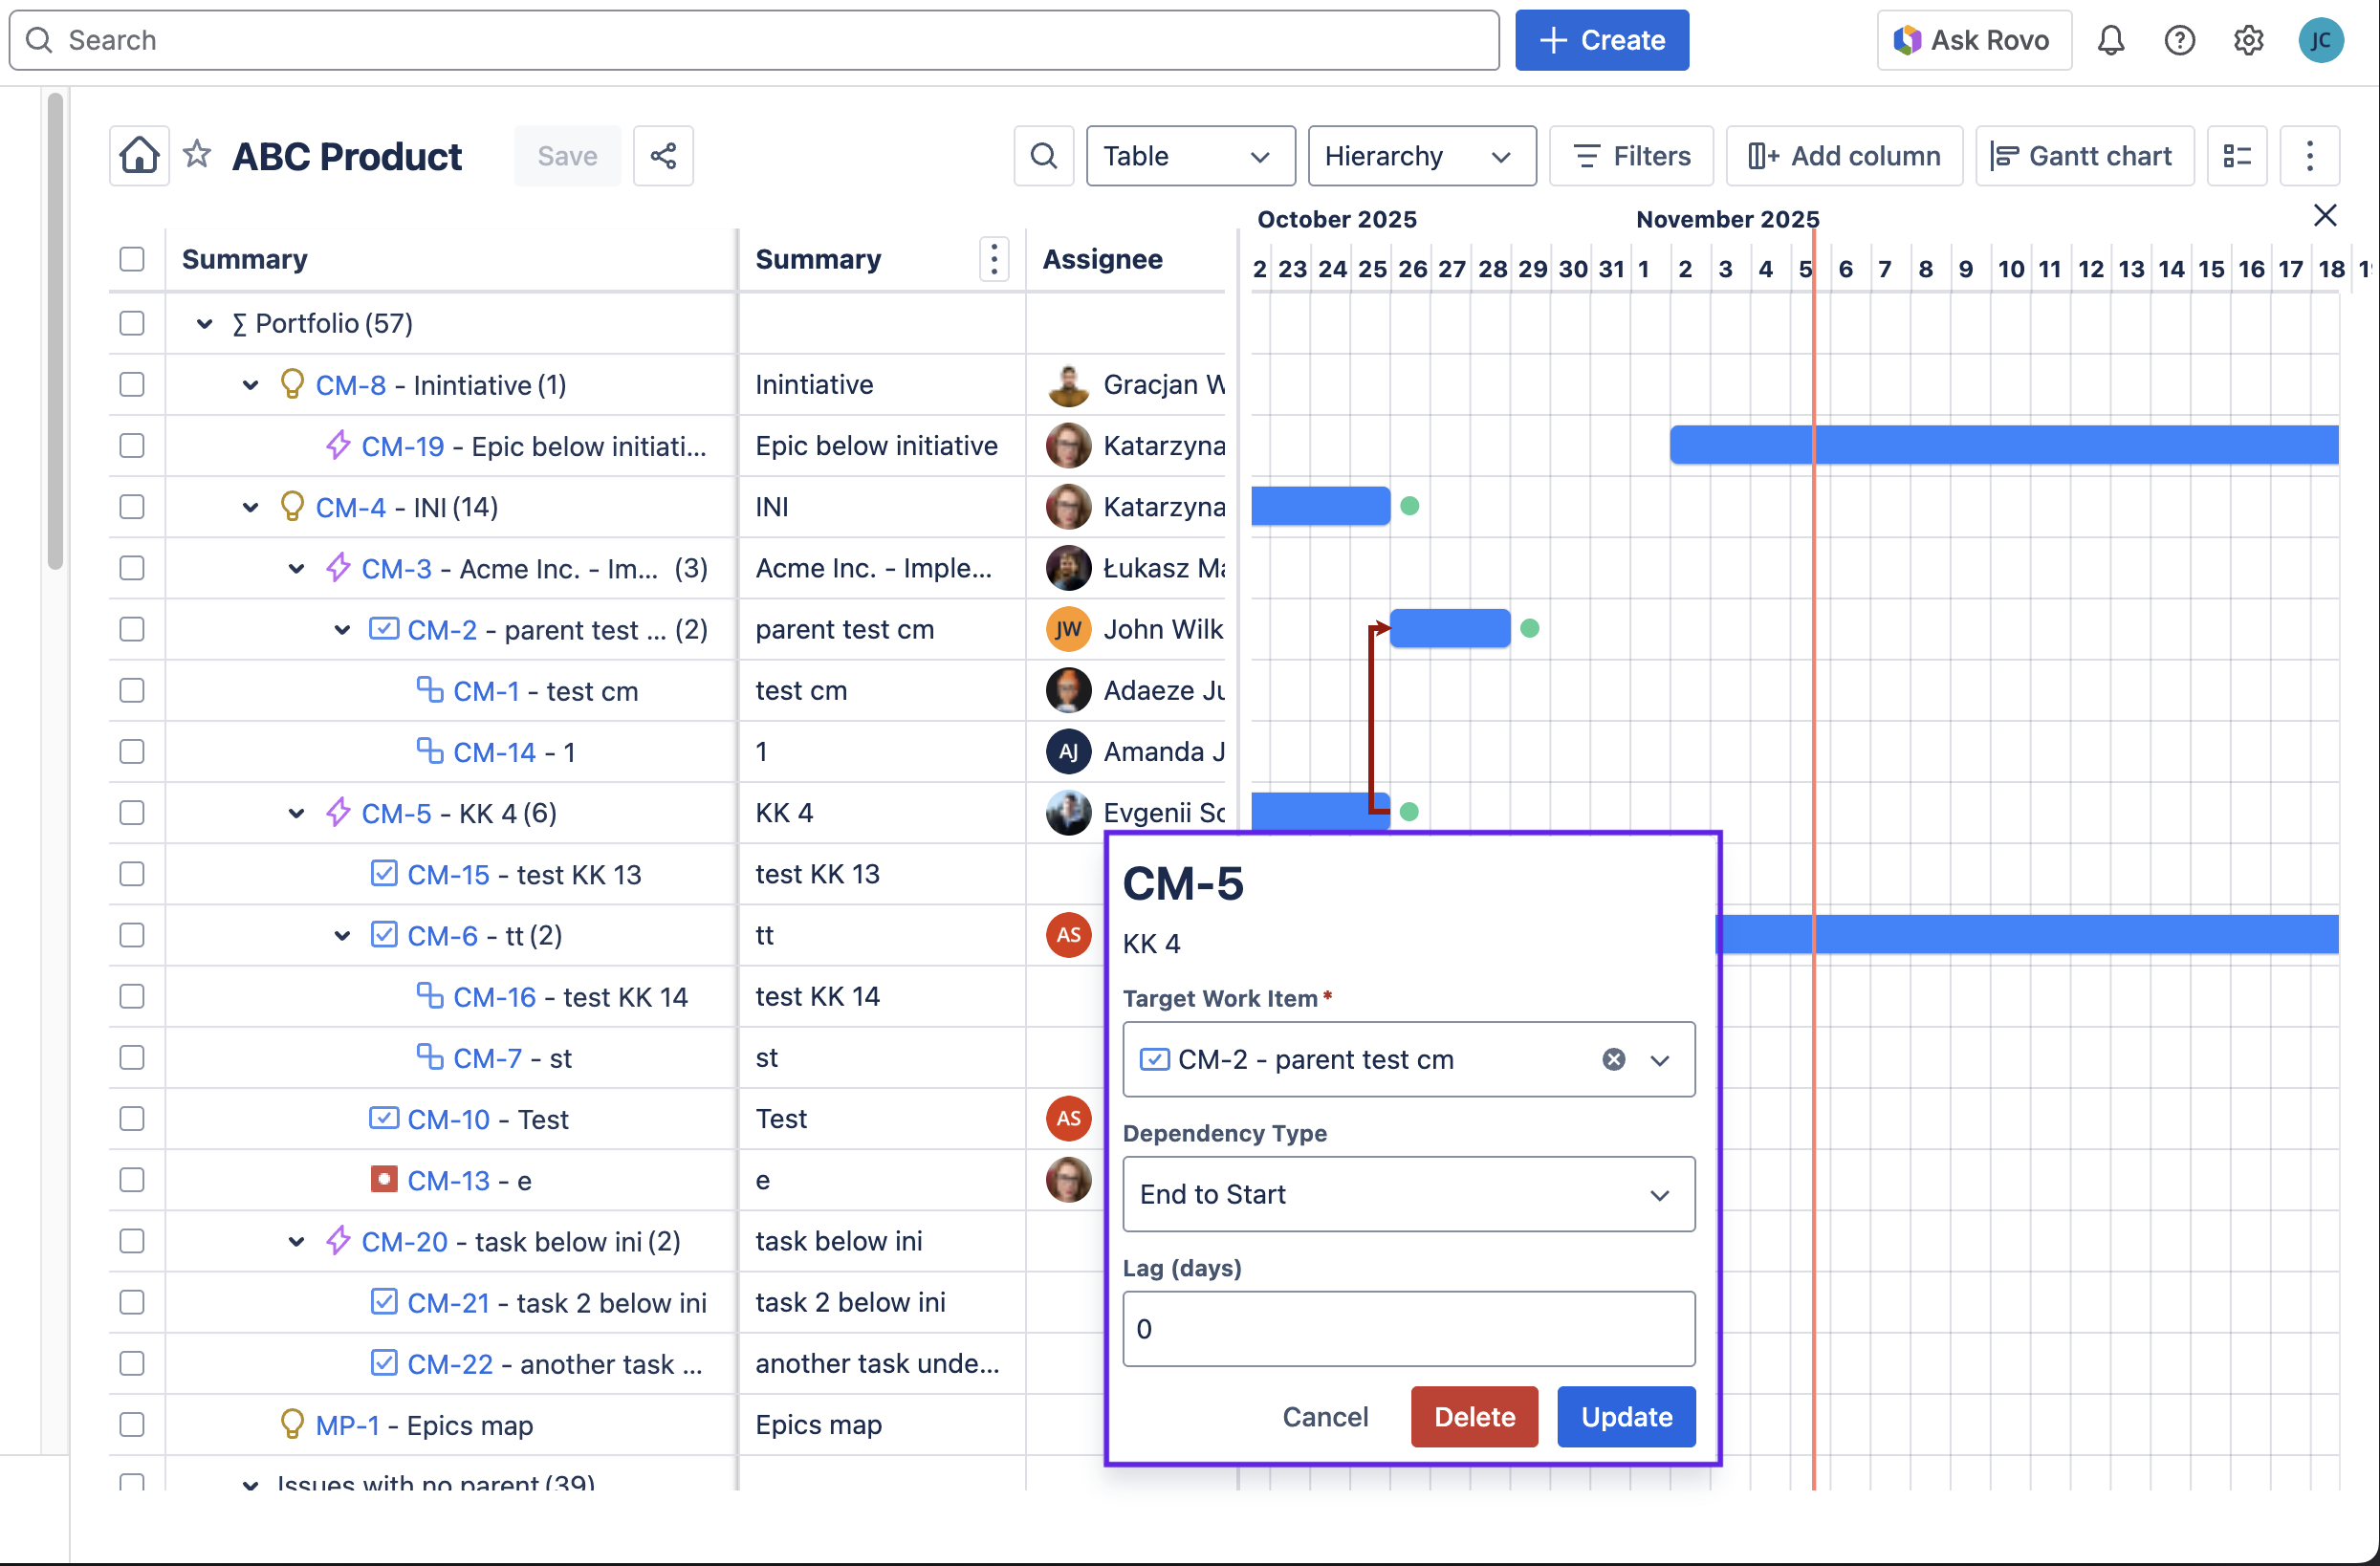
Delete a Dependency from the Gantt Chart advanced edition
To delete an existing dependency:
-
Enable the Gantt chart view.
-
Click onto the red arrow representing the dependency you want to edit.
-
The dialog box will open. Click Delete.
-
Click Delete again to confirm the action.