Employee onboarding is always a stressful process. The hiring manager wants to get the employee working as soon as possible. HR doesn’t want anything to happen until all of the legal the paperwork is complete; and the employee just wants to have the space and tools they need to start their new job.
You can use checklists (and a few other modifications) to add functionality to the Employee Onboarding Jira Business space template. Note that since employee onboarding requires a cross-functional team, this use case assumes that HR owns the space, and that members of the Facilities and IT teams can access the space.
Here’s what you’ll need:
-
Space type: Jira Business Space
-
Apps: Checklists for Jira Enterprise
-
Workflow & work item Type: HR Onboarding Space Template
-
Set-up Tasks:
-
HR Onboarding Global Checklist
-
Workflow Modifications
-
Checklist Templates
-
Automation Rules
-
Employee Onboarding Space Template
The Onboarding space template creates an Employee work item type and a five step workflow.
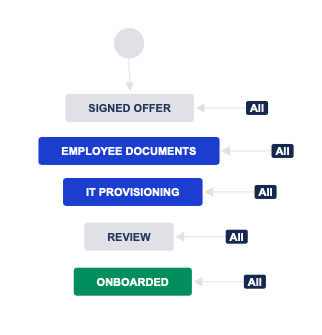
Unless your company is fully remote, there’s probably some facilities provisioning that needs to be done too. After all, the new employee will likely need a desk, keys to the office, access to parking, etc. Since Facilities and IT can both be working on their tasks at the same time, and we’ll be using checklists to track exactly what has and hasn’t been done, you don’t need to create a separate statuses for each.
Also note that the default workflow uses global transitions - meaning there is no imposed order on how an work item moves through the workflow. That’s not good practice. Do you really want to give someone access to your IT systems before they’ve signed the an NDA? And what’s the point of having a REVIEW status if it can be bypassed? A modified workflow might look like this:
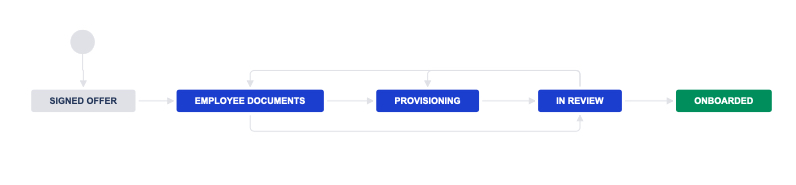
The modified workflow forces the work item to progress through the statuses in the correct order, ensures that the work item must be reviewed before it can be closed, and accommodates that fact that sometimes reviews fail and work needs to be repeated.
Set-up
There are a few more pieces we can put in place in order to optimize the space:
Workflow Restrict Transition Rule (Condition)
The modified workflow ensures that an work item must be reviewed before it can be closed, but doesn’t specify who does the review. To ensure that the work item isn’t closed without HR signing off, use the Restrict who can move an issue rule (User is in group workflow condition) to limit the users who can transition the work item from IN REVIEW to ONBOARDED to members of the HR group.
Checklists for Multiple Teams
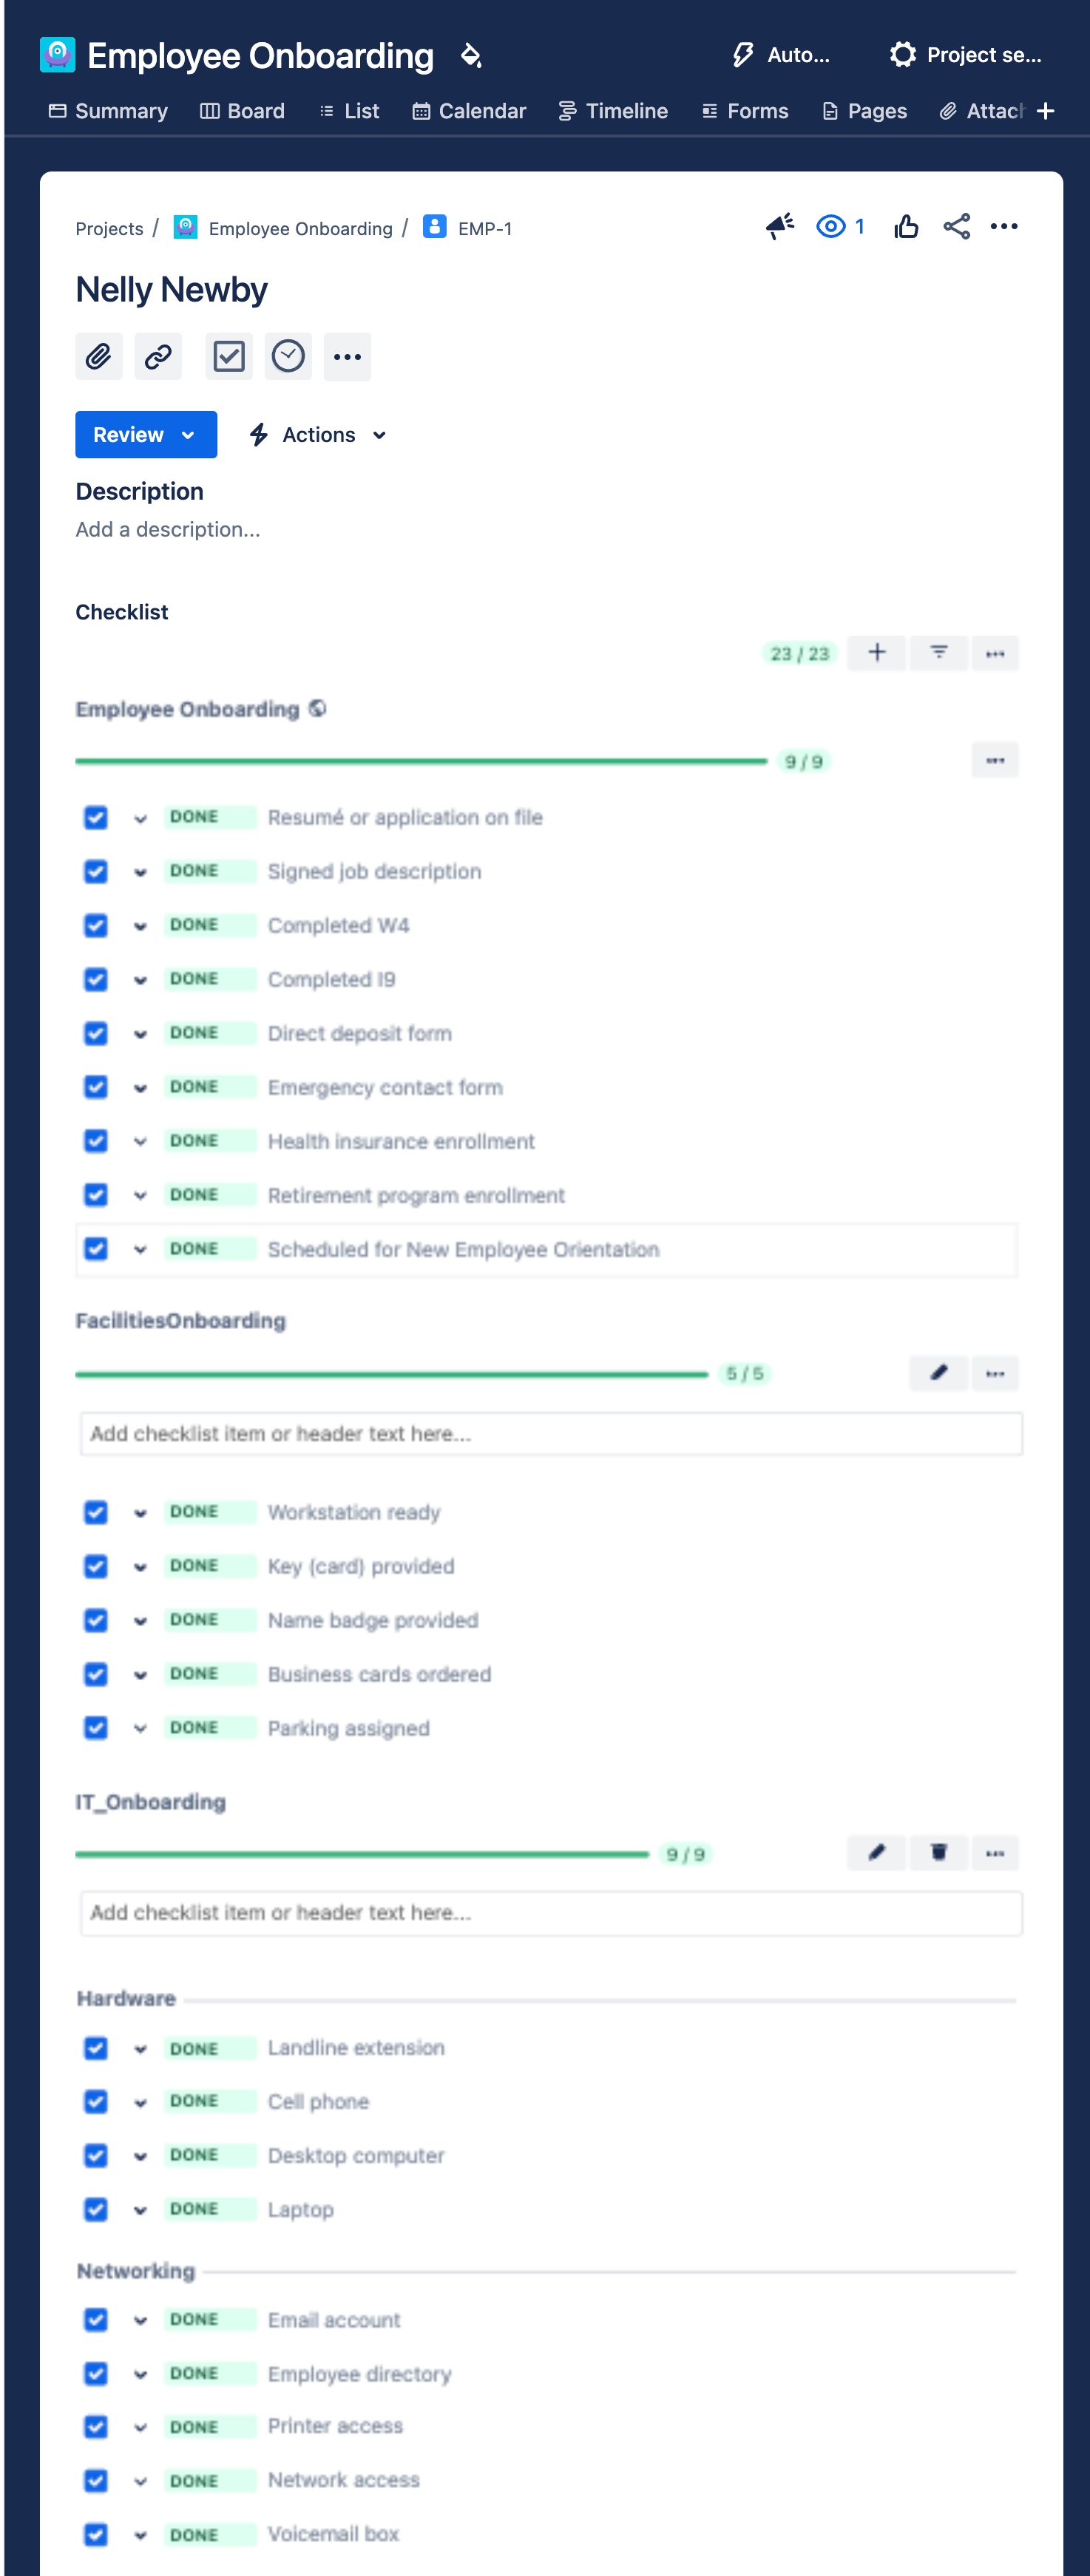
Checklists are essential in employee onboarding. HR, IT and Facilities each have multiple tasks as part of the process and checklists are a great way to ensure nothing gets missed. However, the HR checklist is distinctive from the IT and Facilities lists. The IT and Facilities tasks will vary depending on the needs, location, etc. of each new employee. However, HR is taking their direction from employment law. To be absolutely sure that all required steps are completed, use a Global checklist for the HR tasks.
Creating the Employee Onboarding Global Checklist
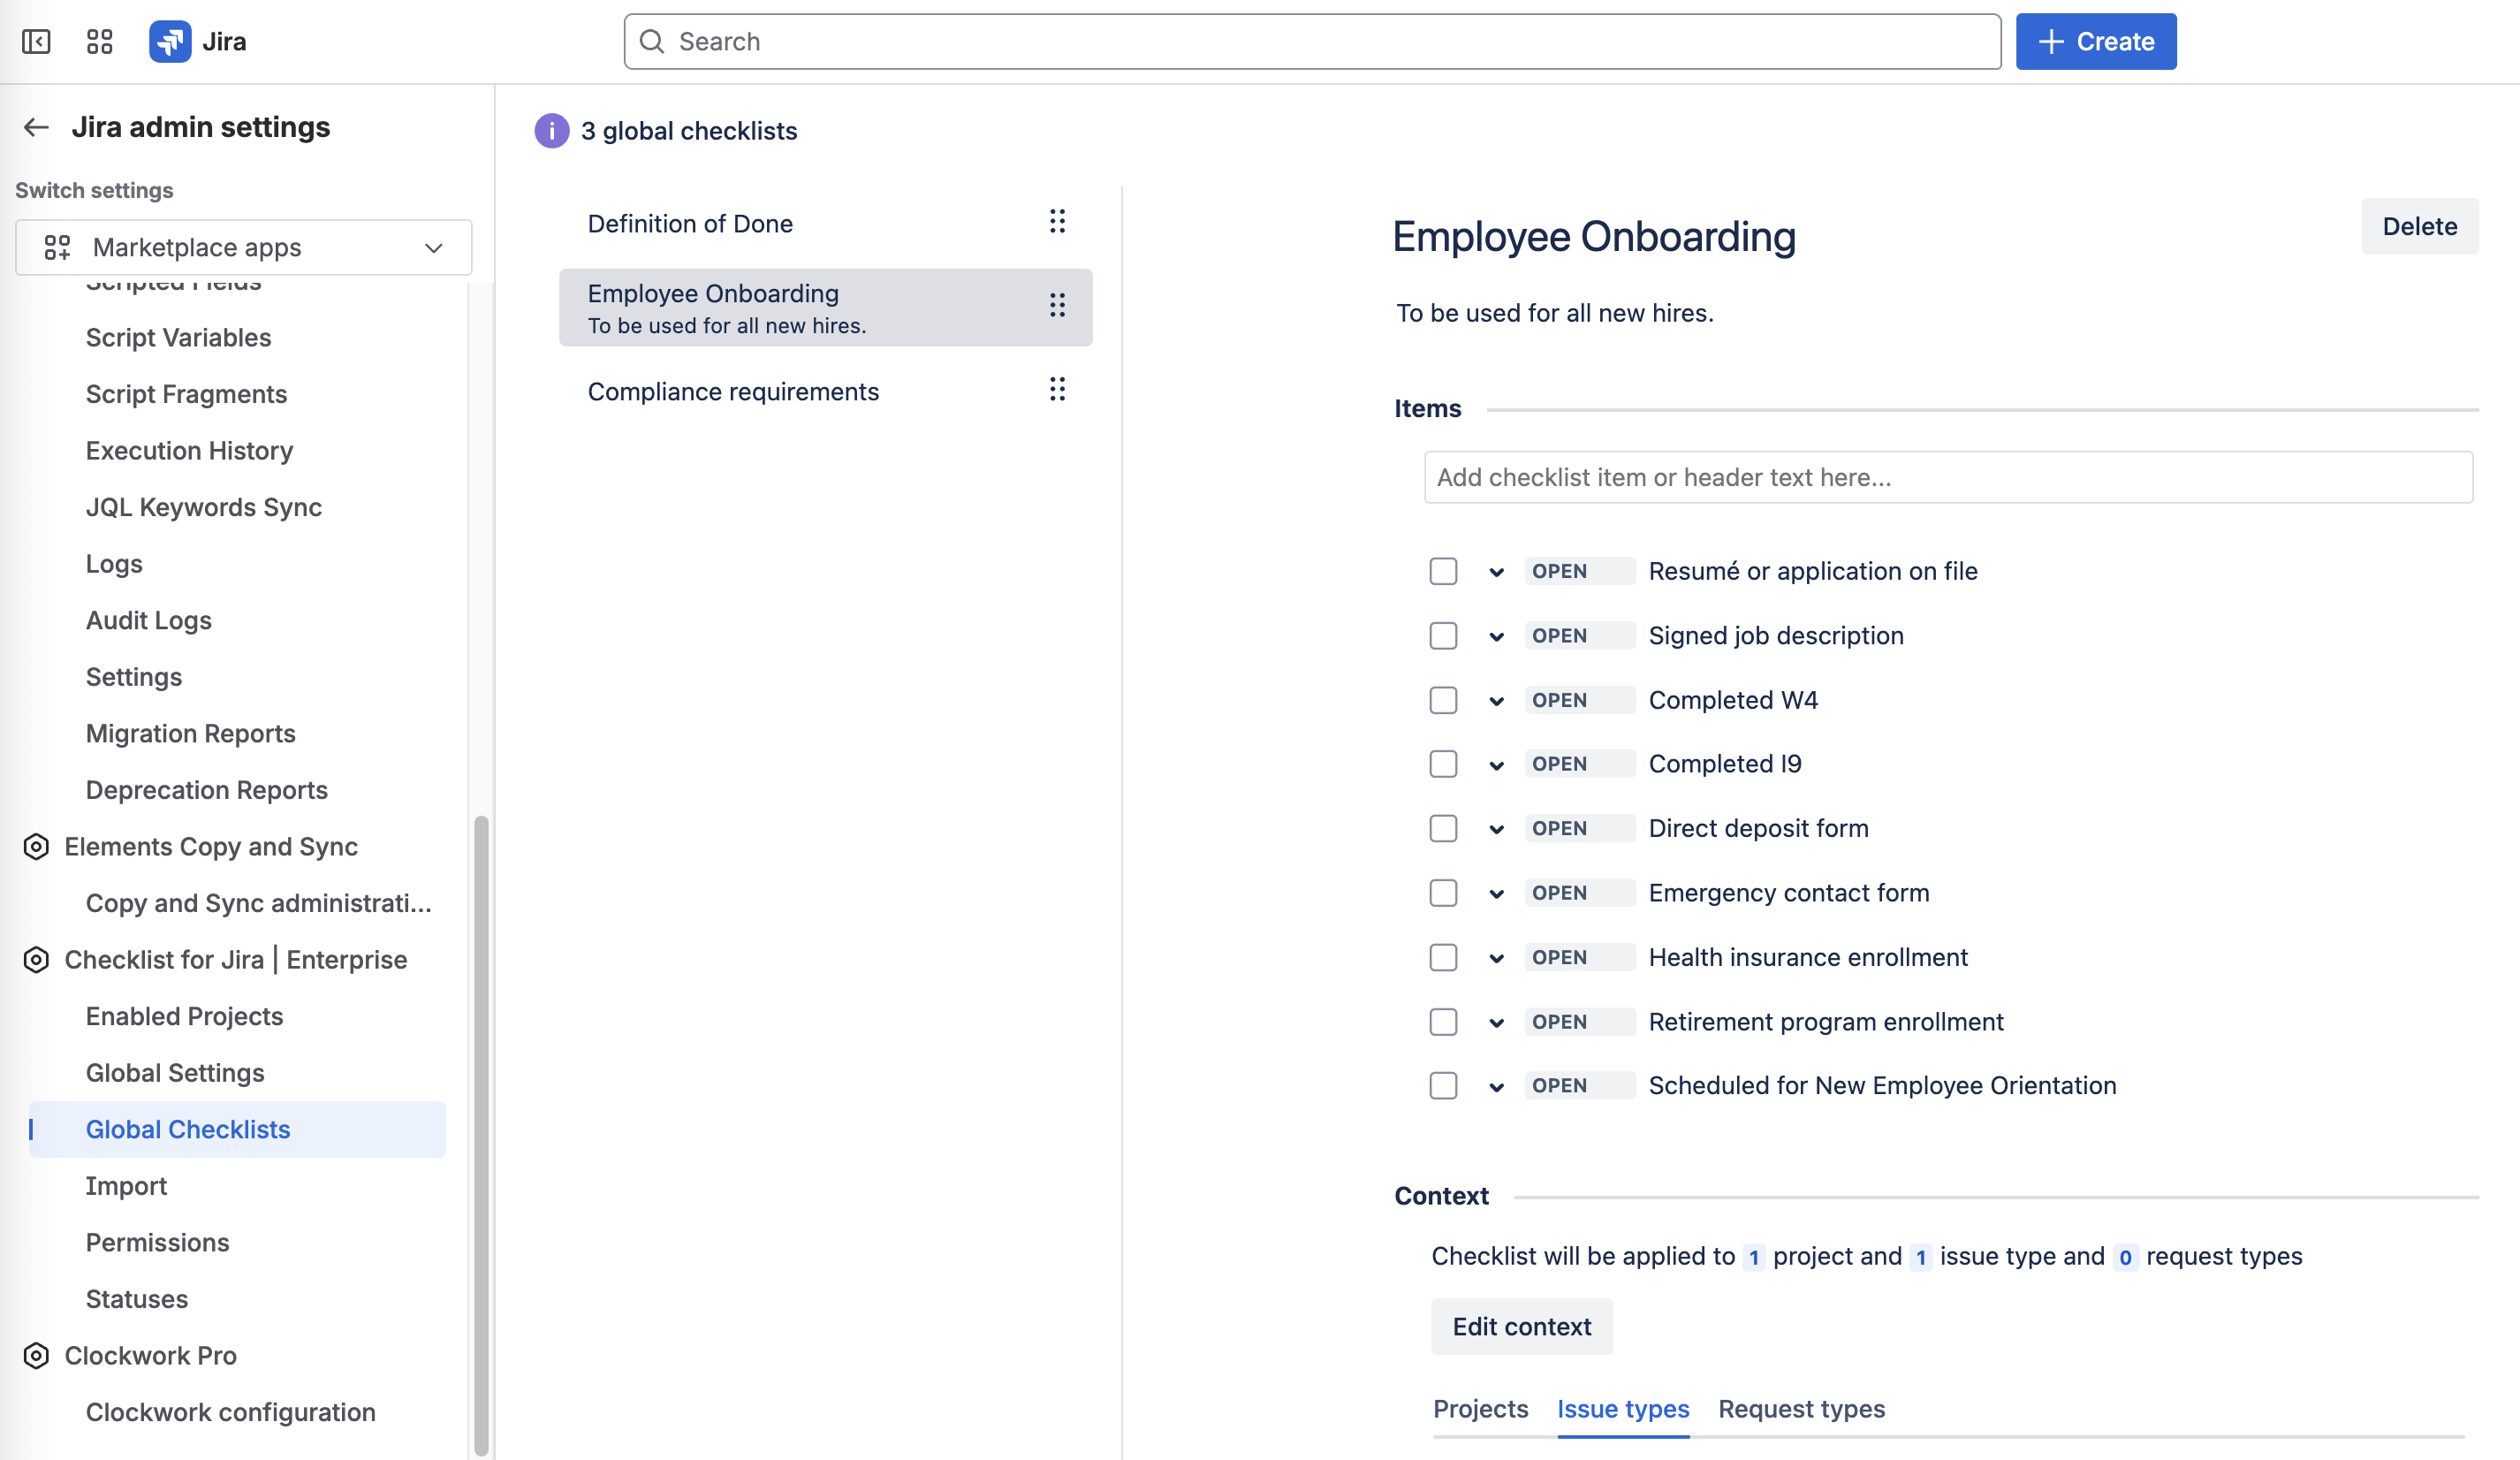
Navigate to Jira settings > Marketplace apps and select Global Checklists under the Checklists for Jira Enterprise heading. Add a new Global checklist with the required HR items. Then click on Edit context to add the list to your onboarding space. This will mean that:
-
The checklist will be automatically applied to all work items meeting the context (the Onboarding space and the Employee work item type)
-
Only Jira Administrators will be able to make changes to the checklist (users can toggle checklist items, but cannot add, edit or delete items)
-
If requirements change, any changes made to the checklist will be automatically applied to all open work items in the space.
Creating Checklist Templates for IT and Facilities Tasks
Now that the HR piece is in place, create Checklist Templates for the IT and Facilities tasks. As with Global Checklists, Checklist Templates can be automatically added to Jira work items. However, the items on Checklist Templates can be added to, edited or deleted by Jira users allowing them to customize the checklist to fit the needs of the new employee being onboarded.
To create a Checklist Template, click on the More menu in the upper nav bar and select Checklist from the list to get to the Templates page. Click Create template. Name the template (without spaces), and add your checklist items.
IT
Hardware
- Landline extension
- Cell phone
- Desktop computer
- Laptop
Networking
- Email account
- Employee directory
- Printer access
- Network access
- Voicemail box
Facilities
- Workstation ready
- Key (card) provided
- Name badge provided
- Business cards ordered
- Parking assigned
Tip: You can also create additional checklists that track the on/offboarding tasks for specific teams. See the example here.
Add Automation
Apply the Checklist Templates
The HR checklist will be automatically added to work items via the Global checklist context. You can create a Jira automation rule to add the IT and Facilities checklists when the work item reaches the PROVISIONING status:
-
Navigate to Jira settings > Marketplace apps and select Global Settings under the Checklists for Jira Enterprise heading. Ensure that both the Allow multiple checklists per work item setting and the Apply checklist templates via labels setting are enabled.
-
Create a new automation rule
-
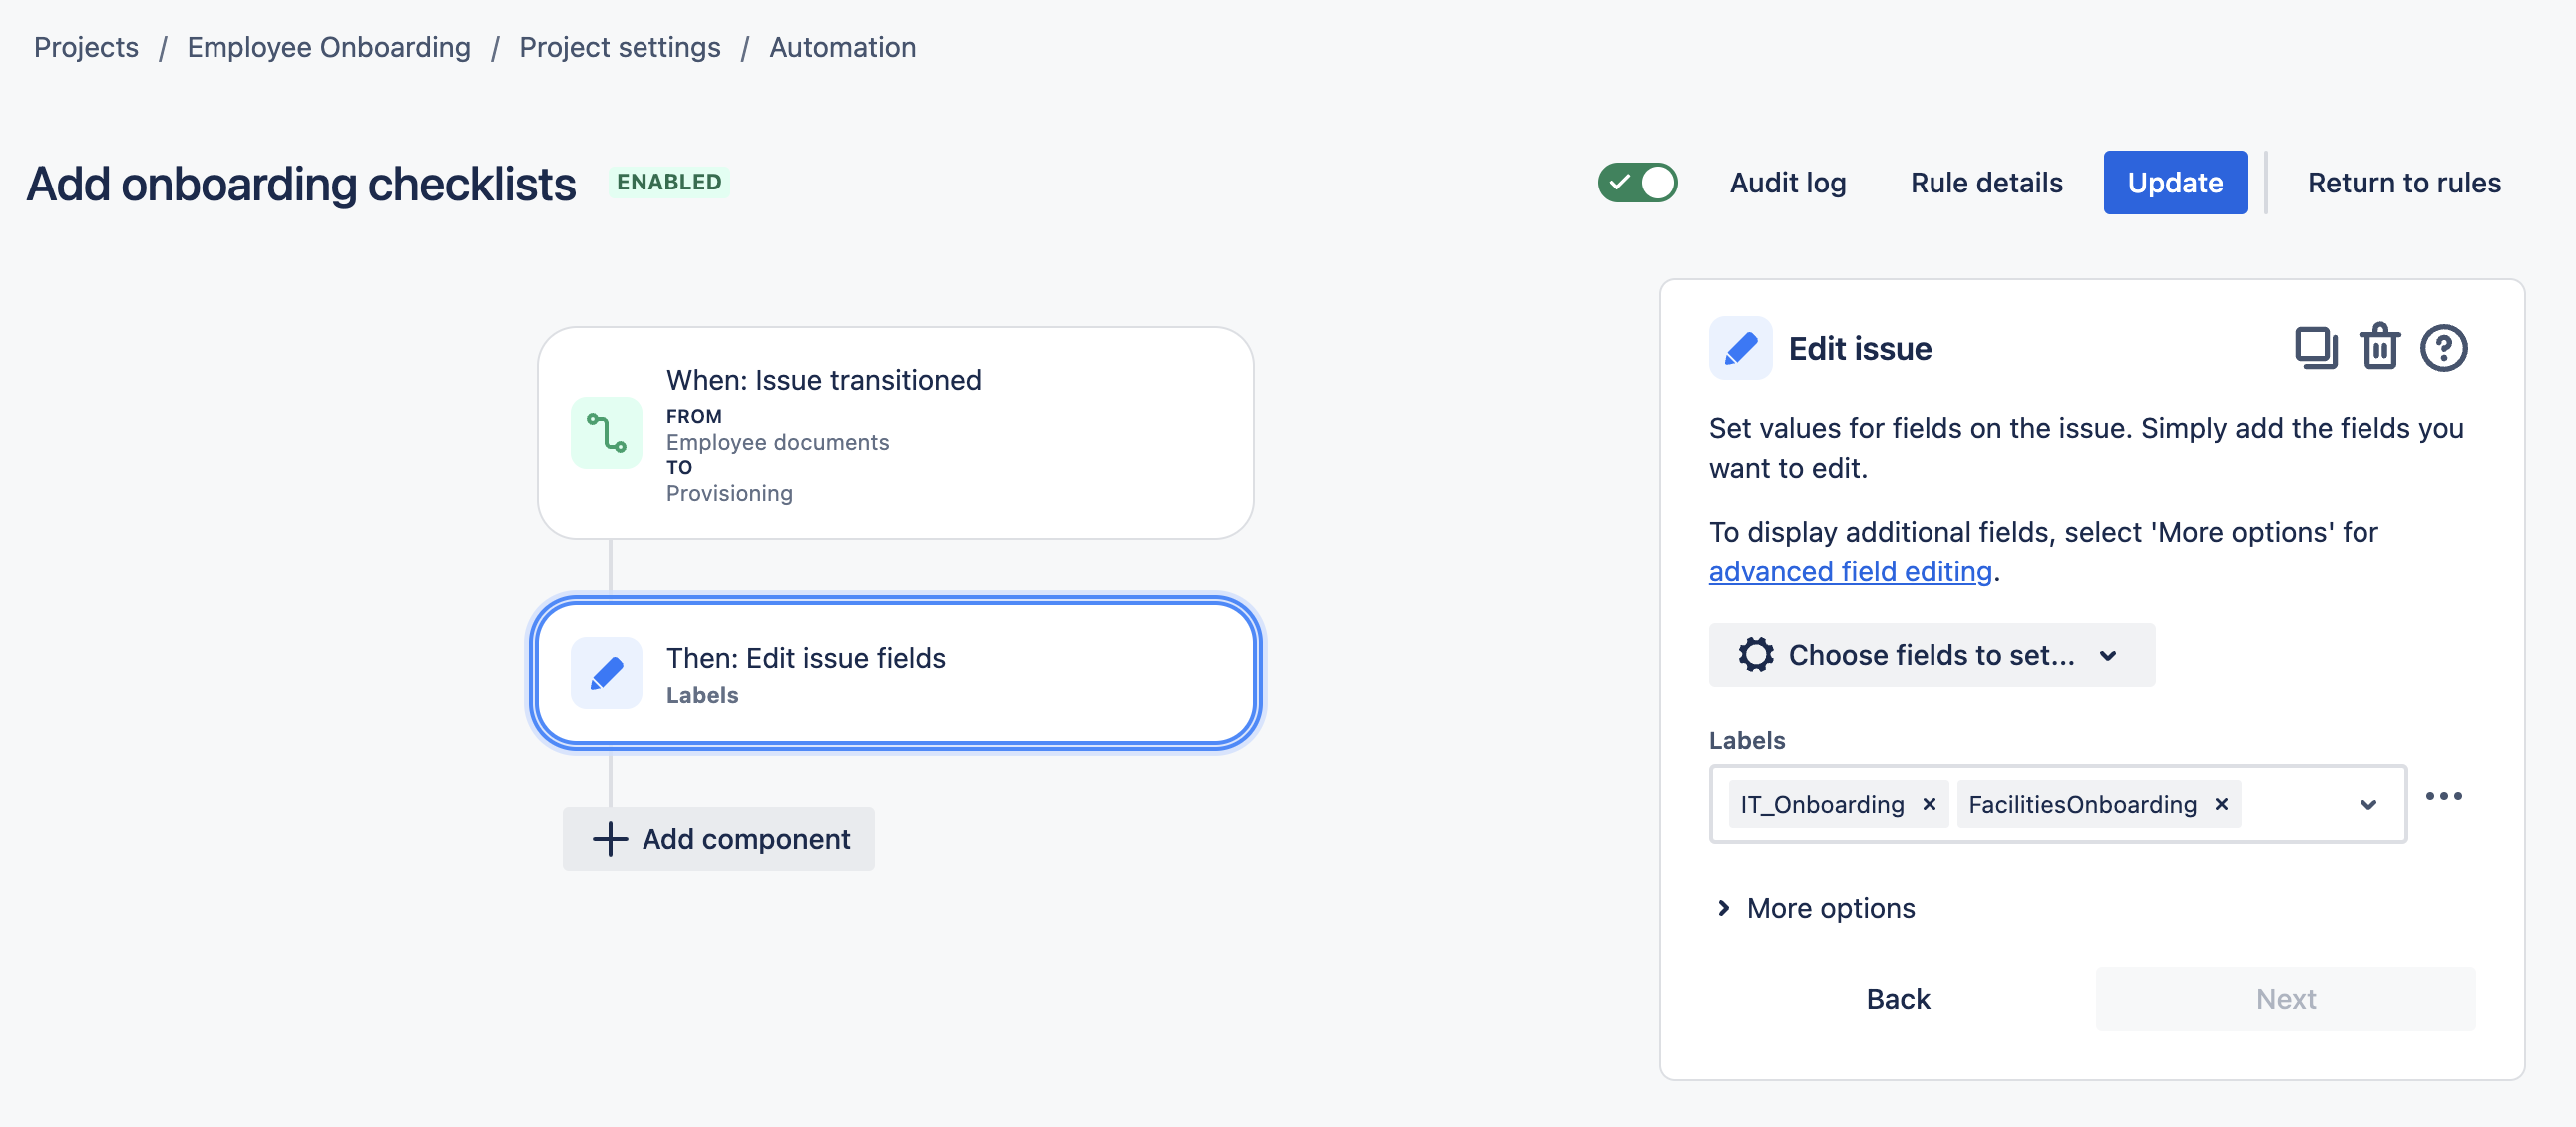
Trigger: When work item transitioned from EMPLOYEE DOCUMENTS to PROVISIONING.
-
Action: Edit work item. Select Labels as the field to be edited and type in the name of the Checklist templates.
-
-
You may want to consider adding an action to notify the appropriate members of the Facilities and IT teams.
Transition the work item to IN REVIEW when Checklists are Complete
The IT and Facilities Teams will customize the applied templates to meet the needs of the particular employee. They will then get to work completing the items on the list. This rule will transition the work item to the IN REVIEW status, when their tasks have been completed.
-
Create a new automation rule
-
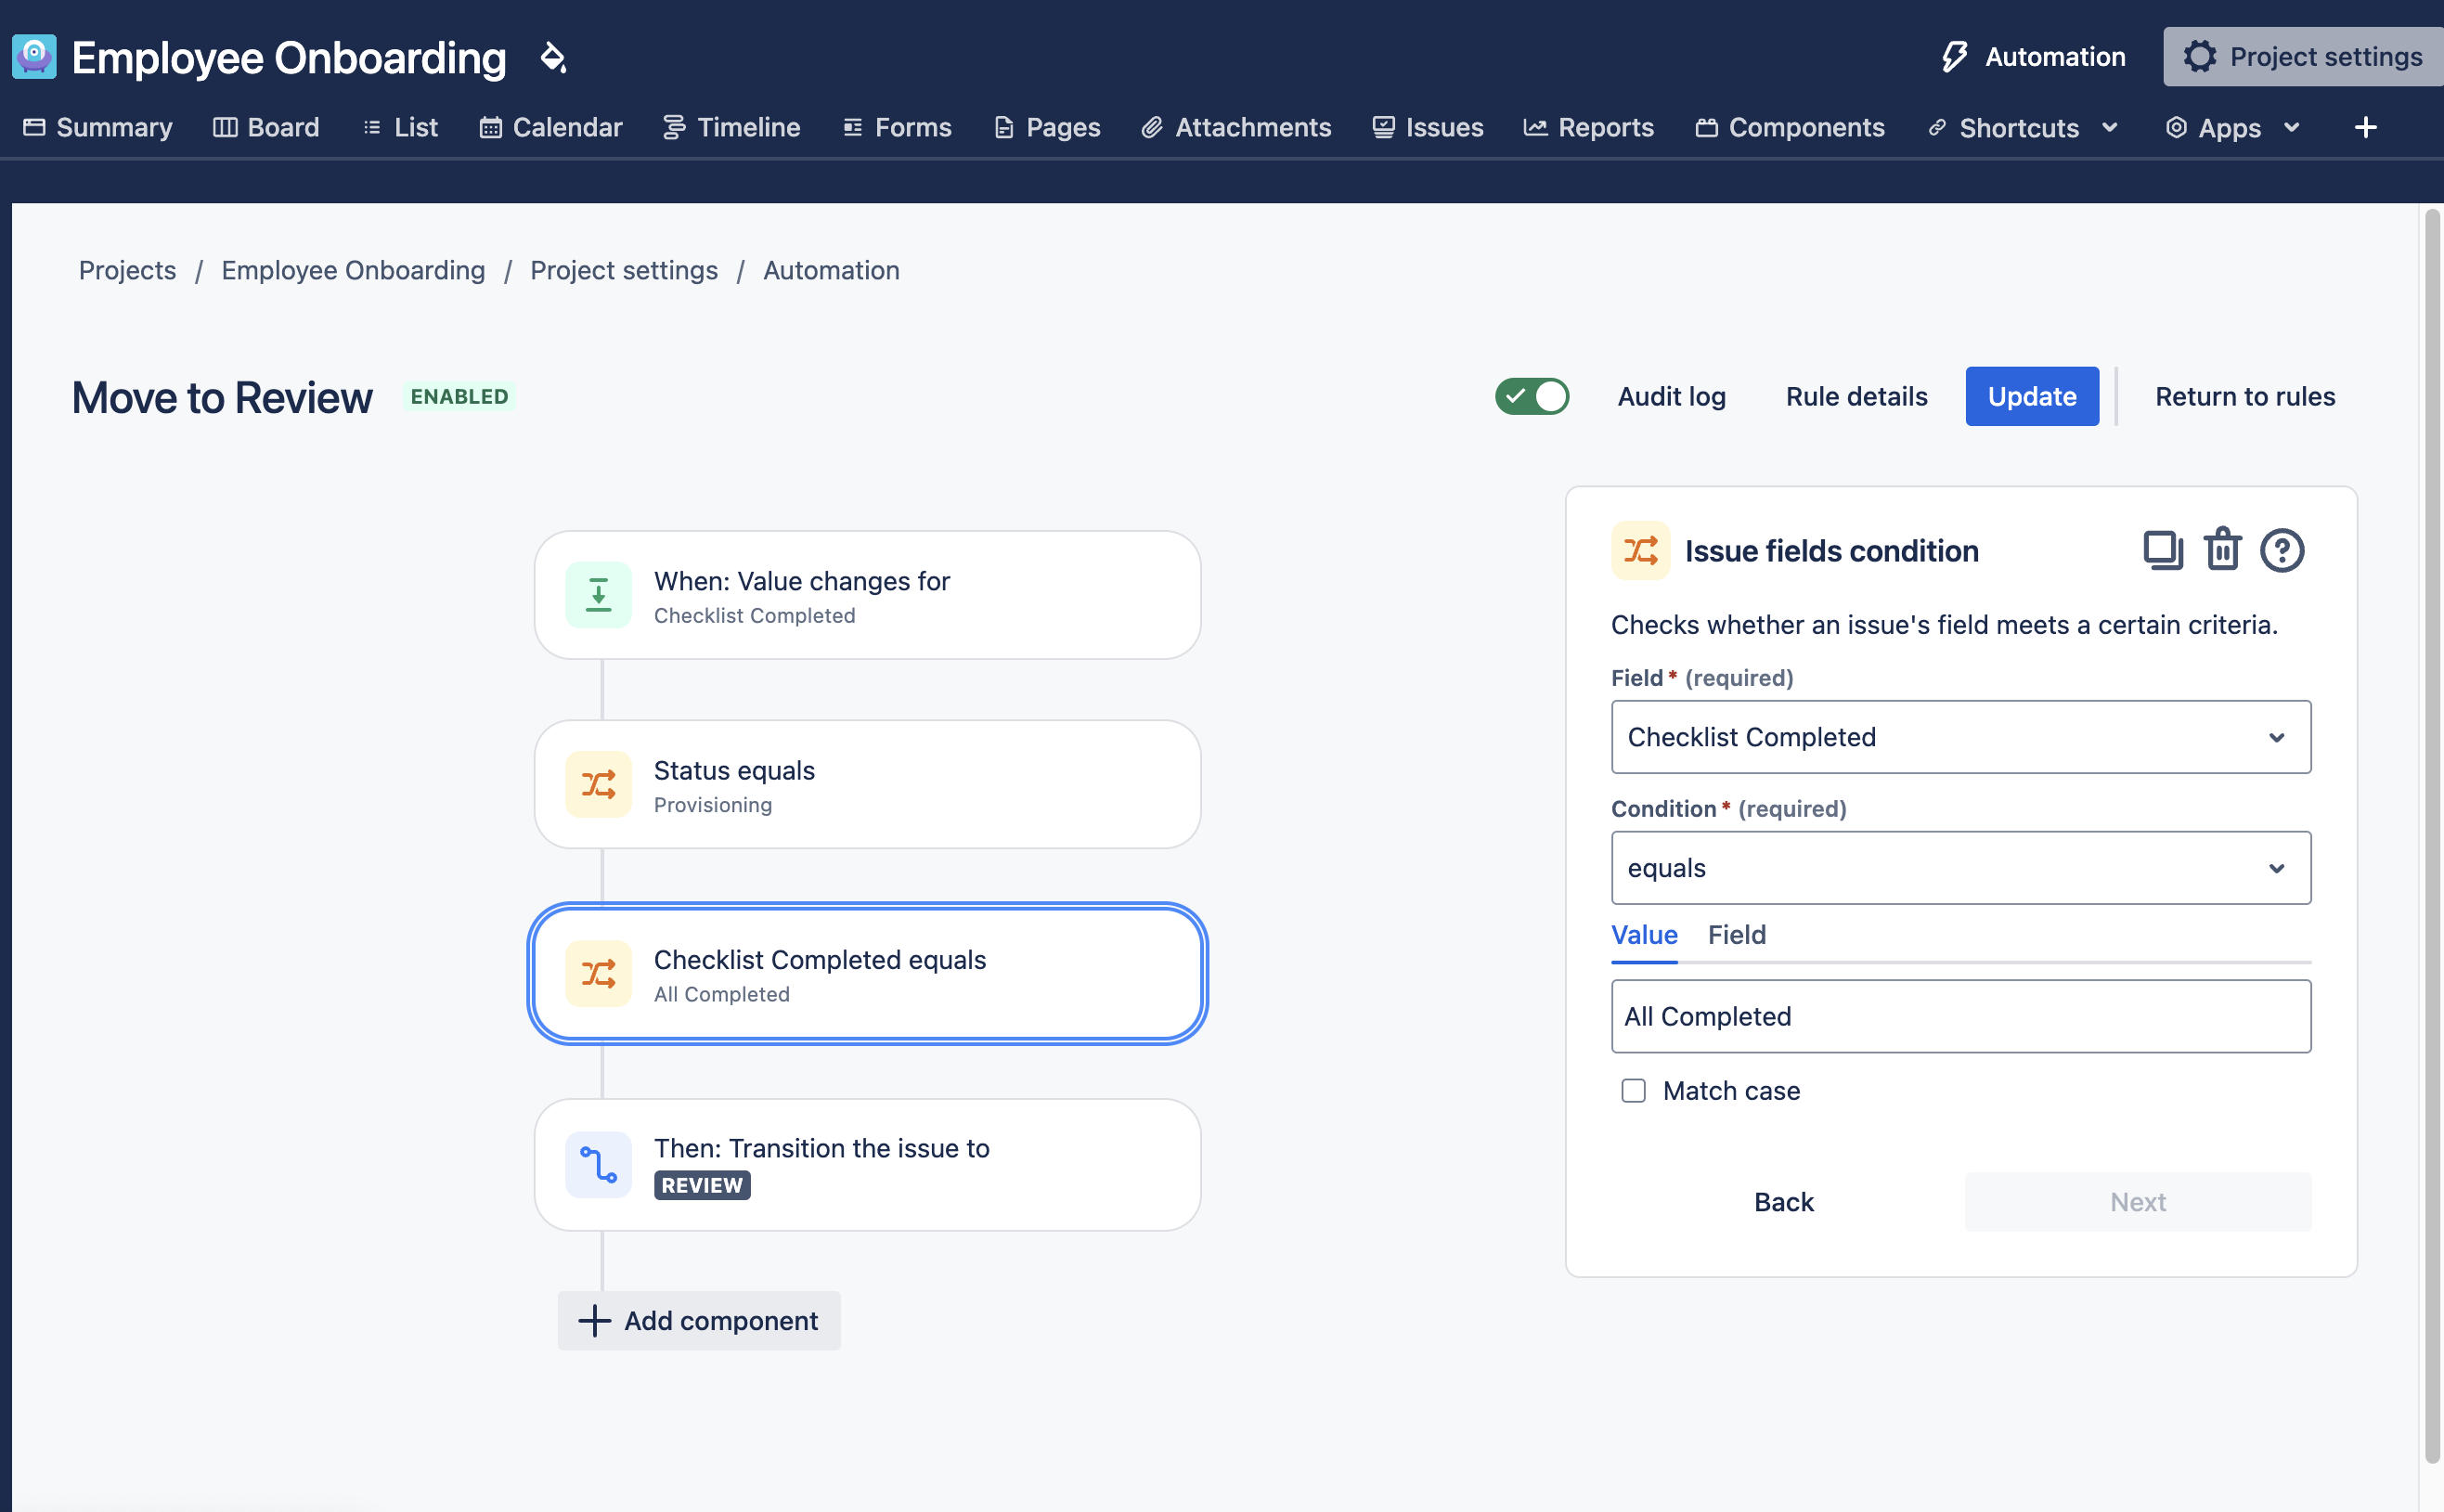
Trigger: Field value changed- Select Checklist Completed as the field to be monitored and Edit as the action.
-
Condition: work item fields condition - Status equals PROVISIONING
-
Condition: work item fields condition - Checklist Completed = All Completed
-
Action: Transition work item to the REVIEW status.
-
-
You may want to consider adding an action to notify the appropriate members of the HR team.
Jira Work Item Life Cycle
-
The hiring manager creates a work item to let HR know they have a new employee ready to be onboarded.
-
The checklist of HR tasks is automatically added to the work item. The HR team transitions the work item to EMPLOYEE DOCUMENTS and begins work on the paperwork.
-
Upon completing the HR documents, the work item is transitioned to provisioning . The Facilities and IT Checklists are automatically added, and the appropriate teams get to work.
-
When the all of the checklist items have been completed, the work item is automatically transitioned to IN REVIEW .
-
HR reviews the work item to ensure that all of the onboarding requirements have been completed, then transitions the work item to ONBOARDED .