
Migrating from On-prem to Checklist for Jira Enterprise
There are two options for migrating from Checklists for Jira Data Center to Checklists for Jira Enterprise (cloud):
Jira Cloud Migration Assistant (JCMA) RECOMMEND
Direct import (if your Jira work items have already been migrated to the new Cloud instance)
Due to differences between Jira Data Center and Jira Cloud, the checklist apps offer similar functionality but may achieve that functionality in different ways. Comparable features are available, but there is not 100% feature parity.
Jira Cloud Migration Assistant (JCMA)
If you stop and then restart a migration with the JCMA, previously imported data will be overwritten by the new import.
How to Prepare for Migration
You may want to make an inventory of elements that are not preserved in the migration in order to restore them once the migration is complete:
Checklist item assignees – Jira Cloud creates different user IDs than Jira Data Center. Once the migration is complete, you will need to re-assign checklist items.
Checklist item due dates – Similarly, due dates on checklist items are not migrated and will need to be manually restored post migration.
Checklist template items – Templates from your Data Center instance will not be imported, however the items on those will be imported as local checklist items on you Jira work items.
Checklist templates – You can create Templates in Checklists for Jira Cloud, but the existing templates from your Data Center instance will not be imported. You may want make a list of existing templates so you recreate them in the cloud instance once the migration is complete.
Archived items – if the instance has archived projects or work items, note that they are bypassed by the migration process. If you want to migrate those items as well, you can unarchive them temporarily in the source instance and then archive them again after the migration.
In the (Source) Data Center Instance
Ensure that you are using Checklists for Jira Data Center version 7.0.6 or later.
Install the Jira Cloud Migration Assistant app.
Navigate to admin.atlassian.com. Select the appropriate Organization. Click on the … menu to the right of the appropriate App and select Manage app. Click on Connected apps from the left nav bar. Scroll to the Checklists for Jira click View app details. Confirm that the version is
7.0.6or later and that the app key iscom.okapya.jira.checklist.
In the (Destination) Cloud Instance
Install the Checklist for Jira Enterprise app.
Navigate to admin.atlassian.com. Select the appropriate Organization. Click on the … menu to the right of the appropriate App and select Manage app. Click on Connected apps from the left nav bar. Scroll to the Checklists for Jira click View app details. Confirm that the version is
2.0.0a or later and the app key iscom.okapya.jira.checklist.Verify that the projects you will be migrating do not already exist in the Cloud instance.
Executing the Migration
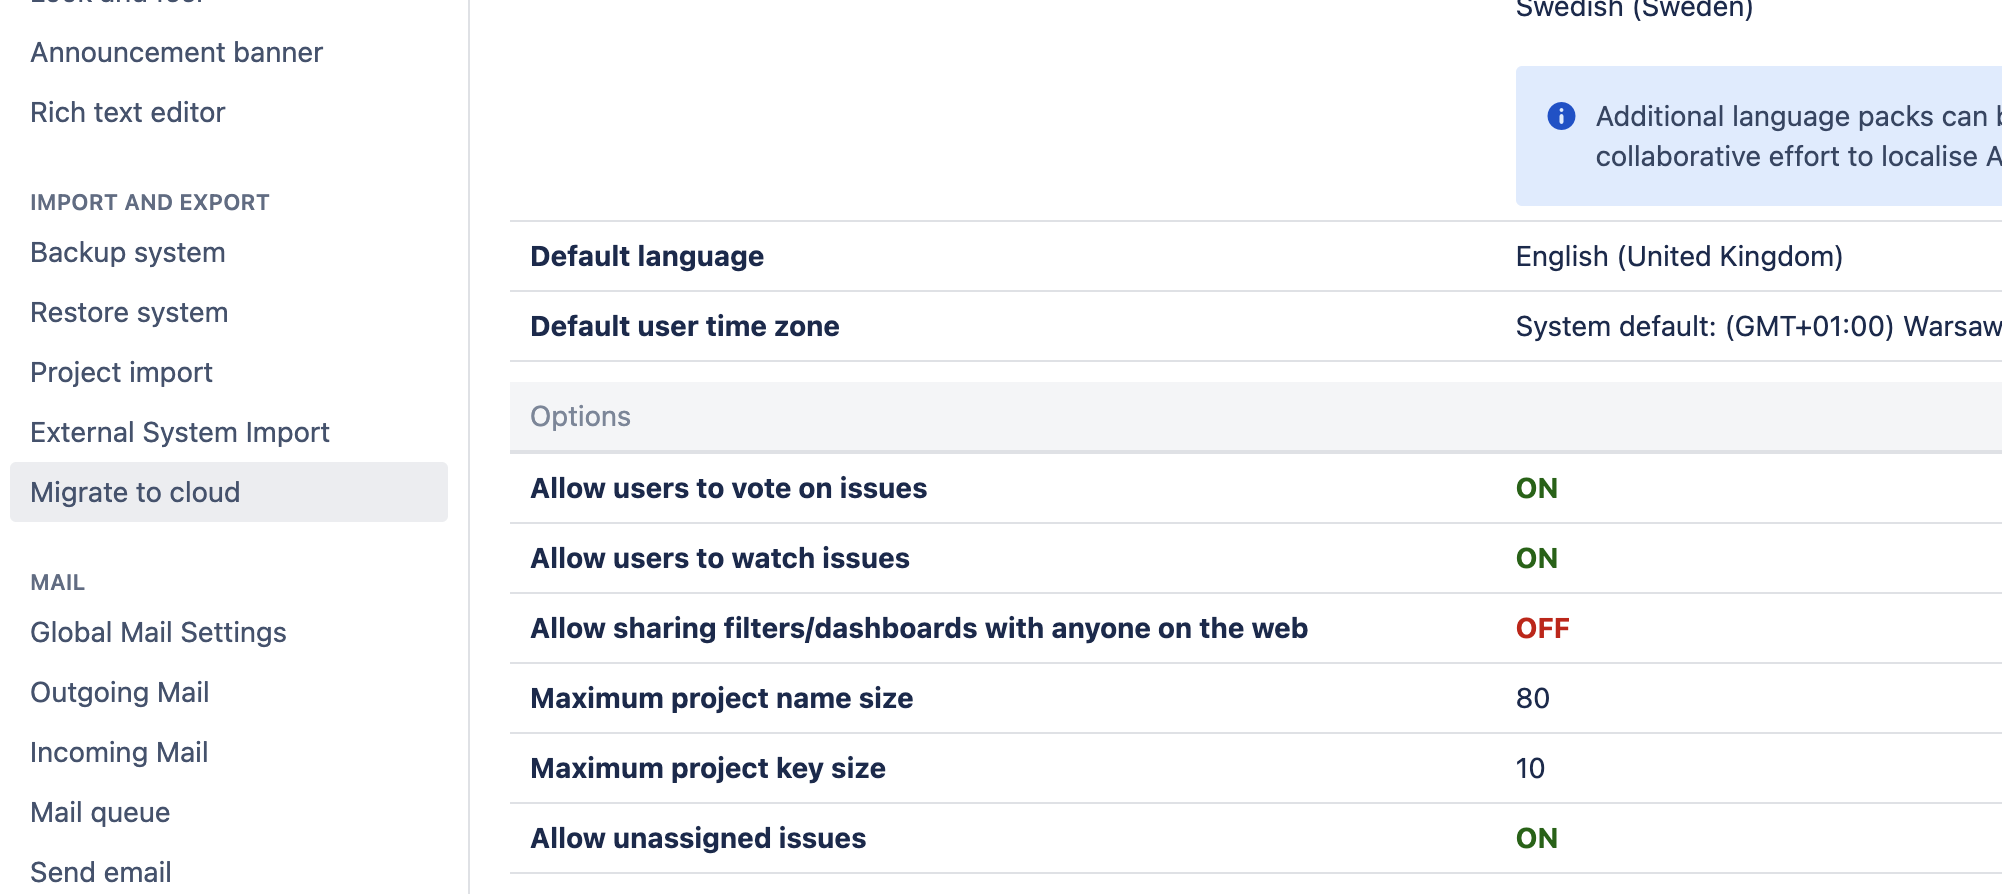
In the source instance, navigate to System and select Migrate to cloud from the left nav bar.
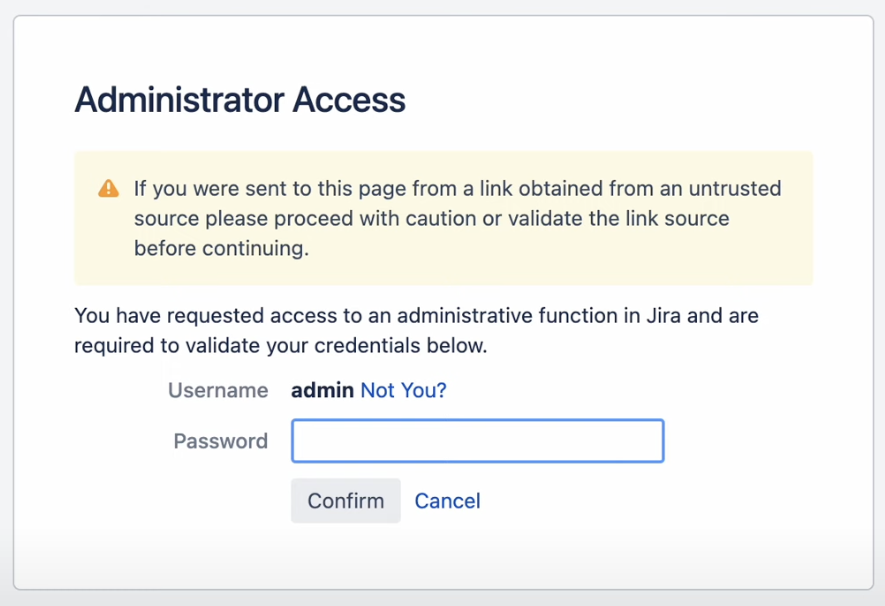
Enter your Administrator password when prompted.
On the Connect to Cloud page, use the dropdown to select the destination cloud instance. If the dropdown is empty or the target instance is not shown, click Choose cloud site. You will be given the option to attach an existing cloud instance or create a new cloud instance.
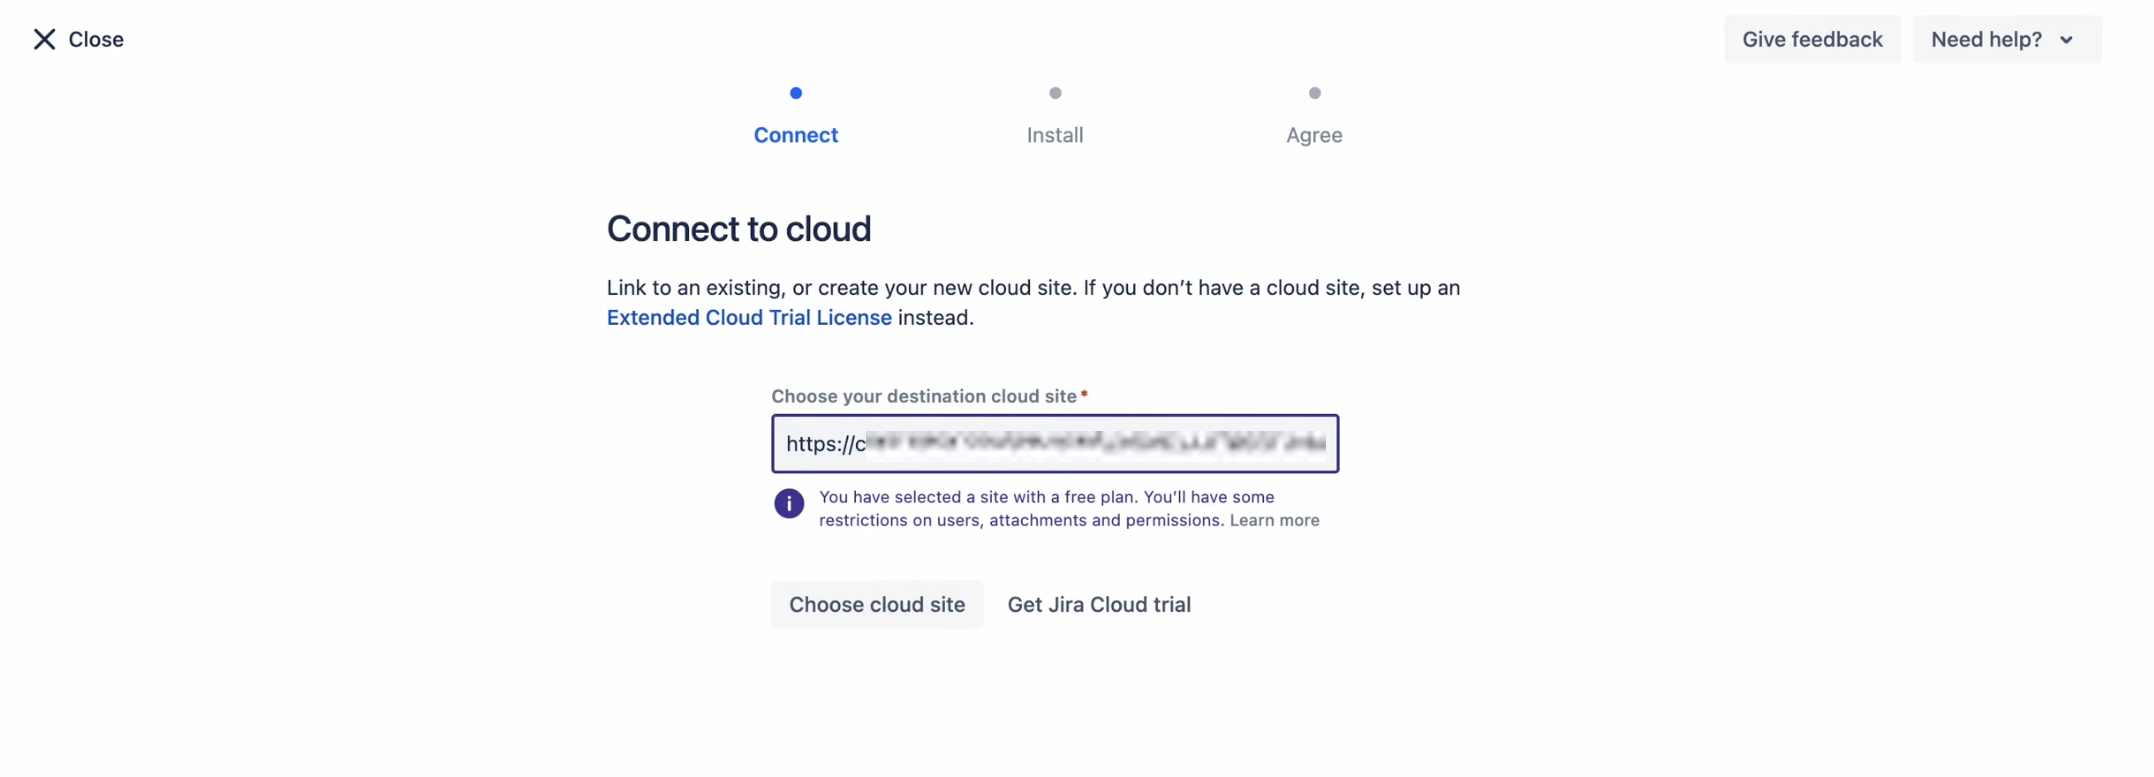
Click Continue.
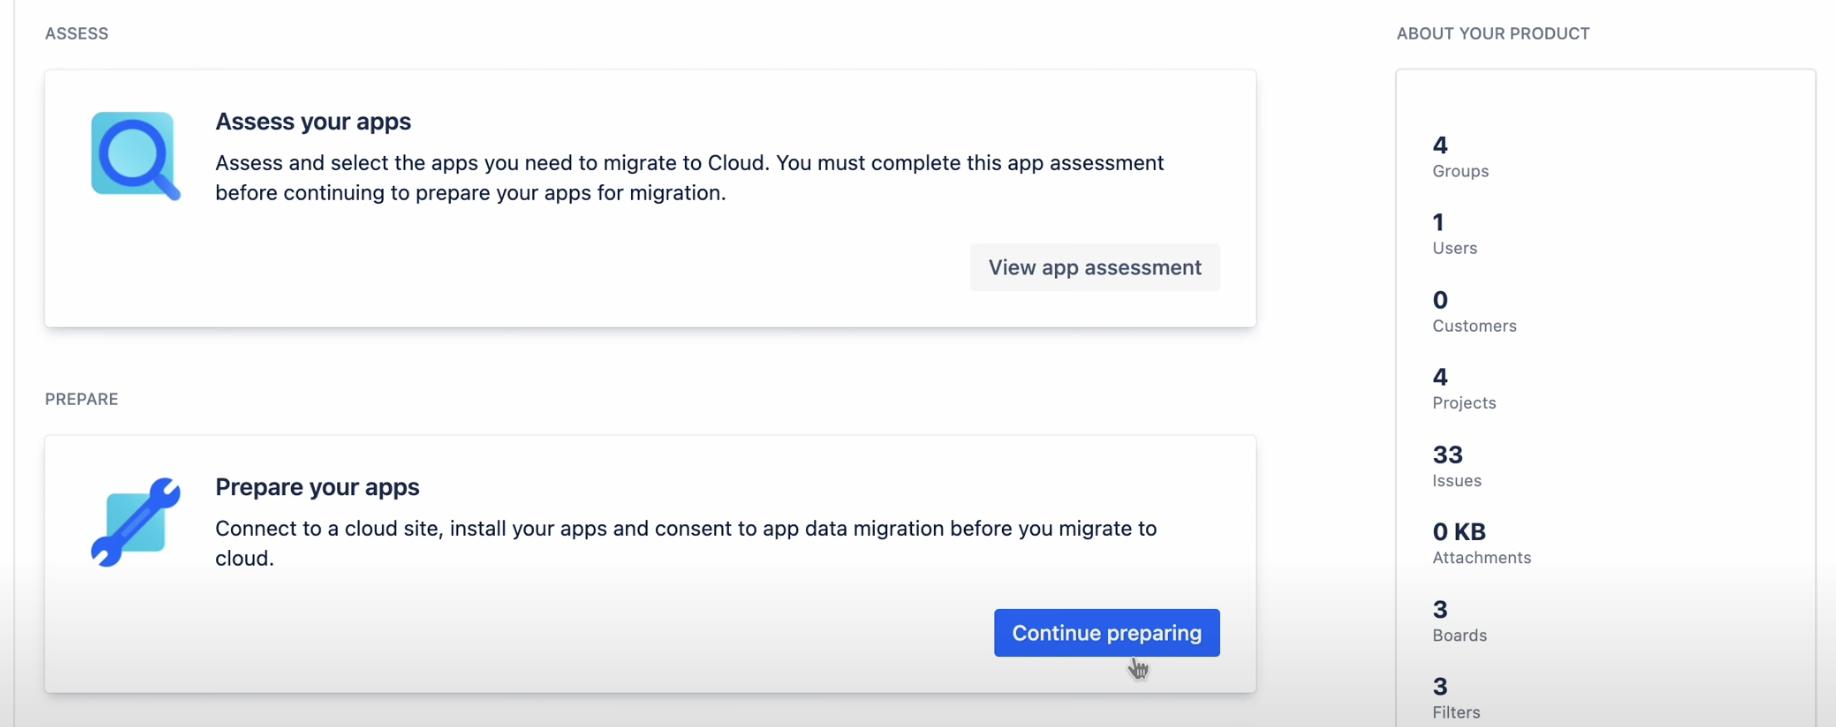
The Migration Assistant home page will open. Scroll down to Assess your apps and click Begin assessing.
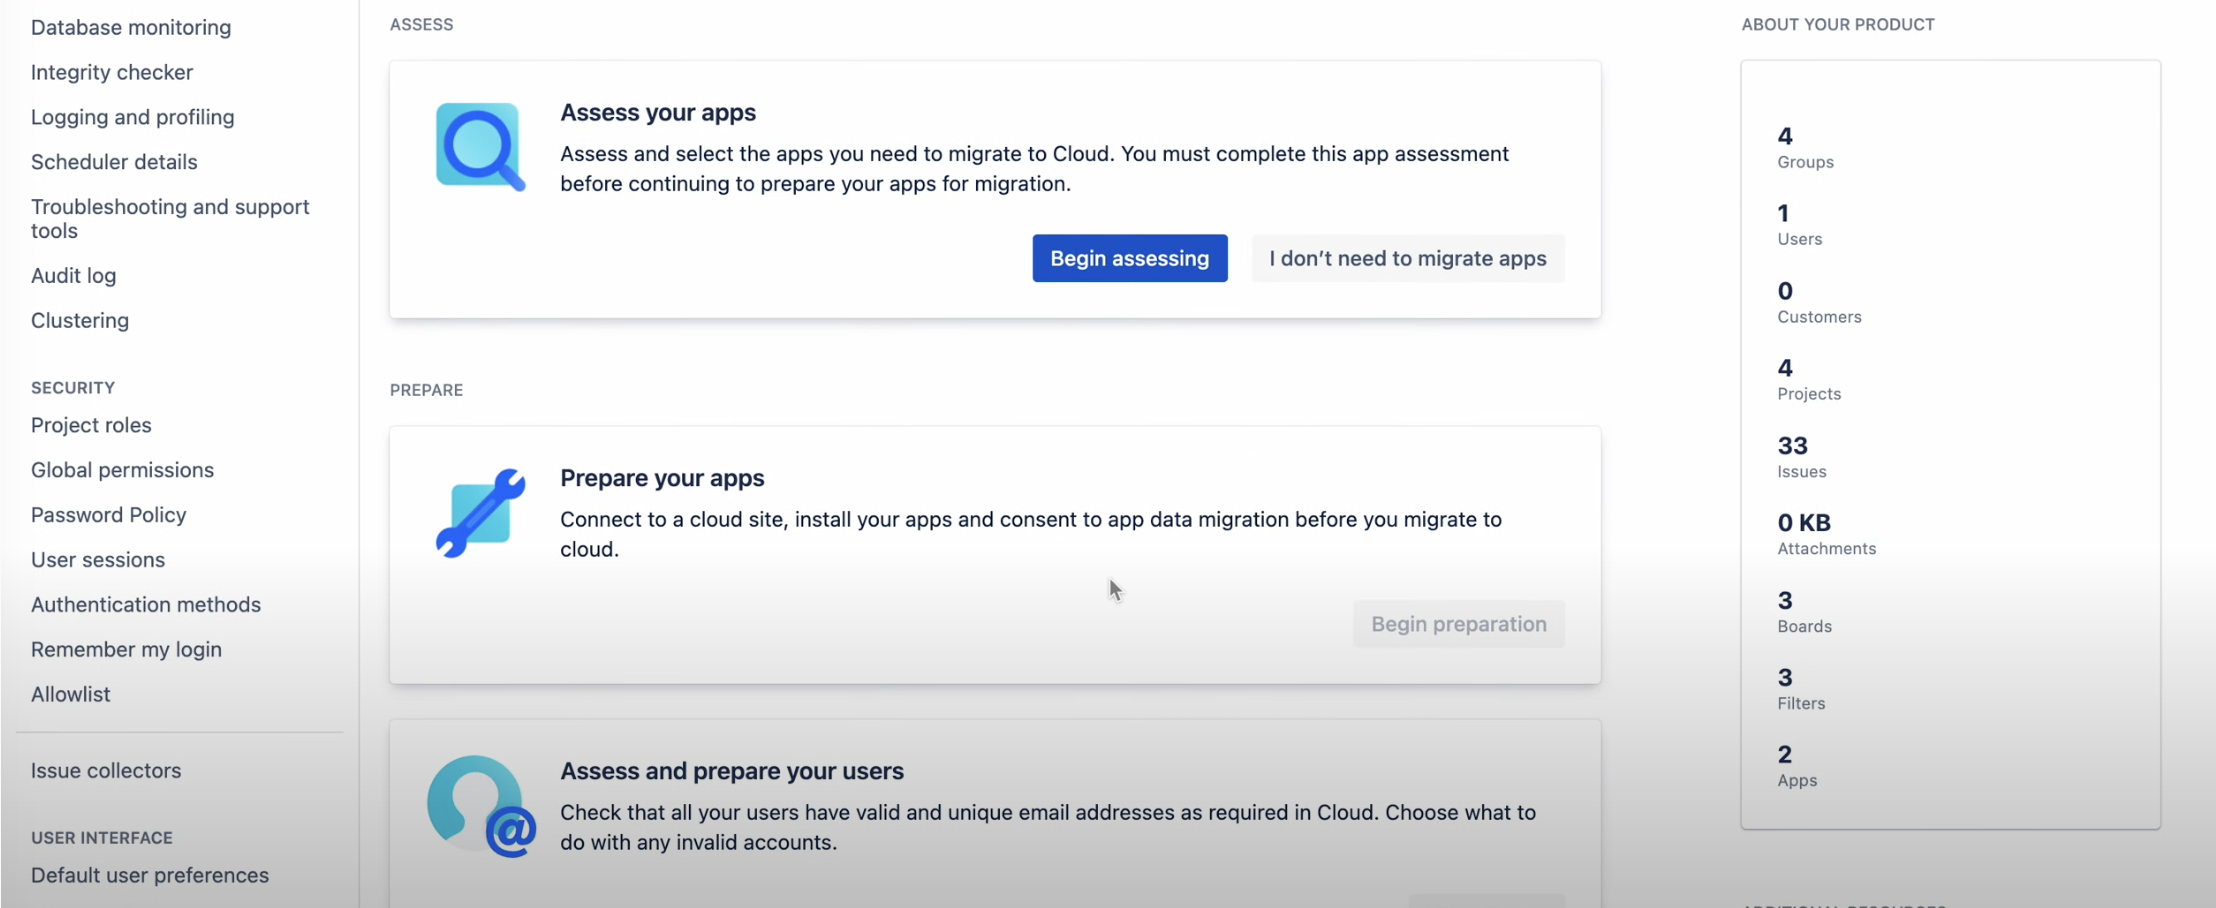
Verify that the spaces being migrated include at lease one Checklist Definition. Then, on the list of apps, find Checklist for Jira. In the status dropdown, select Needed in cloud.
.png?inst-v=7e79bd8d-4cf1-49bc-af46-c68fd944908a)
If you are migrating in batches and none of the spaces in a given batch include Checklist Definitions that should be imported in total to the Cloud, please select Not needed in cloud in the status dropdown.
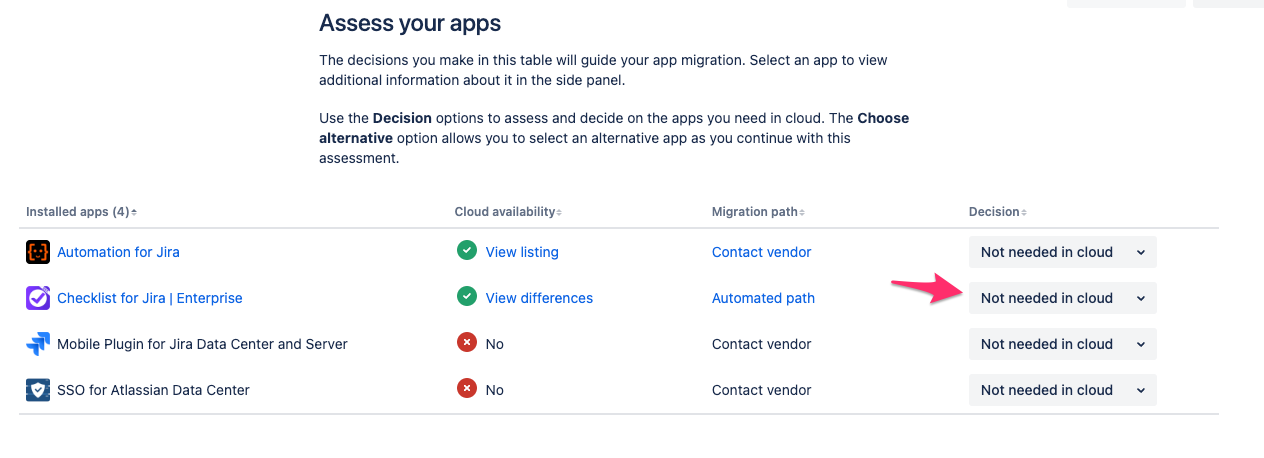
Lack of Checklist Definitions will means the Data Centerchecklist app will not generate any files to be sent to the JCMA. This can cause the import to get stuck.
Make the appropriate selection for any other apps. Click Done.
Scroll down to Prepare your apps and click Continue preparing.
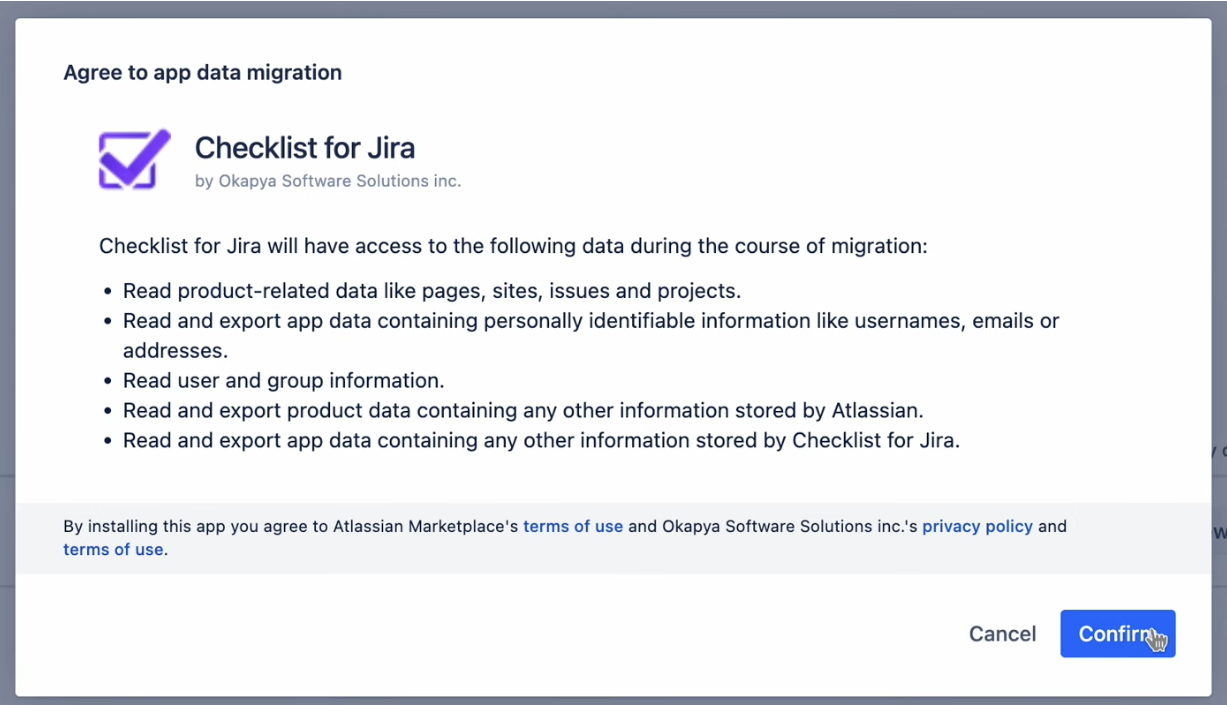
Click Confirm to accept the privacy policy of the cloud app. Click Done.
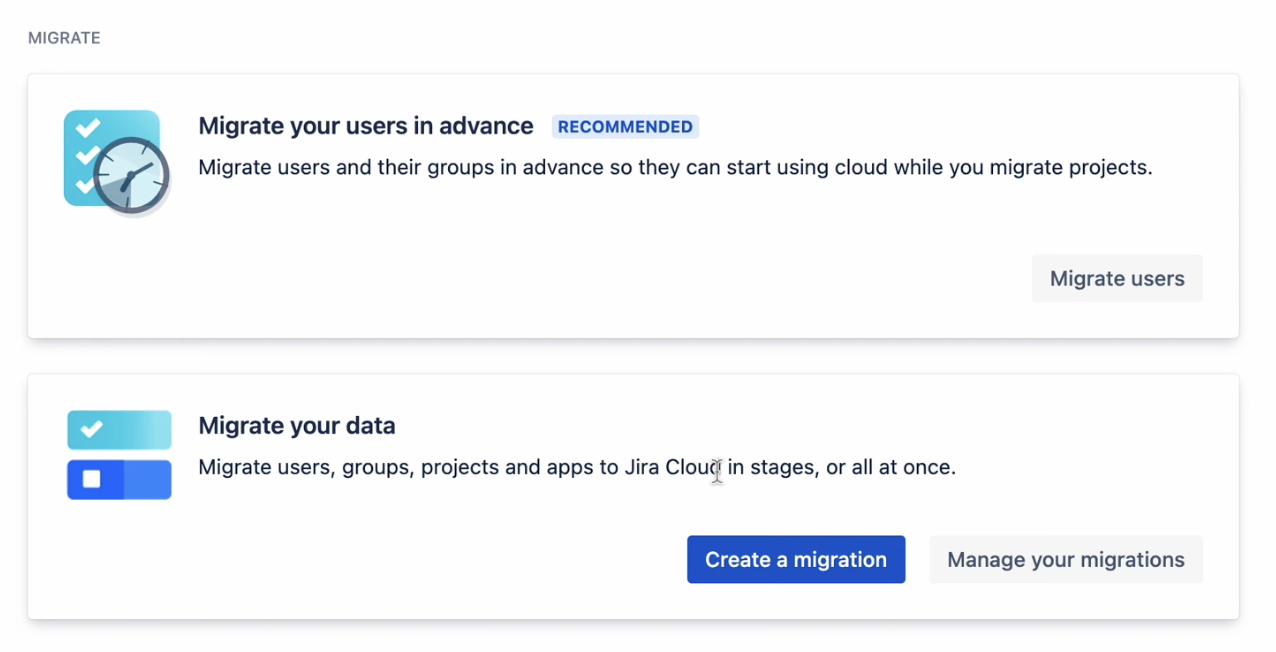
Follow the JCMA instructions for migrating users and email domains.
Scroll to Migrate your data and click Create a migration.
You may be shown the screen below; this is totally optional. To avoid it in the future, tick the “Don’t show me this screen again” box.
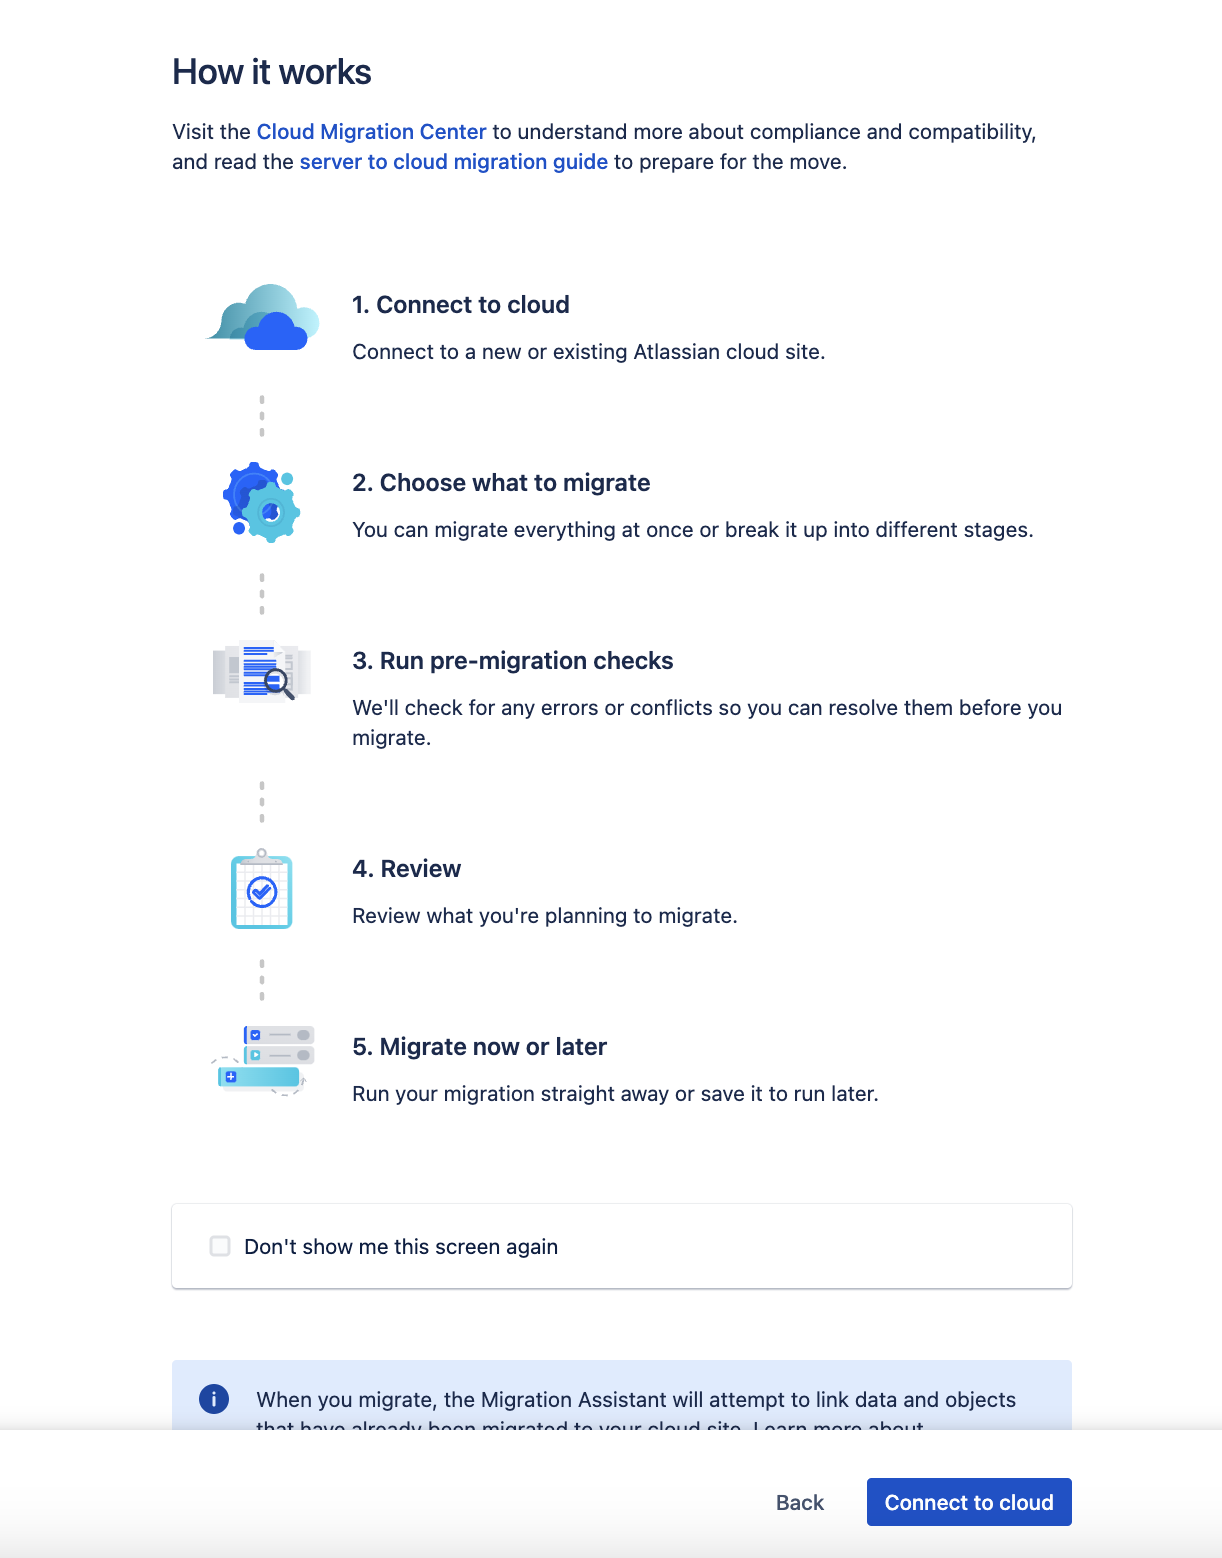
Name the migration.
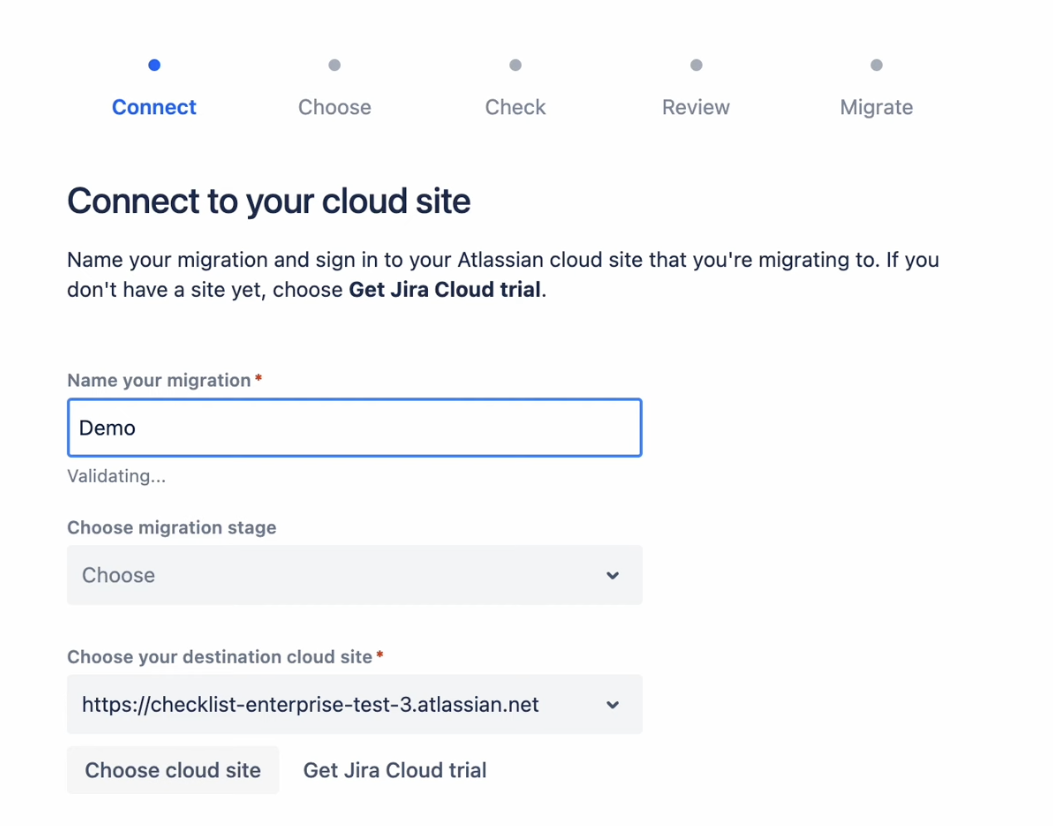
Select the migration stage (testing or production).
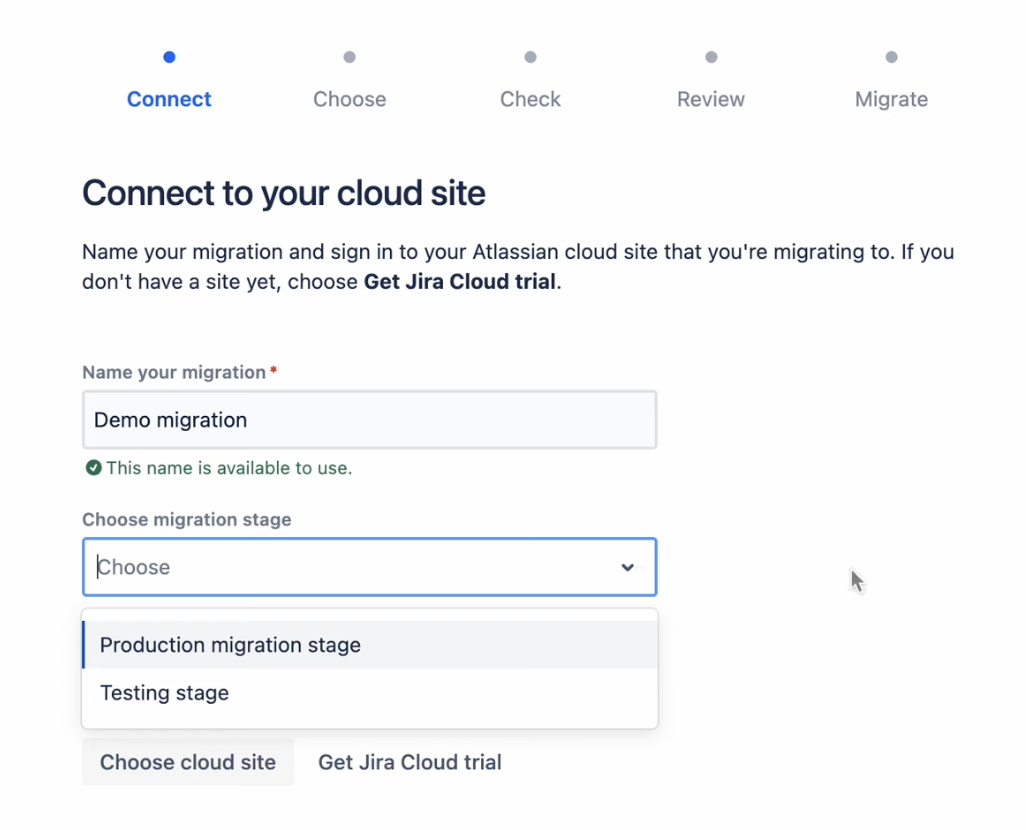
Select the destination cloud instance.
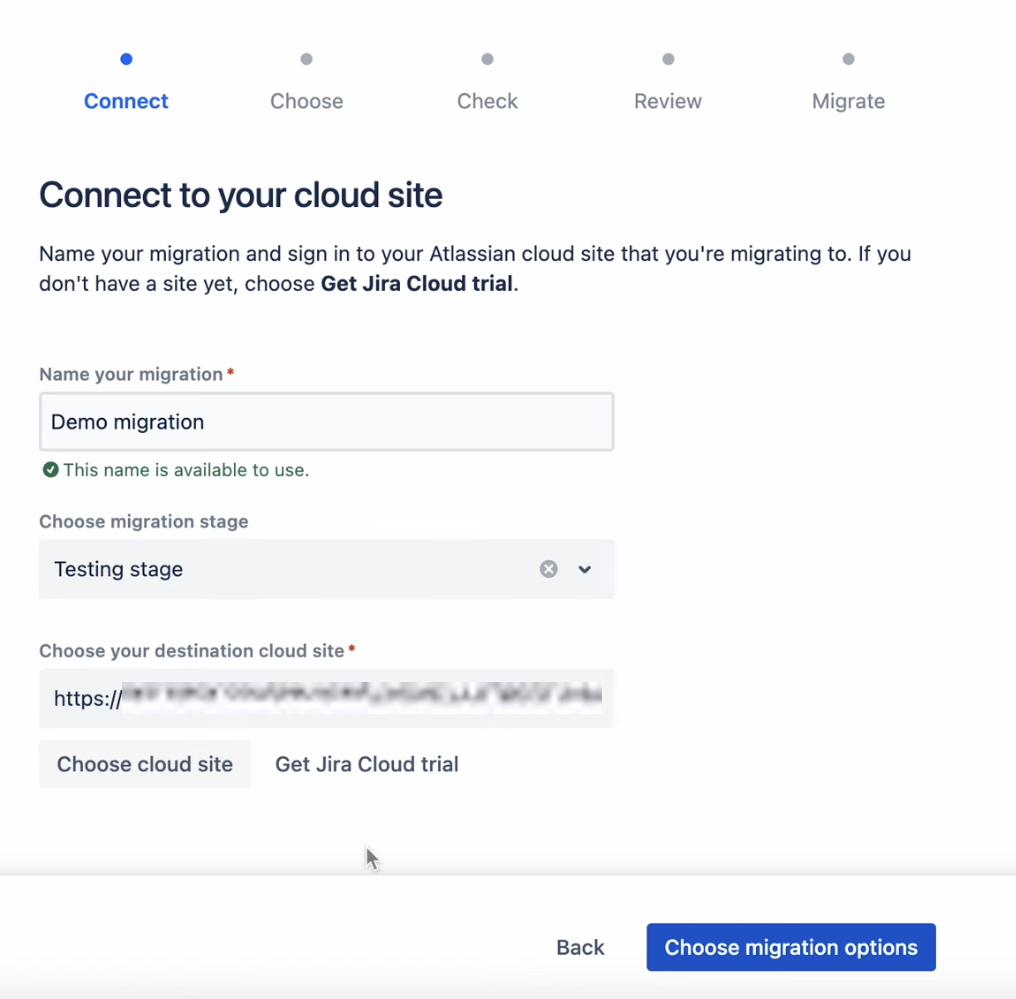
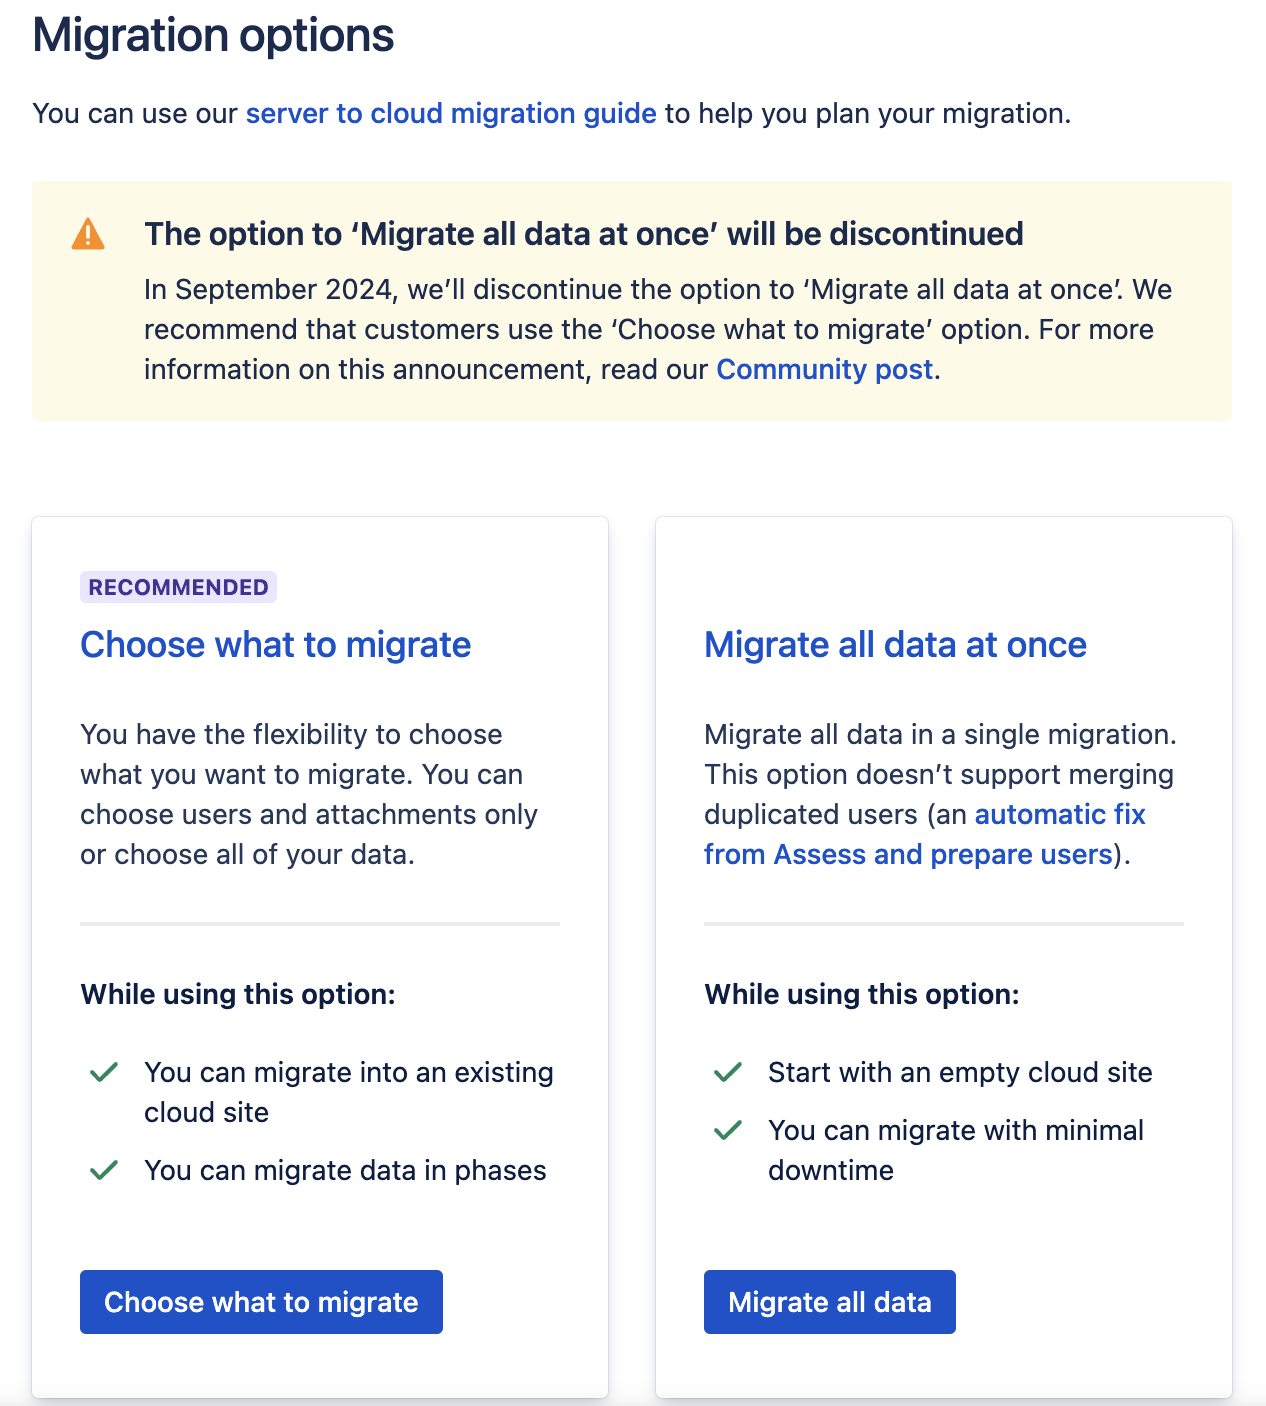
Select Choose what to migrate.
Under Projects, click Select.
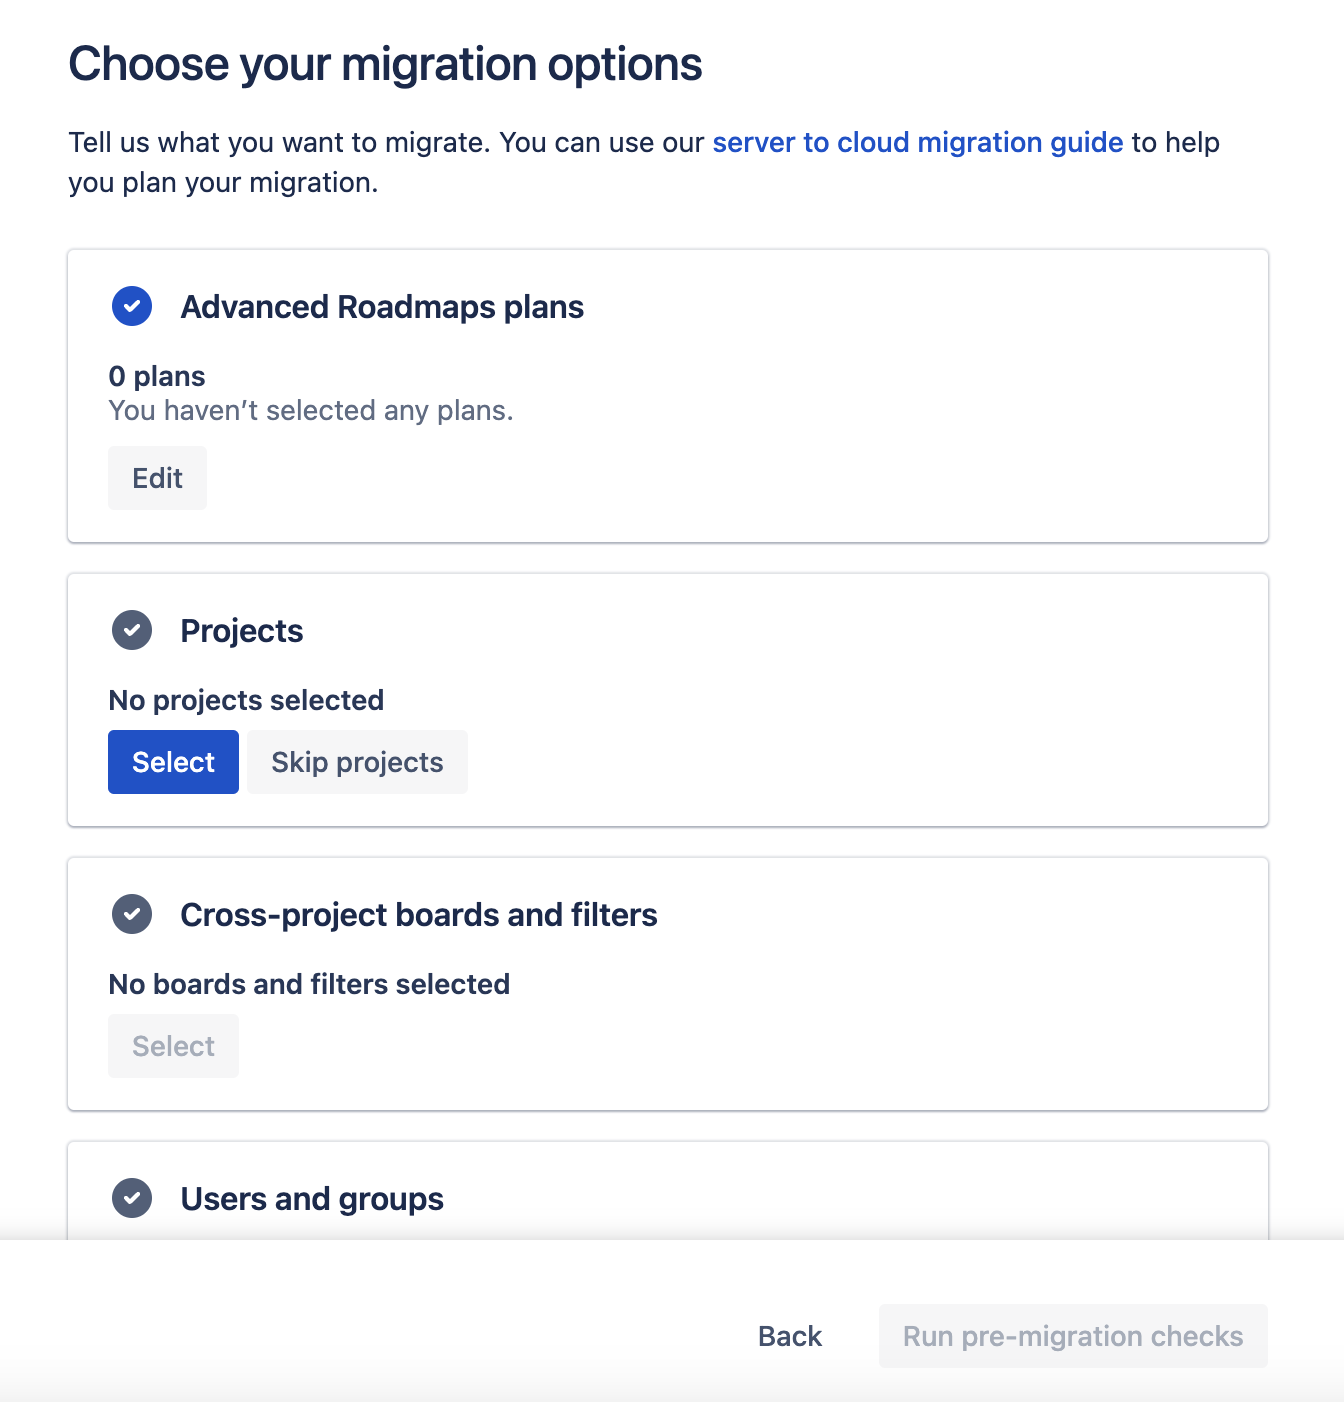
Use the checkboxes to select the spaces(s) you want to migrate. The app will check that the spaces do not already exist on the cloud site.

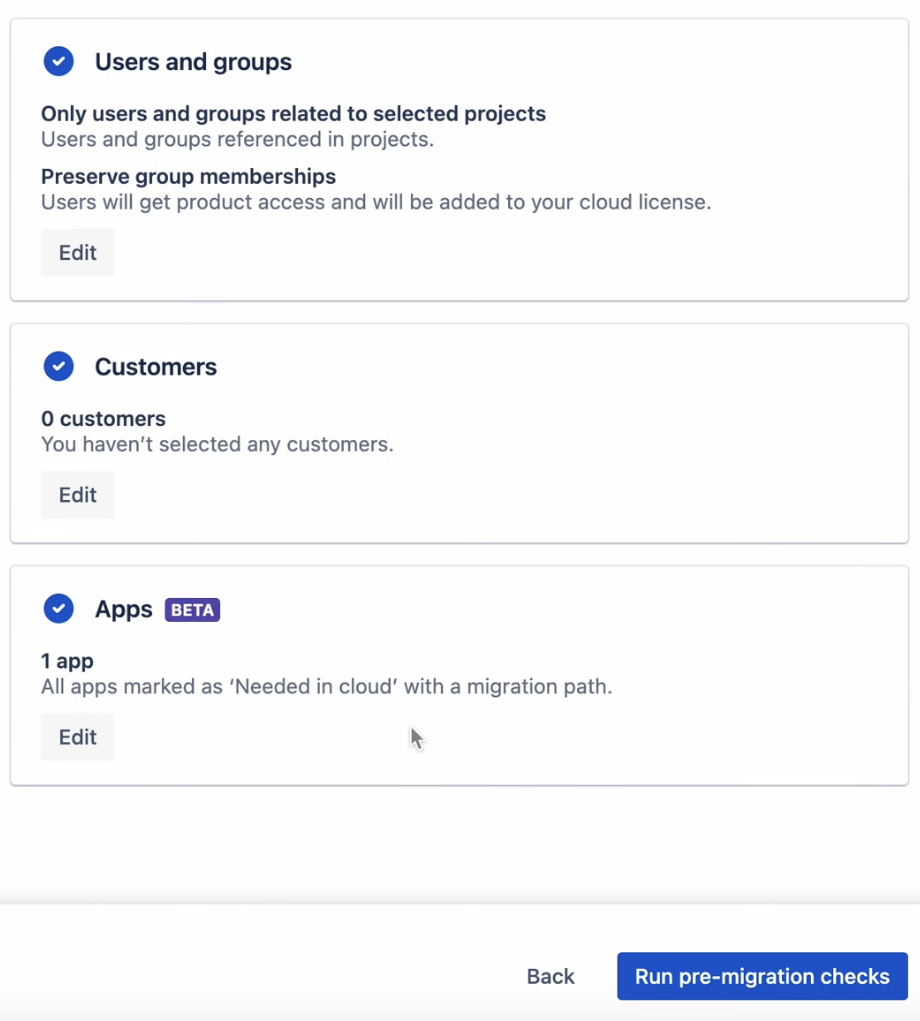
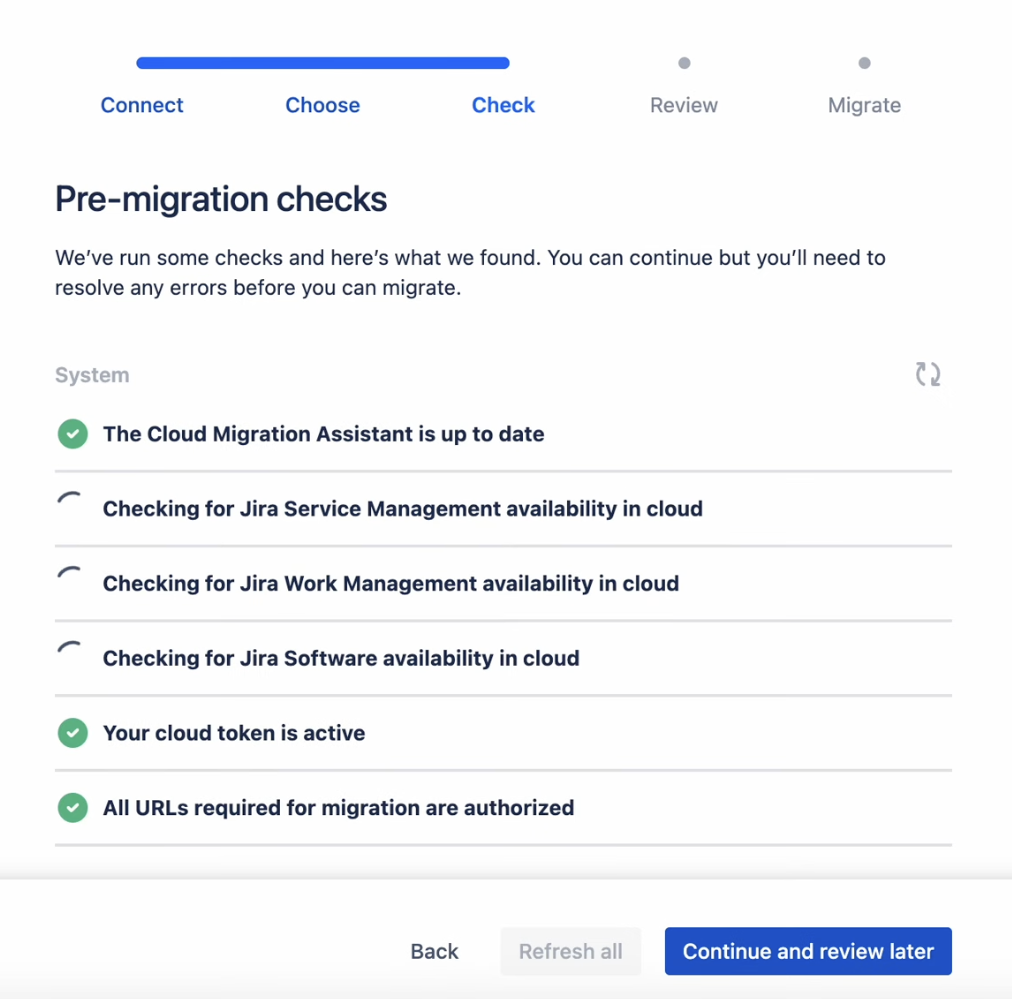
Make the appropriate selections for migrating Boards, User & Groups, JSM customers, etc. Click Run pre-migration checks.
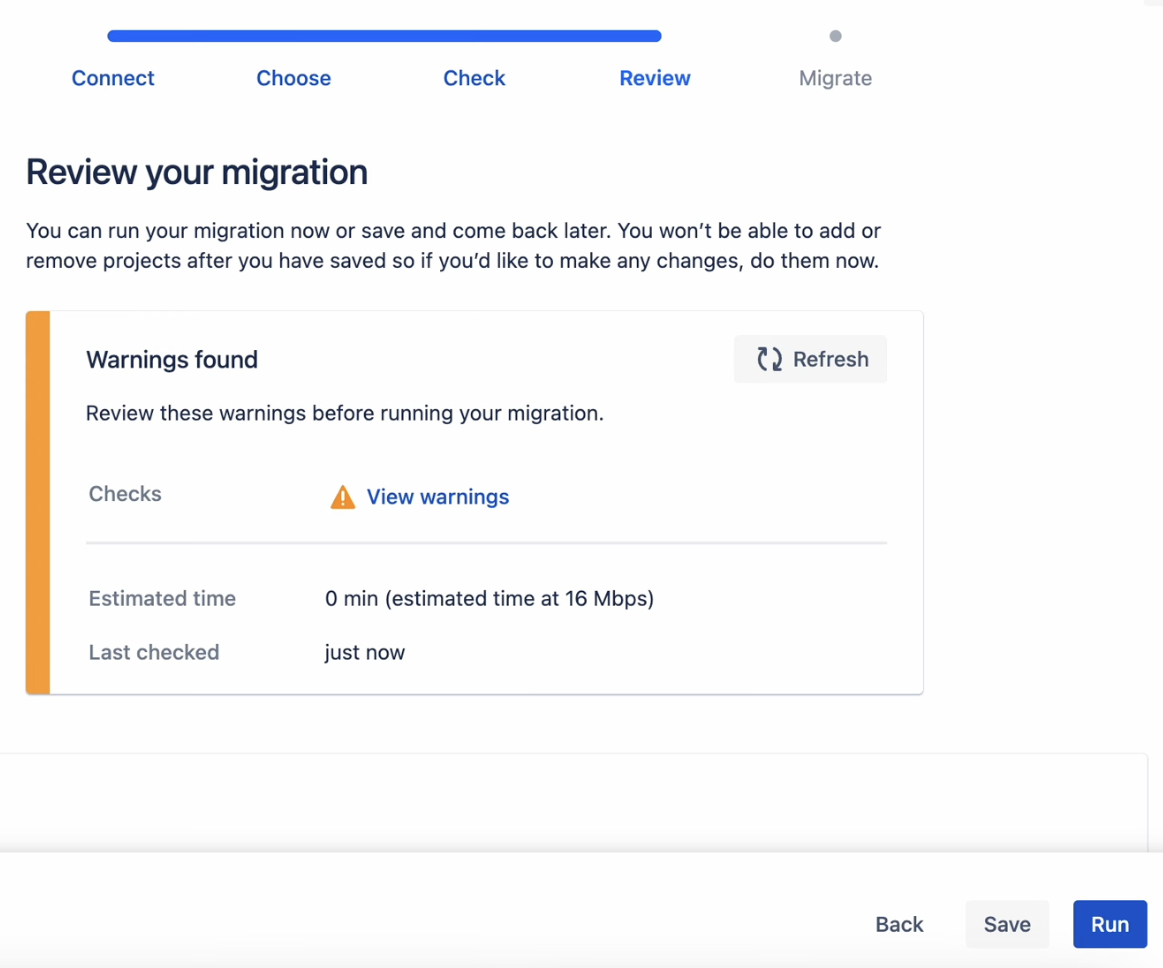
Click Review migration.
After confirming that the migration will include the correct data, click Run.
Note that in the Cloud App, global and local items are separated into two different checklists: A work item that had a checklist with both global and local items in the Data Center version will have two different checklists (global and local) in the Cloud version.
Post-migration Configurations
Once the migration is complete:
Navigate to Jira Settings > Marketplace apps and select Global Settings under the Checklists for Jira Enterprise to review the following:
Global Settings – Ensure your global settings are properly configured. (If checklists are not shown on the main work item panel, enable the Show empty checklist panel in work items setting.)
Global Checklists – Review your global checklists. You may want to adjust the Checklists context.
Permissions – Review checklist permissions.
Statuses – Verify that any custom statuses migrated correctly.
Checklist for Jira Enterprise creates several custom fields. However, since Jira Cloud does not support a checklist custom field type, your previous checklist custom fields will not have been migrated. Therefore it is recommended that you review places other than the work item panel where you were using these fields, and replace them with the new custom fields created by the cloud app:
Automation rules
Board cards
Create and transitions screens
Workflow conditions, post functions, rules and validators
Checklist templates are not included in the import and will need to be recreated. (However, checklist items from templates applied in the Data Center instance will have been imported as local items.)
Default local checklist items are not supported in cloud. However, you can accomplish the same thing using a default template.
Checklist item assignees – Jira Cloud creates different user IDs than Jira Data Center. Currently, after verifying that all of your users were successfully migrated to cloud, you will need to re-assign checklist items.
Due dates on checklist items do not import and will need to be restored.
We’ve worked hard to make your migration easy, but if you run into any trouble your Enterprise subscription comes with priority support including discovery meetings, demo calls and guided support.
An error can occur if you cancel a JCMA import in progress. Please see this page before canceling an import.
Direct Import
How to Prepare for Migration
Checklists for Jira Data Center
Verify the scope of each Checklist Custom Field Context. Ensure that the Context is only marked as “All Projects” for checklists that you truly want to have on all of your Jira work items. (When using checklists Data Center you may have set the Context to “All Projects,” but omitted the Checklist Custom field on screens in certain spaces. When migrating to Cloud, this can result in useless data being stored in the database, and unwanted checklists appearing on Jira work items.)
Some items will need to be verified/reconfigured post-migration. Therefore, you may want to prepare an inventory of:
Global items - Once migration is complete, you may want to create Global Checklists that include these items.
Checklist permissions
Checklist conditions
Checklist validators
Checklist post functions
Assigned checklist items - depending on the migration path you used, user IDs may or may not have been mapped from Data Center to cloud. Therefore, once users are set up in Cloud you will need to re-assign checklist items.
Due dates on checklist items
Checklist for Jira on-prem templates are not imported, however checklist items created on those templates are imported to Jira work items as local checklist items. You can create Templates in Checklists for Jira Cloud, but the existing templates from your Data Center instance will not be imported. You may want make a list of existing templates so you recreate them in the cloud instance once the migration is complete.
Follow the instructions on this page to create the export file.
Checklist for Jira Enterprise
We recommend preparing your data first and waiting until you are ready to migrate before starting a trial of Checklists for Jira Enterprise, as the trial is for a limited time.
Executing the Migration
Install Checklists for Jira Enterprise.
Before you start:
Jira will not be impacted by the migration. However, there will be some downtime during which you will not be able to access your checklist data.
The importer for Checklists for Jira Data Center is available in Checklists for Jira Enterprise and will load all checklist data files created by the Checklists for Jira Export feature and copy them to the Checklists for Jira Enterprise app.
Checklists for Jira Enterprise works differently than Checklists for Jira Data Center. Learn more here.
Use the Checklists for Jira Export feature to generate the files that will be loaded into work item Checklist.
Navigate to Jira Settings > Marketplace apps and select Import under the Checklists for Jira Enterprise heading.
Select the Checklists for Jira Server/DC tab.
Locate the files generated during the Checklist for Jira Data Center export process and drag them to the upload area. Alternatively, you can click the area and select the files from your computer.
When all the files generated during the Export process are in the list, click Upload files.
By default, Global Checklist items on the on-prem instance will be imported as Global Checklists in the cloud instance. However, you can choose to import them as local (specific to the Jira work item). If you choose this option, no Global Checklists will be created by the import.
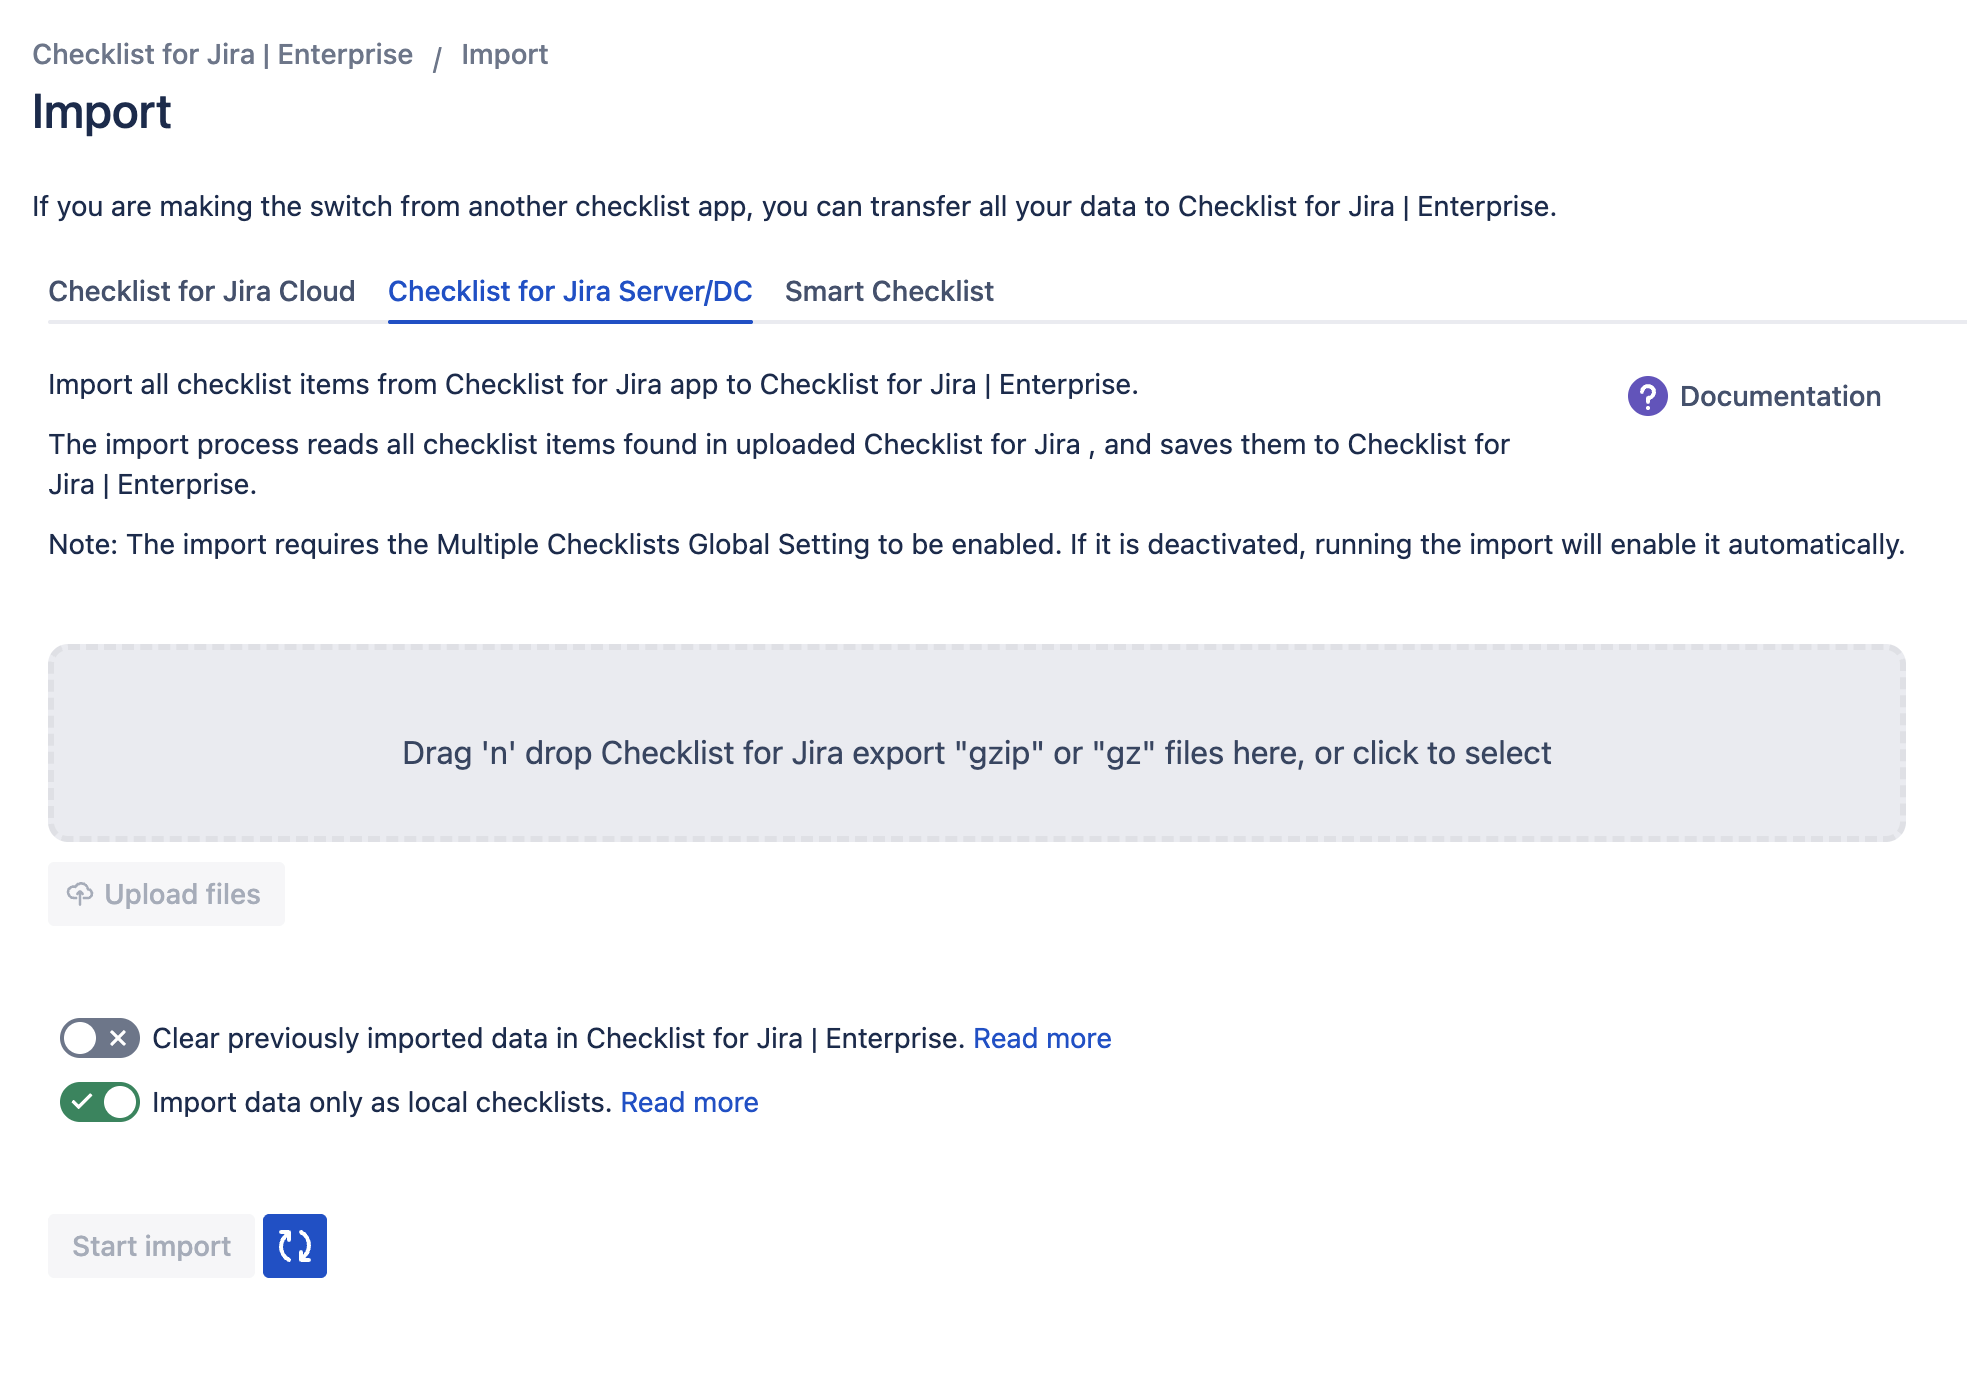
Determine if you want to overwrite or append to previously imported checklists. The import process is designed to allow for incremental imports, and does not prevent duplicates. If you perform an import without enabling Clear previously imported data, any previously imported items may appear as duplicates in subsequent imports. Use the Clear previously imported data toggle to indicate if you want to:
Clear previously imported data (Toggle enabled)
Replace any previously imported data from Checklist for Jira Data Centerwith the items being imported from the currently uploaded files. It is recommended that you enable the toggle if you attempt to perform an import more than once. Data to be replaced includes:Global Checklists
Checklist items in Jira work items (global and local)
Checklist item statuses
Please see the troubleshooting imports page for more information.
Append imported checklist items to already existing checklists (Toggle disabled)
Imported checklist items will be appended to the existing checklist(s) on the work item. If you will import the same checklist Checklist Field but for other space(s), duplicate Global Checklist will appear. It’s recommended to import a checklist Custom Field configuration for all spaces at once.
Once the files are uploaded, and you’ve confirmed that the Clear previously imported data toggle is in the correct position, click Start import. The import will be scheduled and a gray panel will show the import status. Click on the Refresh icon to update the status.
When the import is complete, the status panel will turn green and will display the number of checklist items and work items impacted.
The import is a gradual process. Checklist data will become available in the database and visible in the UI as it’s imported. However, we recommend waiting to work on checklists until the import is finalized.
If you need to cancel and restart the import, be sure to enable the Clear previously imported data in Checklist for Jira Enterprise toggle.
Please contact our support with any questions.
Note that in the Cloud App, global and local items are separated into two different checklists: an work item that had a checklist with both global and local items in the Data Centerversion will have two different checklists (global and local) in the Cloud version.
Post-migration Configurations
Once the migration is complete:
Navigate to Jira Settings > Marketplace app and review the following:
Global Settings – Ensure your global settings are properly configured. (If checklists are not shown on the main work item panel, enable the Show empty checklist panel on work items setting.)
Global Checklists – Review your global checklists and their contexts. If the context did not migrate, please contact support.
Permissions – Review checklist permissions.
Statuses – Verify that any custom statuses migrated correctly.
Checklist-type custom fields used in your Data Center instance are not supported in Jira cloud. If you were using these fields in places other than the work item panel (automation rules, board cards, create and transition screens, workflow behaviors, etc.), you will need to replace those custom fields with the custom fields created by Checklists for Jira Enterprise.
Checklist templates are not included in the import and will need to be recreated. (However, checklist items from templates applied in the Data Center instance will have been imported as local items.)
Default local checklist items are not supported in cloud. However, you can accomplish the same thing using a default template.
Checklist item assignees – After verifying that all of your users were successfully migrated to cloud, you may need to re-assign checklist items on local checklists. Mentions/assignees are not supported in Global Checklists.
Due dates on checklist items do not import and will need to be restored.
We’ve worked hard to make your migration easy, but if you run into any trouble your Enterprise subscription comes with priority support including discovery meetings, demo calls and guided support.