
Acceptance Criteria is shutting down completely on November 10, 2026. Back up your data before that date to keep access to your checklists.
Step 1: Backing up your data
To help make the migration process easier, we have enabled the option to copy all checklist updates to your Jira site’s custom fields. Please do not turn off the Sync checklists to custom fields option to prevent data loss.
Make sure that Sync checklists to custom fields is enabled.
You can find it under Manage apps → Acceptance Criteria → General Settings
We recommend notifying users of your instance of a maintenance pause in using the checklists so that they do not create new data that might not be backed up on time.
Step 2: Install the new Checklists for Jira app
Checklists for Jira is essentially the same app with the same interface, but running on the newest Forge platform. It is actively maintained and receives all security updates and new features.
We offer three versions depending on your needs: Free, Pro, and Enterprise. Here’s a quick cheat sheet, and you can see this page for a detailed comparison: Features (Free, Pro & Enterprise Comparison).
The best thing is that you only need to migrate your data once: if you want to upgrade or downgrade versions, all data will be seamlessly available, so you don’t have to settle on one edition from the start.
Free
Completely free
Who: small teams without rigid processes and start-ups
Up to 10000 checklist items
Up to 5 templates
Pro
Free for 1-10 users
Who: small and medium business that want to build checklist-enforced workflows
Unlimited checklists and templates
Enterprise
Starts from $5
Who: larger organizations with multiple diverse teams with different processes
Data residency
Advanced workflow features
-
Install the app
-
Then, find the same Sync checklists to custom field option and make sure it is on. This will let the checklists populate automatically
Step 3: Migrate data to Checklists for Jira using Automation
Step 3.1: Find custom field IDs
Your data from Acceptance Criteria has been backed up to a custom field called Checklist Text. Checklists for Jira also comes with the same Checklist Text field, however, because Acceptance Criteria was running on a different platform, these fields do not share data. In this step, we will need to copy all data from one Checklist Text field to the other.
-
Open Jira admin settings → Work items → Fields.
-
Search for “Checklist Text”. You should see a list of checklist-related fields.
-
Look at the field descriptions and find the Checklist Text field that was created by Acceptance Criteria Free. This should be shown in the Description field.
-
Now, find and copy its Field ID to somewhere. If you don’t see the Field ID column, click the Columns button at the top and enable it. (Note that the field ID will be different for every Jira site, this is why you need to find it for yourself)
-
Then, do the same for the Checklist Text field that says it was created by Checklist for Jira. If you have more than one version (Free, Pro, Enterprise) installed, we recommend only keeping one for the migration process and use the field that was last used.

We will need these IDs in the next steps.
Step 3.2: Check how many work items need copying
Open the work item search, switch to JQL, and run this with your numbers (digits only, no "customfield_"). This should show you the list of all work items that contain Acceptance Criteria checklists if they were backed up correctly.
cf[10418] IS NOT EMPTY
Take a look at the bottom of the list and see how many work items there are total. If the number is less than 500, you will be able to copy it in one go.
Step 3.3: Set up automation
-
Open global automations: Jira admin settings → System → Automation → Global automation.
-
Create new rule.
-
Choose the Scheduled trigger.
-
As for start date and time, you can choose whatever time you need, but we recommend a time when fewer users are active.
-
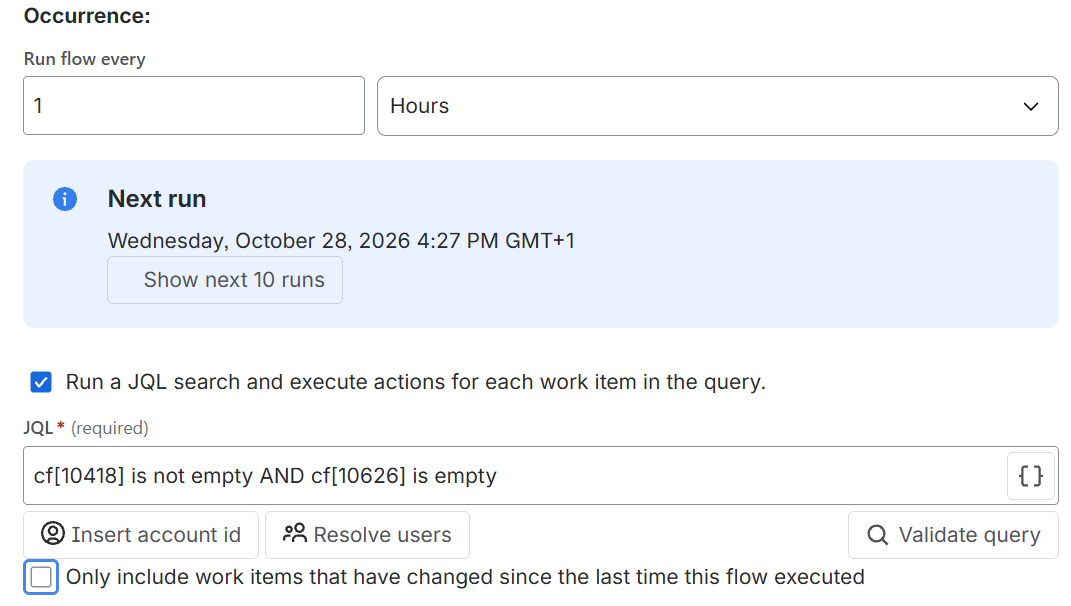
In the Scheduled trigger options, set Occurrence to Run flow every 1 Hours.
-
Enable the checkbox to Run a JQL search and execute actions for each item in the query. Disable “Only include work items that have changed since last time this flow was executed”. Otherwise, the automation will skip a lot of items if you need a second and third runs.
-
Under the JQL checkbox, enter the following to check that this work items has data from the old Acceptance Criteria Free custom field, and does not yet have migrated data in the new Checklists for Jira custom field. Just put the number IDs of each field in brackets, you don’t need to include “customfield_”.
cf[ACCEPTANCE_CRITERIA_FIELD_ID] is not empty AND cf[CHECKLISTS_FOR_JIRA_ID] is empty
-
-
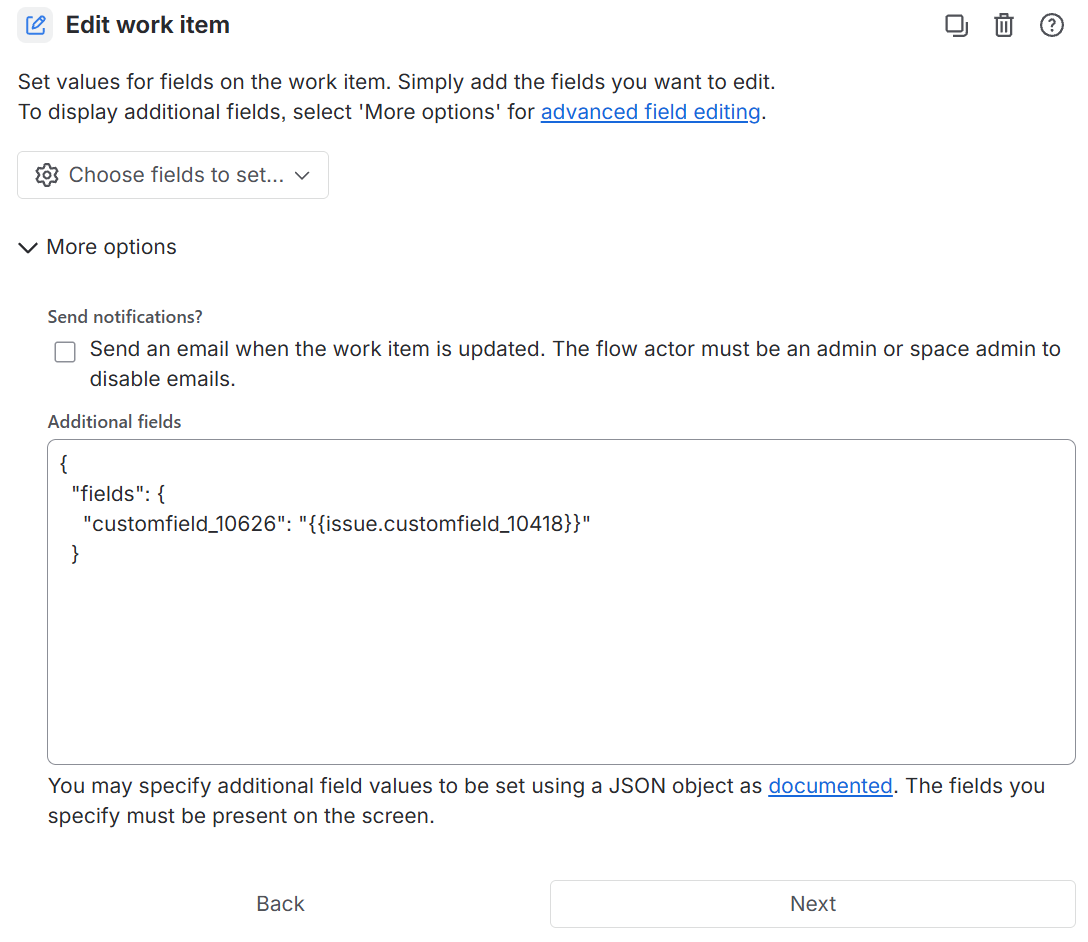
Next, add an Action and choose Edit work item fields.
-
You don’t need to choose a field here. Instead, click More options. This will help us ensure we don’t edit the wrong field with the same name.
-
Enter the following into Additional fields. Replace “CFJ_ID” with the number for the NEW custom field for Checklists for Jira, and “AC_ID” with the number from the older Acceptance Criteria field. In this case, Jira requires that we also include “customfield_” before the number.
JSON{ "fields": { "customfield_CFJ_ID": "{{issue.customfield_AC_ID}}" } }
-
-
Name the rule and start it.
Jira is limited to processing only a specific number of items within each automation. So if the automation is interrupted by this limit, it will resume in the next hour and only include items that have not yet been copied.
Step 3.4: Check that everything’s there!
Go to Search for work items and run another search to include hasChecklistItems = "true" to find all work items with checklists.
Once successfully migrated, the checklists will appear in the Checklists for Jira app panels on work items.
Unfortunately, we cannot offer a migration solution for templates and app settings, so these will have to be copied manually.
To speed up copying templates, open template editing and click Switch to editor view. This will let you copy the entire checklist template with formatting. Enter this same editor mode in a new template and paste the contents there. All you’ll need to do is name the template and save.
Step 4: Hide or uninstall Acceptance Criteria
Now you can uninstall the Acceptance Criteria app. Then, go to Field configuration and delete the duplicate custom fields. Make sure to only delete those that are connected to Acceptance Criteria and keep the newer ones for Checklists for Jira:
-
Checklist completed
-
Checklist content YAML
-
Checklist Progress%
-
Checklist Progress
-
Checklist Template
-
Checklist Text.
-
Checklist Text (view only)